 |
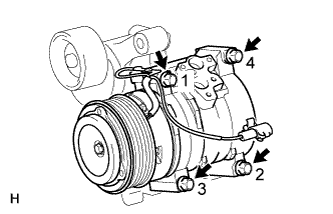
Install the cooler compressor assembly with the 4 bolts and tighten the bolts in the order shown in the illustration.
- Torque:
- 25 N*m{ 250 kgf*cm , 18 ft.*lbf }
COMPRESSOR (for 1GR-FE) > INSTALLATION |
| 1. ADJUST COMPRESSOR OIL |
When replacing the compressor and magnet clutch with a new one, gradually discharge the refrigerant gas from the service valve, and drain the following amount of oil from the new compressor and magnet clutch before installation.
| 2. INSTALL COOLER COMPRESSOR ASSEMBLY |
|
Install the cooler compressor assembly with the 4 bolts and tighten the bolts in the order shown in the illustration.
Connect the connector.
| 3. INSTALL NO. 1 COOLER REFRIGERANT DISCHARGE HOSE |
Remove the vinyl tape attached to the No. 1 cooler refrigerant discharge hose.
Sufficiently apply compressor oil to a new O-ring and the fitting surface of the compressor.
Install the O-ring to the No. 1 cooler refrigerant discharge hose.
Connect the No. 1 cooler refrigerant discharge hose with the bolt.
| 4. INSTALL SUCTION HOSE SUB-ASSEMBLY |
Remove the vinyl tape attached to the suction hose sub-assembly.
Sufficiently apply compressor oil to a new O-ring and the fitting surface of the compressor.
Install the O-ring to the suction hose sub-assembly.
Connect the suction hose sub-assembly with the bolt.
| 5. INSTALL DRIVE BELT |
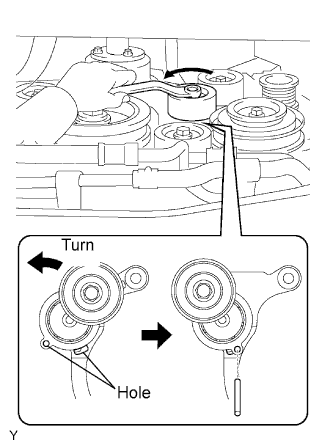 |
While turning the belt tensioner counterclockwise, align its holes, and then insert a bar with a diameter of 6 mm (0.24 in.) into the holes to fix the belt tensioner.
Install the V-ribbed belt.
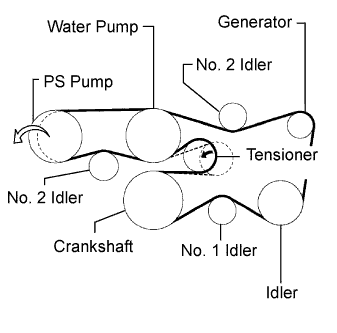 |
Put the V-ribbed belt on everything except the PS pump as shown in the illustration.
While releasing the belt tension by turning the belt tensioner counterclockwise, put the V-ribbed belt on the PS pump.
While turning the belt tensioner counterclockwise, remove the pin.
| 6. CHARGE REFRIGERANT |
Perform vacuum purging using a vacuum pump.
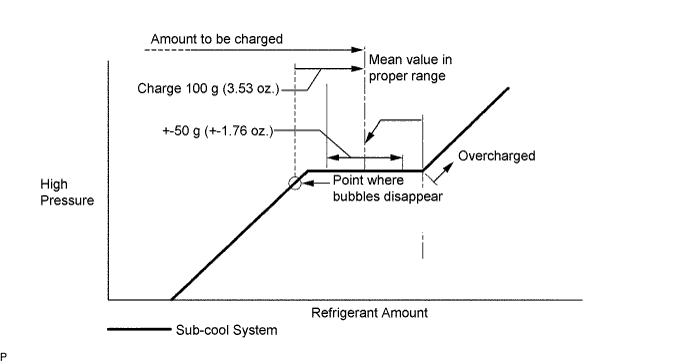
Charge refrigerant HFC-134a (R134a).
| 7. WARM UP ENGINE |
Warm up the engine at less than 1,850 rpm for 2 minutes or more after charging refrigerant.
| 8. CHECK FOR REFRIGERANT GAS LEAK |
After recharging the refrigerant gas, check for refrigerant gas leakage using a halogen leak detector.
After recharging the refrigerant gas, prepare the vehicle for a refrigerant gas leakage check by making sure the following conditions are met.
The ignition switch is OFF.
The vehicle is in a place with good air ventilation and without any volatile gases, such as evaporated gasoline or exhaust gas. The detector is very sensitive gases, If volatile gases are unavoidable, the vehicle must be lifted up.
Some refrigerant is remaining in the refrigerant system.
The compressor is OFF and its pressure is approximately 392 to 588 kPa (4 to 6 kgf/cm2).
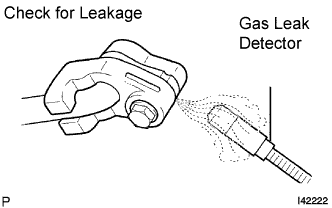 |
Using a gas leak detector, check the refrigerant line for leakage.
If a gas leak is not detected on the drain hose, remove the blower motor control (blower resistor) from the cooling unit. Insert the gas leak detector sensor into the unit and perform the test.
Disconnect the connector and leave the pressure switch on for approximately 20 minutes. Bring the gas leak detector close to the pressure switch and perform the test.