 |
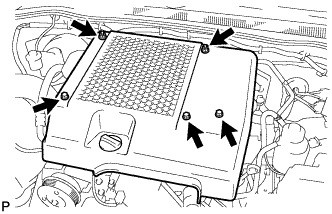
Remove the 3 bolts, 2 nuts and engine cover.
CYLINDER HEAD > REMOVAL |
| 1. DISCONNECT CABLE FROM NEGATIVE BATTERY TERMINAL |
| 2. DRAIN ENGINE OIL |
Remove the oil filler cap.
Remove the oil drain plug, and drain the engine oil from the oil pan.
| 3. LOOSEN FUEL TANK CAP ASSEMBLY |
| 4. DRAIN FUEL |
| 5. REMOVE FRONT EXHAUST PIPE ASSEMBLY |
Remove the 2 bolts and 2 compression springs.
Disconnect the front pipe from the outlet pipe and remove the gasket.
Remove the front pipe from the pipe support.
| 6. REMOVE NO. 1 ENGINE COVER SUB-ASSEMBLY |
|
Remove the 3 bolts, 2 nuts and engine cover.
| 7. REMOVE CHARGE AIR COOLER ASSEMBLY WITH INTAKE AIR CONNECTOR |
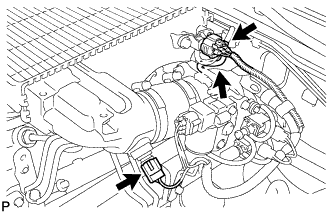 |
Disconnect the IAT sensor connector.
Disconnect the manifold absolute diesel pressure sensor connector.
Disconnect the vacuum hose from the manifold absolute pressure sensor.
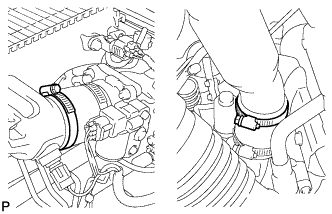 |
Loosen the 2 clamps.
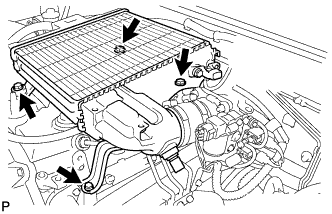 |
Remove the 4 bolts and CAC.
| 8. REMOVE AIR CLEANER ASSEMBLY |
Disconnect the MAF meter connector.
Loosen the hose clamp.
Remove the 2 bolts and air cleaner.
| 9. REMOVE VENTILATION PIPE |
| 10. REMOVE FAN SHROUD |
Remove the fan shroud .
| 11. REMOVE FAN PULLEY |
| 12. DISCONNECT COOLER COMPRESSOR ASSEMBLY |
Remove the 4 bolts and disconnect the cooler compressor.
| 13. REMOVE NO. 1 COMPRESSOR MOUNTING BRACKET |
Remove the 4 bolts and No. 1 compressor mounting bracket.
| 14. REMOVE EXHAUST MANIFOLD |
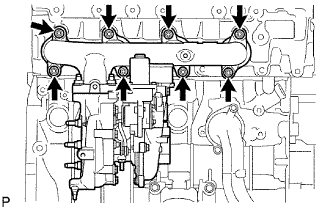 |
Remove the 8 nuts, 8 collars, 8 spacers and exhaust manifold with turbocharger as shown in the illustration.
| 15. REMOVE MANIFOLD STAY |
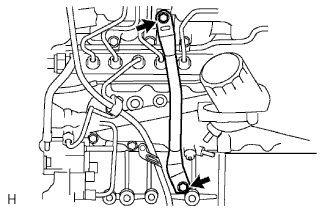 |
Remove the 2 bolts and manifold stay.
| 16. DISCONNECT WIRE HARNESS |
| 17. REMOVE INJECTION PIPE |
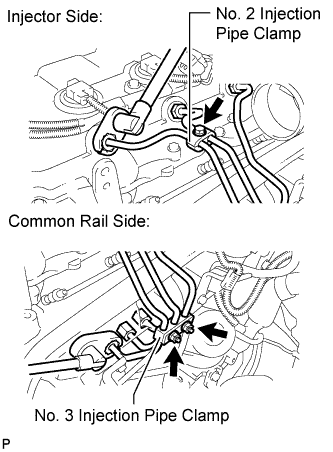 |
Remove the bolt and No. 2 injection pipe clamp.
Remove the 2 nuts and No. 3 injection pipe clamp.
Using a 17 mm union nut wrench, loosen the union nuts and remove the No. 1, No. 2 and No. 3 injection pipes.
| 18. REMOVE INJECTION PIPE |
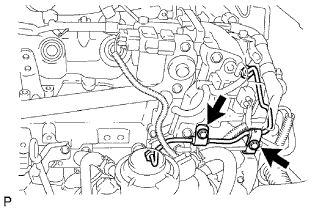 |
Remove the 2 bolts and disconnect the 2 injection pipe clamps.
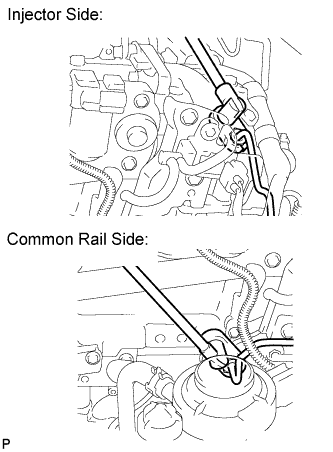 |
Using a 17 mm union nut wrench, loosen the union nuts and remove the No. 4 injection pipe.
| 19. REMOVE NO. 2 NOZZLE LEAKAGE PIPE ASSEMBLY |
Disconnect the 3 fuel hoses.
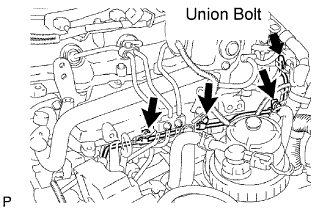 |
Remove the union bolt, 3 bolts, No. 2 nozzle leakage pipe and gasket.
| 20. REMOVE EGR VALVE ASSEMBLY |
Remove the electric EGR control valve and gasket.
| 21. REMOVE INTAKE MANIFOLD |
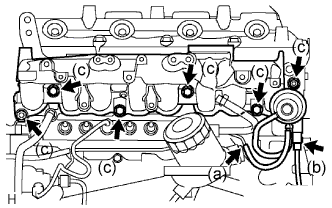 |
Disconnect the vacuum hose.
Disconnect the VSV connector.
Remove the 2 nuts, 4 bolts, intake manifold and gasket.
| 22. REMOVE NO. 1 TIMING BELT COVER |
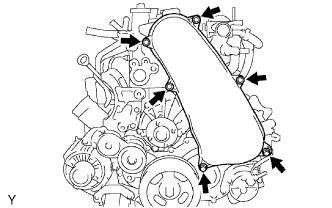 |
Remove the bolt and water hose clamp.
Remove the wire harness clamp.
Remove the 6 bolts and timing belt cover.
| 23. REMOVE TIMING BELT |
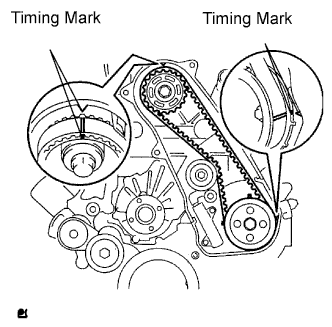 |
Turn the crankshaft clockwise and align the timing marks as shown in the illustration.
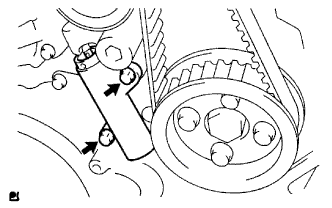 |
Uniformly loosen the 2 bolts and remove the timing belt tensioner.
Remove the timing belt.
Using a 10 mm hexagon wrench, remove the bolt, timing belt idler and washer.
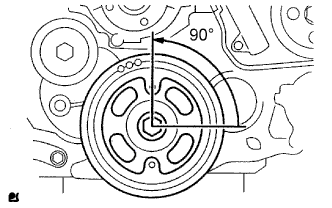 |
| 24. REMOVE CYLINDER HEAD COVER SUB-ASSEMBLY |
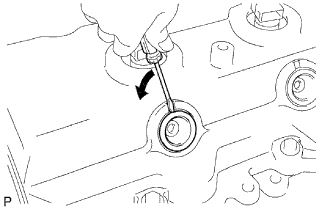 |
Using a small screwdriver, remove the 4 holder seals by prying the portion between each holder seal and the cutout part of the cylinder head.
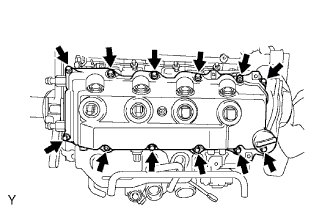 |
Remove the 10 bolts, 2 nuts, cylinder head cover and gasket.
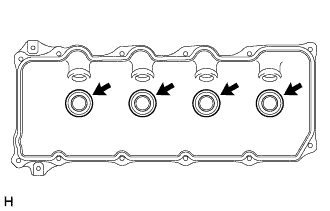 |
Remove the 4 No. 3 cylinder head cover gaskets from the cylinder head cover.
| 25. REMOVE CAMSHAFT TIMING PULLEY |
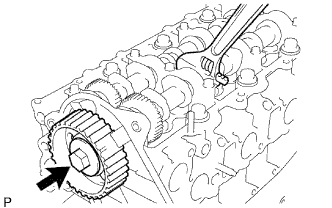 |
Remove the bolt of the camshaft timing pulley by holding the camshaft with a wrench.
Remove the camshaft timing pulley.
| 26. REMOVE NO. 1 TIMING BELT IDLER SUB-ASSEMBLY |
| 27. REMOVE NO. 2 TIMING BELT COVER |
Remove the 4 bolts, nut and timing belt cover.
| 28. REMOVE INJECTOR ASSEMBLY |
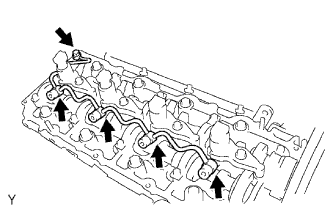 |
Remove the union bolt, 4 injector hollow screws, 5 gaskets and nozzle leakage pipe.
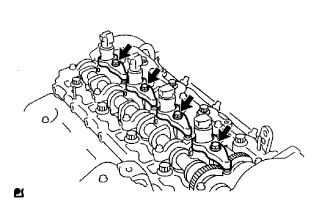 |
Remove the 4 bolts, 4 washers, 4 No. 1 nozzle holder clamps and 4 injectors.
Remove the O-ring from each injector.
Remove the 4 injection nozzle seats from the cylinder head.
| 29. REMOVE CAMSHAFT |
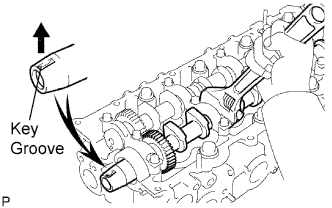 |
Face the key groove of the camshaft upward by turning the camshaft with a wrench.
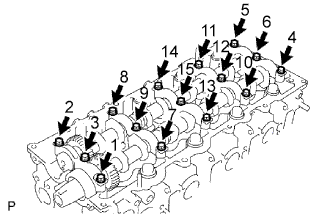 |
Uniformly loosen the 15 bearing cap bolts in several passes in the sequence shown in the illustration.
Remove the 5 bearing caps, oil seal and 2 camshafts.
| 30. REMOVE CYLINDER HEAD SUB-ASSEMBLY |
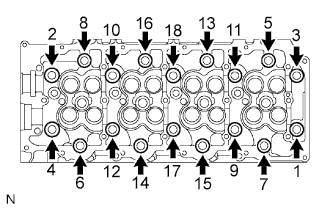 |
Uniformly loosen the 18 cylinder head bolts in several passes in the sequence shown in the illustration. Then remove the 18 cylinder head bolts and 18 washers.
Lift the cylinder head from the dowels on the cylinder block, and place the cylinder head on wooden blocks on a bench.
| 31. REMOVE CYLINDER HEAD GASKET |