ENGINE UNIT > DISASSEMBLY |
| 1. REMOVE NO. 1 TIMING BELT COVER |
| 2. REMOVE TIMING BELT |
| 3. REMOVE NO. 1 TIMING BELT IDLER SUB-ASSEMBLY |
| 4. REMOVE NO. 1 TIMING BELT TENSIONER ASSEMBLY |
| 5. REMOVE OIL FILLER CAP SUB-ASSEMBLY |
| 6. REMOVE NOZZLE HOLDER SEAL |
|
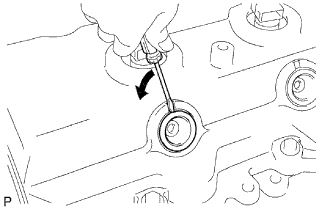
Using a small screwdriver, remove the 4 holder seals by prying the portion between each holder seal and the cutout part of the cylinder head.
| 7. REMOVE CYLINDER HEAD COVER SUB-ASSEMBLY |
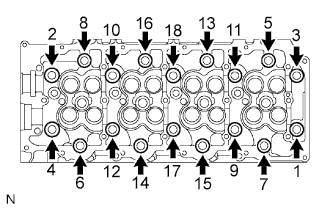 |
Uniformly loosen the 18 cylinder head bolts in several passes in the sequence shown in the illustration. Then remove the 18 cylinder head bolts and 18 washers.
Lift the cylinder head from the dowels on the cylinder block, and place the cylinder head on wooden blocks on a bench.
| 8. REMOVE INJECTOR ASSEMBLY |
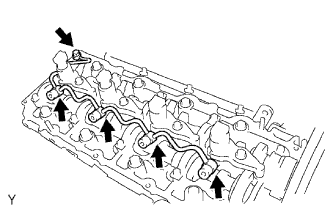 |
Remove the union bolt, 4 injector hollow screws, 5 gaskets and nozzle leakage pipe.
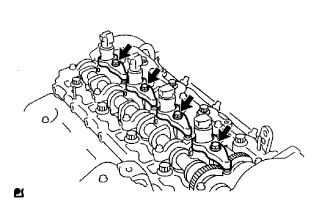 |
Remove the 4 bolts, 4 washers, 4 No. 1 nozzle holder clamps and 4 injectors.
Remove the O-ring from each injector.
Remove the 4 injection nozzle seats from the cylinder head.
| 9. REMOVE CAMSHAFT TIMING PULLEY |
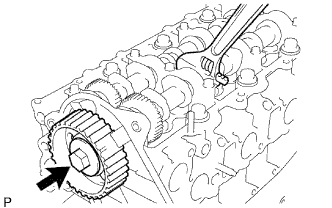 |
Remove the bolt of the camshaft timing pulley by holding the camshaft with a wrench.
Remove the camshaft timing pulley.
| 10. REMOVE NO. 2 TIMING BELT COVER |
Remove the 4 bolts, nut and timing belt cover.
| 11. REMOVE CAMSHAFT |
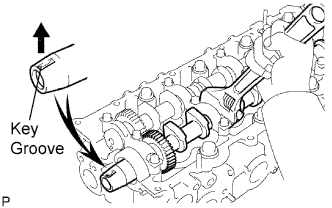 |
Face the key groove of the camshaft upward by turning the camshaft with a wrench.
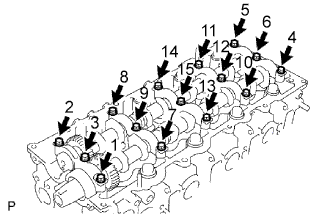 |
Uniformly loosen the 15 bearing cap bolts in several passes in the sequence shown in the illustration.
Remove the 5 bearing caps, oil seal and 2 camshafts.
| 12. REMOVE CYLINDER HEAD SUB-ASSEMBLY |
|
Uniformly loosen the 18 cylinder head bolts in several passes in the sequence shown in the illustration. Then remove the 18 cylinder head bolts and 18 washers.
Lift the cylinder head from the dowels on the cylinder block, and place the cylinder head on wooden blocks on a bench.
| 13. REMOVE WATER PUMP ASSEMBLY |
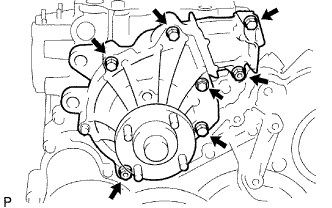 |
Remove the 5 bolts, 2 nuts, water pump and gasket.
| 14. REMOVE TIMING GEAR COVER |
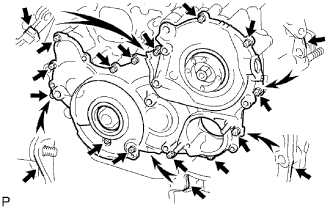 |
Remove the 14 bolts and 2 nuts.
Pry the gear cover in the locations shown in the illustration, and remove the gear cover together with the supply pump gear.
Remove the O-ring from the timing gear case.
| 15. REMOVE SUPPLY PUMP GEAR |
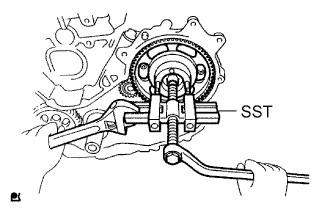 |
Using SST, remove the injection gear.
| 16. REMOVE NO. 1 CRANKSHAFT POSITION SENSOR PLATE |
| 17. INSPECT BACKLASH OF OIL PUMP GEAR TO CRANKSHAFT TIMING GEAR |
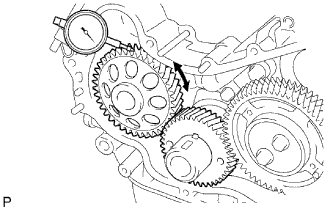 |
Using a dial indicator, measure the backlash.
| 18. INSPECT NO. 1 IDLE GEAR THRUST CLEARANCE |
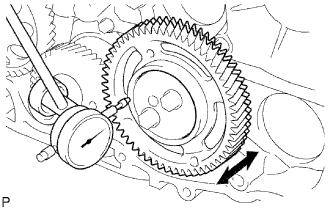 |
Using a dial indicator, measure the thrust clearance.
| 19. REMOVE NO. 1 IDLE GEAR |
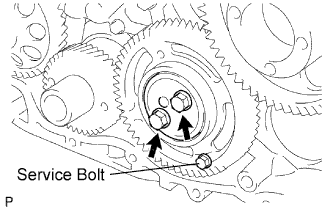 |
Secure the idle gears to the idle gear with the service bolt.
Remove the 2 bolts and thrust plate.
Turn the sub-gear and align the gear teeth of the idle main gear and sub-gear.
Remove the idle gear and sub-gear.
Remove the idle gear shaft.
| 20. REMOVE NO. 1 IDLE SUB-GEAR |
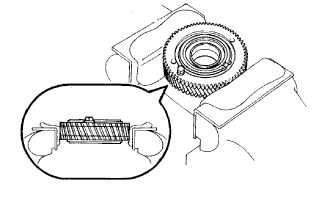 |
Mount the No. 1 idle gear and No. 2 idle sub-gear in a vise.
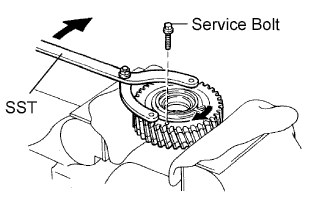 |
Using SST, turn the No. 1 idle sub-gear clockwise and remove the service bolt.
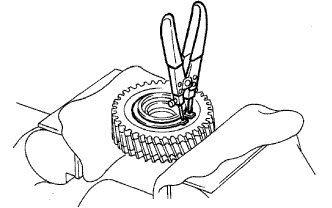 |
Using snap ring pliers, remove the shaft snap ring.
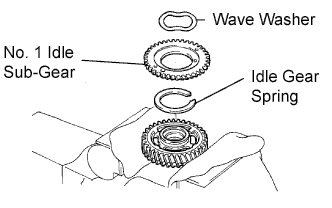 |
Remove the wave washer, sub-gear and gear spring.
| 21. REMOVE NO. 2 IDLE SUB-GEAR |
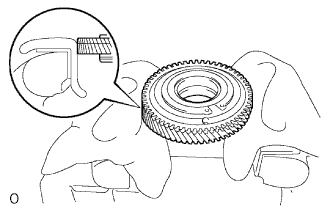 |
Reverse the No. 1 idle gear and set it in a vise.
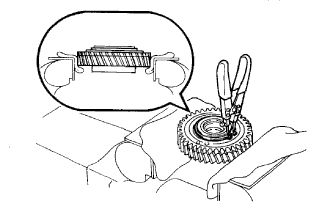 |
Using snap ring pliers, remove the shaft snap ring.
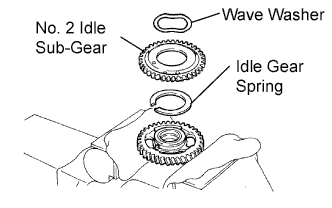 |
Remove the wave washer, sub-gear and gear spring.
| 22. INSPECT BACKLASH OF CRANKSHAFT TIMING GEAR TO NO. 1 IDLE GEAR |
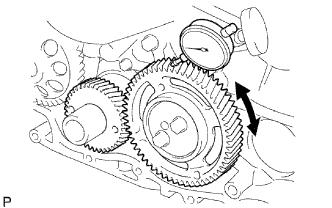 |
Install the idle gear.
Using a dial indicator, measure the backlash.
Remove the idle gear.
| 23. REMOVE CRANKSHAFT TIMING GEAR OR SPROCKET |
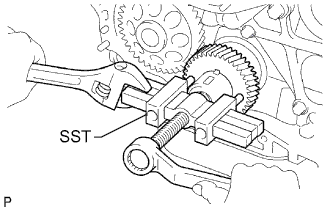 |
Using SST, remove the crankshaft timing gear.
| 24. INSPECT BACKLASH OF OIL PUMP GEAR TO NO. 1 BALANCE SHAFT |
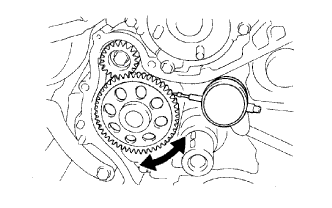 |
Using a dial indicator, measure the backlash.
| 25. INSPECT BACKLASH OF SUPPLY PUMP GEAR TO NO. 2 BALANCE SHAFT |
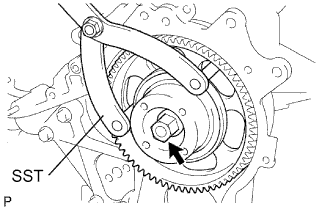 |
Install the supply pump with the 2 nuts.
Using SST, install the supply pump gear with the nut.
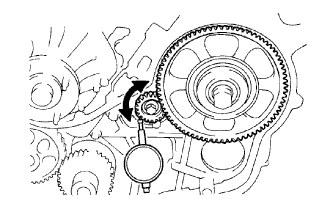 |
Using a dial indicator, measure the backlash.
| 26. INSPECT BACKLASH OF SUPPLY PUMP GEAR TO NO. 1 IDLE GEAR |
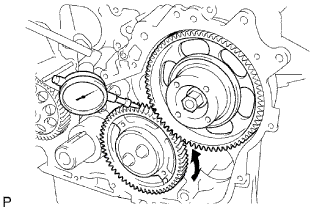 |
Install the idle gear without the sub gears.
Using a dial indicator, measure the backlash.
Using SST, remove the nut and supply pump gear.
Remove the 2 nuts and supply pump.
Remove the idle gear.
| 27. REMOVE OIL PAN SUB-ASSEMBLY |
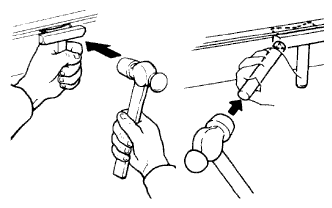 |
Remove the 4 bolts and oil level gauge sensor.
Remove the 22 bolts and 2 nuts.
Insert the blade of a oil pan seal cutter between the oil pan and cylinder block, cut through the applied sealer and remove the oil pan.
| 28. REMOVE OIL STRAINER SUB-ASSEMBLY |
Remove the 2 bolts, 2 nuts, oil strainer and gasket.
| 29. REMOVE TIMING GEAR CASE ASSEMBLY |
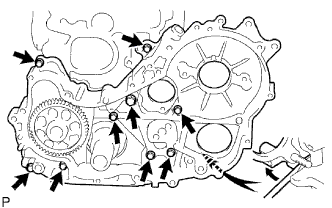 |
Remove the union bolt and 8 bolts.
Pry the gear case in the location shown in the illustration, and remove the gear case, driven rotor and gasket.
Remove the 2 O-rings.
| 30. INSPECT NO. 1 BALANCE SHAFT SUB-ASSEMBLY |
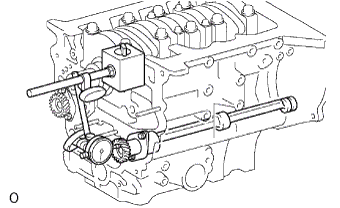 |
Using a dial indicator, measure the thrust clearance by moving the balance shaft back and forth.
| 31. REMOVE NO. 1 BALANCE SHAFT SUB-ASSEMBLY |
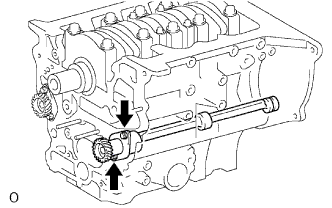 |
Remove the 2 bolts and balance shaft.
| 32. REMOVE NO. 1 BALANCE SHAFT DRIVEN GEAR |
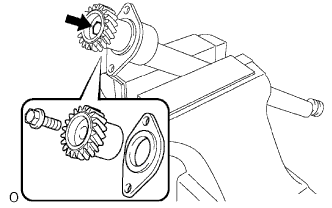 |
Mount the balance shaft between aluminum plates in a vise.
Remove the bolt, balance shaft driven gear and balance shaft thrust washer.
| 33. INSPECT NO. 2 BALANCE SHAFT SUB-ASSEMBLY |
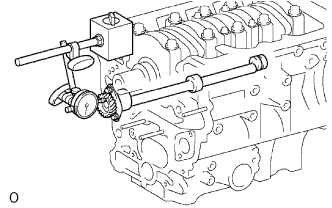 |
Using a dial indicator, measure the thrust clearance by moving the balance shaft back and forth.
| 34. REMOVE NO. 2 BALANCE SHAFT SUB-ASSEMBLY |
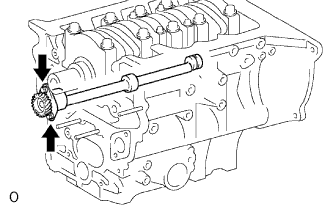 |
Remove the 2 bolts and balance shaft.
| 35. REMOVE NO. 2 BALANCE SHAFT DRIVEN GEAR |
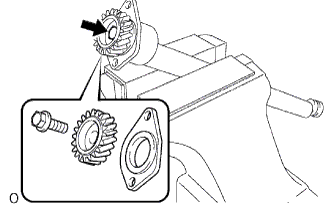 |
Mount the balance shaft between aluminum plates in a vise.
Remove the bolt, balance shaft driven gear and balance shaft thrust washer.
| 36. REMOVE REAR ENGINE OIL SEAL RETAINER |
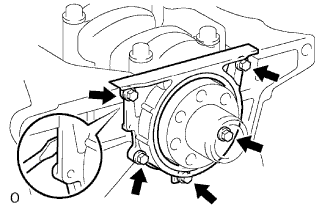 |
Remove the 5 bolts.
Using a screwdriver, remove the oil seal retainer by prying the portions between the oil seal retainer and cylinder block.
| 37. REMOVE CYLINDER BLOCK OIL ORIFICE |
| 38. INSPECT CONNECTING ROD THRUST CLEARANCE |
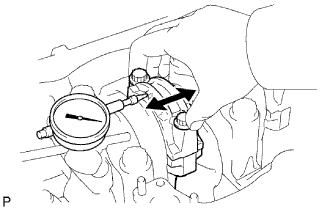 |
Using a dial indicator, measure the thrust clearance while moving the connecting rod back and forth.
| 39. INSPECT CONNECTING ROD OIL CLEARANCE |
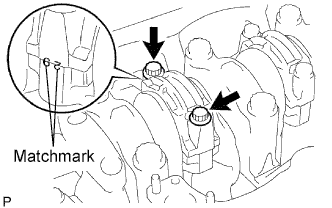 |
Check the matchmarks on the connecting rod and cap to ensure correct reassembly.
Remove the 2 connecting rod cap bolts.
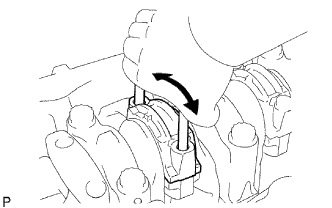 |
Using the 2 removed connecting rod bolts, move the connecting rod cap back and forth to remove the connecting cap.
Clean the crank pin and bearing.
Check the crank pin and bearing for pitting and scratches.
If the crank pin or bearing is damaged, replace the bearings. If necessary, grind or replace the crankshaft.
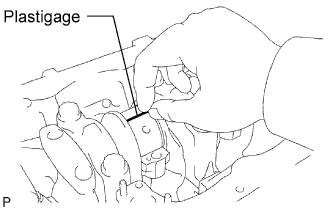 |
Lay a strip of Plastigage across the crank pin.
|
Install the connecting rod cap with the 2 bolts.
Check the matchmarks on the connecting rod and cap to ensure correct reassembly.
Remove the 2 bolts, connecting rod cap and lower bearing.
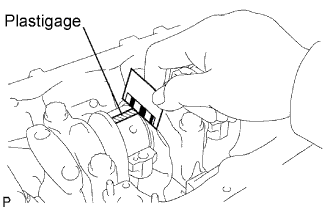 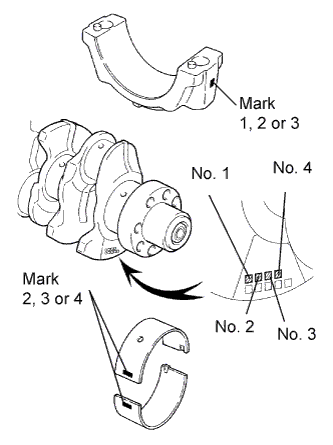 |
Measure the Plastigage at its widest point.
| STD | U/S 0.25, U/S 0.50 |
| 0.036 to 0.054 mm (0.0014 to 0.0021 in.) | 0.037 to 0.077 mm (0.0015 to 0.0030 in.) |
| Item | Number Mark | ||||||||
| Connecting rod cap | 1 | 2 | 3 | ||||||
| Crankshaft | 1 | 2 | 3 | 1 | 2 | 3 | 1 | 2 | 3 |
| Use bearing | 2 | 3 | 4 | 3 | 4 | 5 | 4 | 5 | 6 |
| Mark | Diameter |
| 1 | 62.014 to 62.020 mm (2.4415 to 2.4417 in.) |
| 2 | 62.020 to 62.026 mm (2.4417 to 2.4420 in.) |
| 3 | 62.026 to 62.032 mm (2.4420 to 2.4422 in.) |
| Mark | Diameter |
| 1 | 58.994 to 59.000 mm (2.3226 to 2.3228 in.) |
| 2 | 58.988 to 58.994 mm (2.3224 to 2.3226 in.) |
| 3 | 58.982 to 58.988 mm (2.3221 to 2.3224 in.) |
| Mark | Thickness |
| 1 | 1.486 to 1.489 mm (0.0585 to 0.0586 in.) |
| 2 | 1.489 to 1.492 mm (0.0586 to 0.0587 in.) |
| 3 | 1.492 to 1.495 mm (0.0587 to 0.0589 in.) |
| 4 | 1.495 to 1.498 mm (0.0589 to 0.0590 in.) |
| 5 | 1.498 to 1.501 mm (0.0590 to 0.0591 in.) |
Completely remove the Plastigage.
| 40. REMOVE PISTON AND CONNECTING ROD |
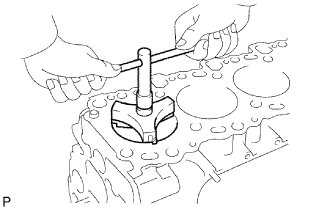 |
Using a ridge reamer, remove all the carbon from the top of the cylinder.
Push out the piston, connecting rod assembly and upper bearing through the top of the cylinder block.
| 41. REMOVE PISTON WITH PIN |
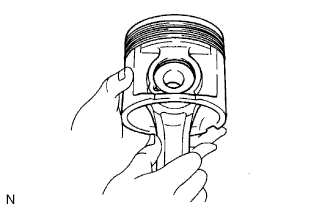 |
Check the fit between the piston and piston pin.
Try to move the piston back and forth on the piston pin.
If any movement is felt, replace the piston and pin with a new piston and pin set.
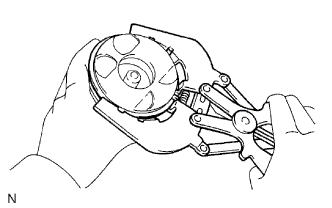 |
Using a piston ring expander, remove the 2 piston rings.
Remove the coil and oil ring by hand.
 |
Disconnect the connecting rod from the piston.
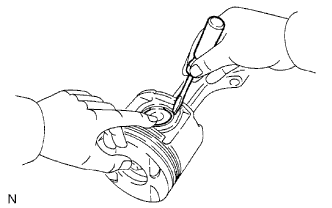
Using a small screwdriver, pry off the 2 snap rings from the piston.
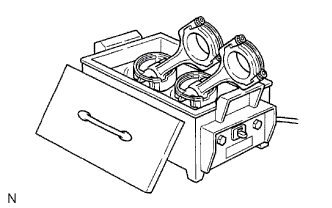 |
Gradually heat the piston to approximately 80°C (176°F).
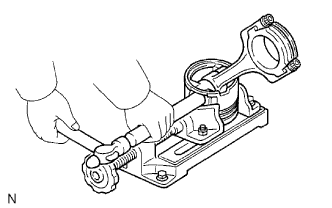 |
Using a plastic-faced hammer and brass bar, lightly tap out the piston pin. Then remove the connecting rod.
| 42. INSPECT CRANKSHAFT THRUST CLEARANCE |
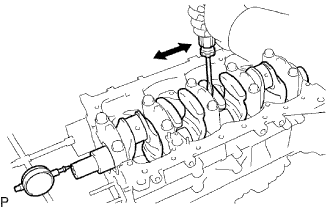 |
Using a dial indicator, measure the thrust clearance while prying the crankshaft back and forth with a screwdriver.
| STD | 2.430 to 2.480 mm (0.0957 to 0.0976 in.) |
| O/S 0.125 | 2.493 to 2.543 mm (0.0981 to 0.1001 in.) |
| O/S 0.250 | 2.680 to 2.730 mm (0.1055 to 0.1074 in.) |
| 43. INSPECT CRANKSHAFT OIL CLEARANCE |
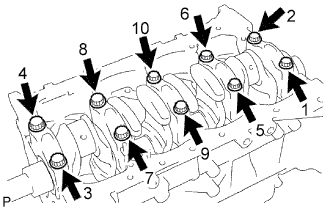 |
Uniformly loosen and remove the 10 crankshaft bearing cap bolts in several passes, in the sequence shown.
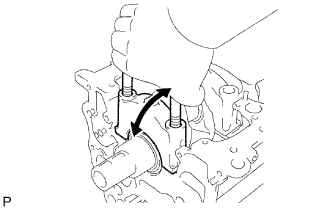 |
Using the removed crankshaft bearing cap bolts, move the cap back and forth to remove the crankshaft bearing caps, lower crankshaft bearings and lower thrust washers (No. 3 crankshaft bearing cap only).
Lift out the crankshaft.
Clean each main journal and bearing.
Check each crankshaft journal and bearing for pitting and scratches.
If the journal or bearing is damaged, replace the bearings. If necessary, grind or replace the crankshaft.
Place the crankshaft on the cylinder block.
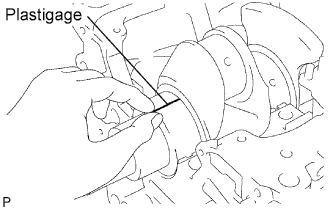 |
Lay a strip of Plastigage across each journal.
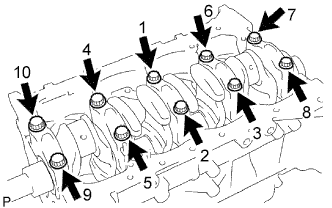 |
Install the 5 crankshaft bearing caps with the 10 bolts.
Remove the 10 bolts and 5 crankshaft bearing caps.
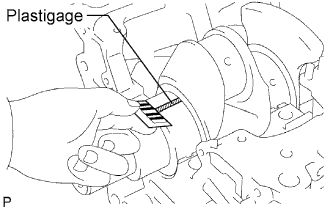 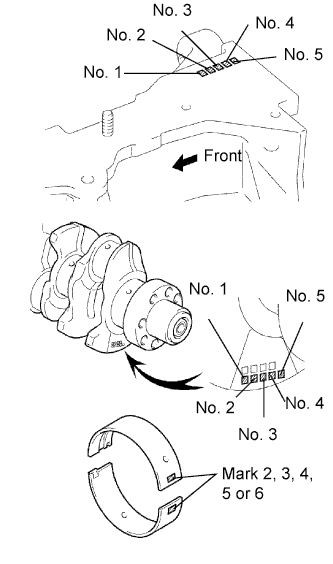 |
Measure the Plastigage at its widest point.
| STD | 0.030 to 0.048 mm (0.0012 to 0.0019 in.) |
| O/S 0.25, O/S 0.50 | 0.037 to 0.077 mm (0.0015 to 0.0030 in.) |
| Item | Number Mark | ||||||||
| Cylinder block | 1 | 2 | 3 | ||||||
| Crankshaft | 1 | 2 | 3 | 1 | 2 | 3 | 1 | 2 | 3 |
| Use bearing | 2 | 3 | 4 | 3 | 4 | 5 | 4 | 5 | 6 |
| Mark | Diameter |
| 1 | 75.000 to 75.006 mm (2.9528 to 2.9530 in.) |
| 2 | 75.006 to 75.012 mm (2.9530 to 2.9532 in.) |
| 3 | 75.012 to 75. 018 mm (2.9532 to 2.9535 in.) |
| Mark | Diameter |
| 1 | 69.994 to 70.000 mm (2.7557 to 2.7559 in.) |
| 2 | 69.988 to 69.994 mm (2.7554 to 2.7557 in.) |
| 3 | 69.982 to 69.988 mm (2.7552 to 2.7554 in.) |
| Mark | Diameter |
| 2 | 2.482 to 2.485 mm (0.0977 to 0.0978 in.) |
| 3 | 2.485 to 2.488 mm (0.0978 to 0.0980 in.) |
| 4 | 2.488 to 2.491 mm (0.0980 to 0.0981 in.) |
| 5 | 2.491 to 2.494 mm (0.0981 to 0.0982 in.) |
| 6 | 2.494 to 2.497 mm (0.0982 to 0.0983 in.) |
Completely remove the Plastigage.
| 44. REMOVE CRANKSHAFT SUB-ASSEMBLY |
Lift out the crankshaft.
Remove the upper bearings and upper thrust washers from the cylinder block.
| 45. REMOVE NO. 1 OIL NOZZLE SUB-ASSEMBLY |
Remove the 4 check valves and 4 oil nozzles.
| 46. REMOVE NO. 1 STRAIGHT SCREW PLUG |
Remove the screw plug and gasket.