ROOF HEADLINING > REMOVAL |
| 1. PRECAUTION |
| 2. DISCONNECT CABLE FROM NEGATIVE BATTERY TERMINAL |
| 3. REMOVE REAR NO. 2 SEAT ASSEMBLY RH |
| 4. REMOVE REAR NO. 2 SEAT ASSEMBLY LH |
| 5. REMOVE FRONT DOOR SCUFF PLATE LH |
|
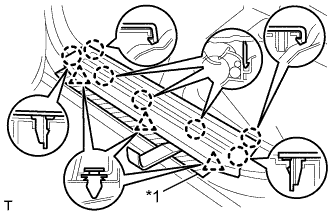
Put protective tape around the front door scuff plate.
| *1 | Protective Tape |
Using a moulding remover, detach the 7 claws and 3 clips and remove the front door scuff plate.
| 6. REMOVE FRONT DOOR SCUFF PLATE RH |
| 7. REMOVE FRONT DOOR OPENING TRIM LH |
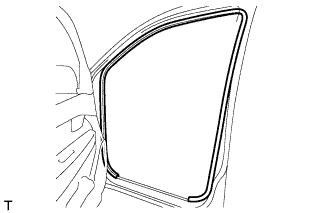 |
Remove the front door opening trim.
| 8. REMOVE FRONT DOOR OPENING TRIM RH |
| 9. REMOVE FRONT NO. 1 ASSIST GRIP PLUG LH |
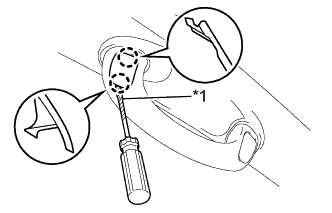 |
Using a screwdriver, detach the 2 claws and remove the front No. 1 assist grip plug.
| *1 | Protective Tape |
| 10. REMOVE FRONT NO. 1 ASSIST GRIP PLUG RH |
| 11. REMOVE FRONT ASSIST GRIP SUB-ASSEMBLY |
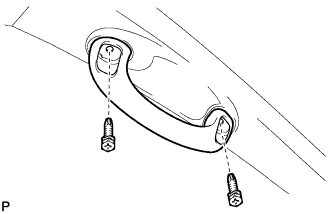 |
Remove the 2 screws and front assist grip.
| 12. REMOVE FRONT PILLAR GARNISH LH |
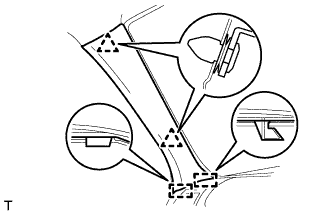 |
Detach the 2 clips and 2 guides and remove the front pillar garnish.
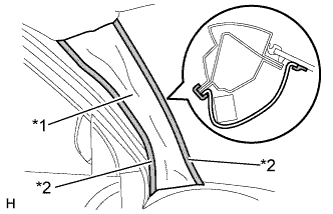 |
w/ Curtain Shield Airbag:
Protect the curtain shield airbag assembly.
Thoroughly cover the airbag with a cloth or nylon sheet and fix the ends of the cover with adhesive tape, as shown in the illustration.
| *1 | Protective Cover |
| *2 | Adhesive Tape |
| 13. REMOVE FRONT PILLAR GARNISH RH |
| 14. REMOVE REAR DOOR SCUFF PLATE LH |
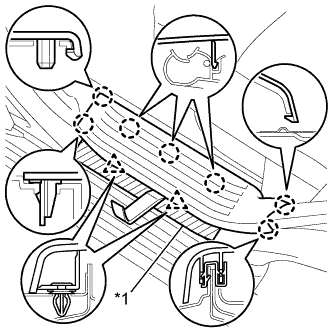 |
Put protective tape around the rear door scuff plate.
| *1 | Protective Tape |
Using a moulding remover, detach the 7 claws and 2 clips and remove the rear door scuff plate.
| 15. REMOVE REAR DOOR SCUFF PLATE RH |
| 16. REMOVE REAR DOOR OPENING TRIM WEATHERSTRIP LH |
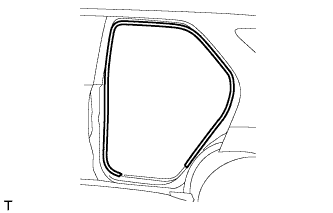 |
Remove the rear door opening trim weatherstrip.
| 17. REMOVE REAR DOOR OPENING TRIM WEATHERSTRIP RH |
| 18. REMOVE LOWER CENTER PILLAR GARNISH LH |
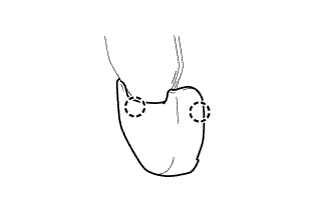 |
Detach the 2 claws and remove the outer lap belt anchor cover.
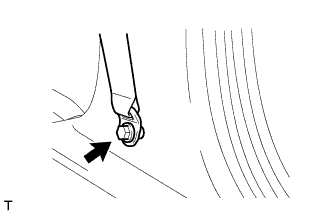 |
Remove the bolt and disconnect the front seat outer belt floor anchor.
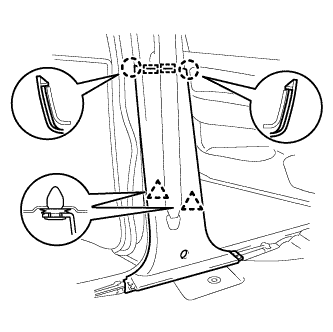 |
Detach the 2 claws, 2 guides and 2 clips and remove the lower center pillar garnish.
| 19. REMOVE LOWER CENTER PILLAR GARNISH RH |
| 20. REMOVE CENTER PILLAR GARNISH LH |
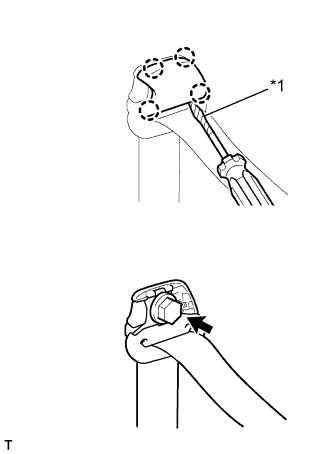 |
Using a screwdriver, detach the 4 claws and remove the front seat belt shoulder anchor cover.
| *1 | Protective Tape |
Remove the bolt and disconnect the front seat belt shoulder anchor.
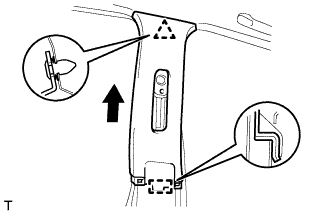 |
Detach the clip.
Pull the center pillar garnish in the direction indicated by the arrow in the illustration to detach the guide and remove the center pillar garnish.
| 21. REMOVE CENTER PILLAR GARNISH RH |
| 22. REMOVE BACK DOOR SCUFF PLATE |
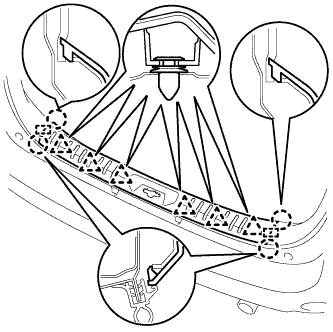 |
Detach the 4 claws, 2 guides and 6 clips and remove the back door scuff plate.
| 23. REMOVE QUARTER TRIM HOOK |
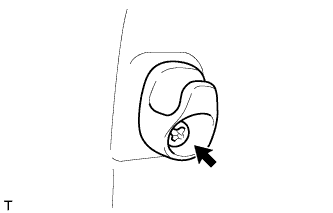 |
Remove the screw and quarter trim hook.
| 24. REMOVE QUARTER INSIDE TRIM BOARD LH |
|
Detach the 2 claws and remove the outer lap belt anchor cover.
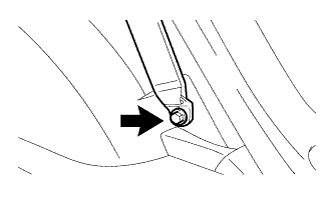 |
Remove the bolt and disconnect the rear No. 1 seat outer belt floor anchor.
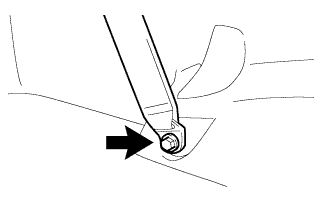 |
Remove the bolt and disconnect the rear No. 2 seat outer belt floor anchor.
Using a clip remover, remove the clip.
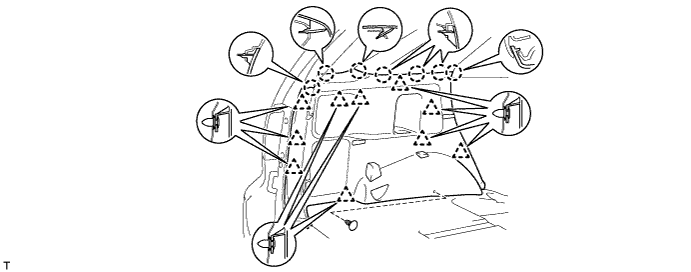
Detach the 7 claws and 10 clips.
Disconnect the power point socket connector and remove the quarter inside trim board.
| 25. REMOVE QUARTER INSIDE TRIM BOARD RH |
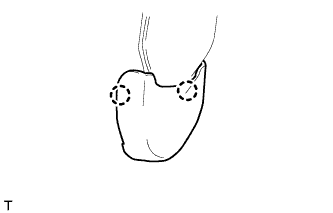 |
Detach the 2 claws and remove the outer lap belt anchor cover.
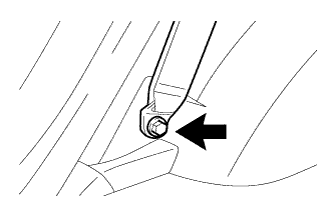 |
Remove the bolt and disconnect the rear No. 1 seat outer belt floor anchor.
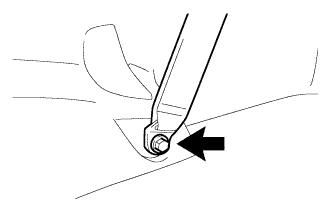 |
Remove the bolt and disconnect the rear No. 2 seat outer belt floor anchor.
Using a clip remover, remove the clip.
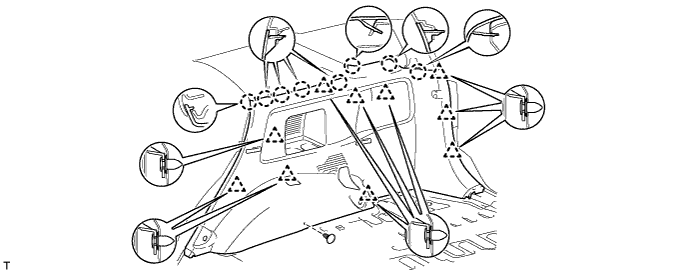
Detach the 8 claws and 10 clips and remove the quarter inside trim board.
| 26. REMOVE QUARTER PILLAR GARNISH LH |
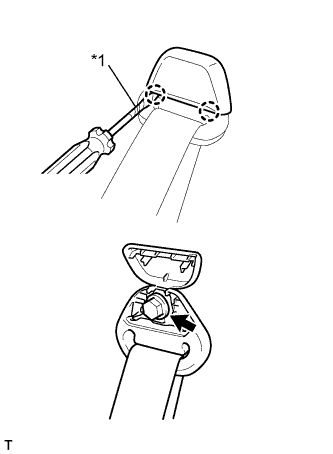 |
Using a screwdriver, detach the 2 claws and open the rear No. 1 seat belt shoulder anchor cover.
| *1 | Protective Tape |
Remove the bolt and disconnect the rear No. 1 seat belt shoulder anchor.
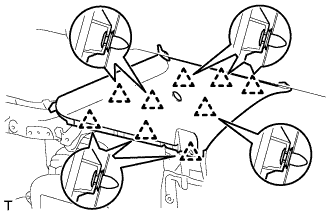 |
Detach the 9 clips and remove the quarter pillar garnish.
| 27. REMOVE QUARTER PILLAR GARNISH RH |
| 28. REMOVE INNER UPPER ROOF SIDE GARNISH LH |
|
Using a screwdriver, detach the 2 claws and open the rear No. 2 seat belt shoulder anchor cover.
| *1 | Protective Tape |
Remove the bolt and disconnect the rear No. 2 seat belt shoulder anchor.
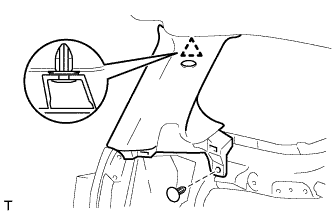 |
Using a clip remover, remove the clip.
Detach the clip and remove the inner upper roof side garnish.
| 29. REMOVE INNER UPPER ROOF SIDE GARNISH RH |
| 30. REMOVE MAP LIGHT ASSEMBLY |
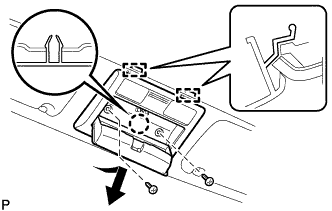 |
Remove the 2 screws.
Detach the claw and 2 guides and remove the map light assembly.
Disconnect the connector.
| 31. REMOVE COOLER CONTROL SWITCH ASSEMBLY |
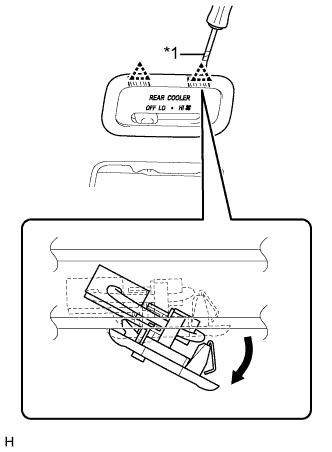 |
Using a screwdriver, detach the 2 clips and remove the cooler control switch assembly (rear blower switch) as shown in the illustration.
| *1 | Protective Tape |
| 32. REMOVE NO. 1 ROOM LIGHT ASSEMBLY |
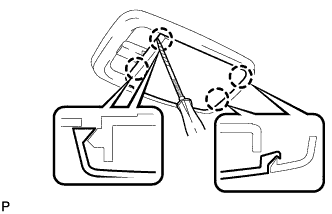 |
Using a screwdriver wrapped with protective tape, detach the 4 claws and remove the lens.
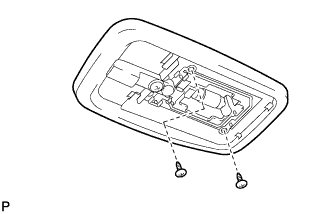 |
Remove the 2 screws and room light.
Disconnect the light connector.
| 33. REMOVE VISOR ASSEMBLY LH |
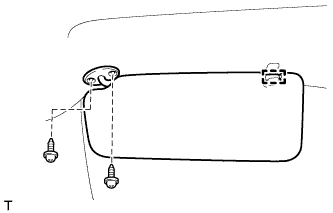 |
Detach the guide.
Remove the 2 screws and visor.
| 34. REMOVE VISOR ASSEMBLY RH |
| 35. REMOVE VISOR HOLDER LH |
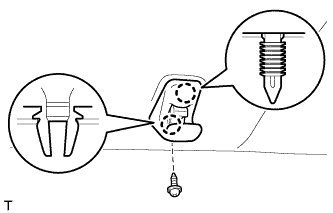 |
Remove the screw.
Detach the 2 claws and remove the visor holder.
| 36. REMOVE VISOR HOLDER RH |
| 37. REMOVE ASSIST GRIP |
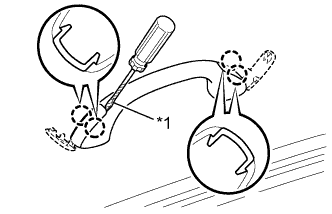 |
Using a screwdriver, detach the 4 claws and open the 2 covers.
| *1 | Protective Tape |
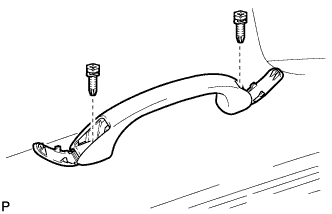 |
Remove the 2 screws and assist grip.
| 38. REMOVE UPPER INSTRUMENT PANEL SUB-ASSEMBLY |
| 39. REMOVE LOWER INSTRUMENT PANEL FINISH PANEL SUB-ASSEMBLY |
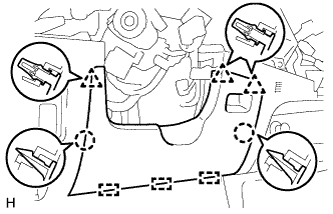 |
Detach the 2 claws, 3 clips and 3 guides and remove the lower instrument panel finish panel.
| 40. REMOVE NO. 2 HEATER TO REGISTER DUCT |
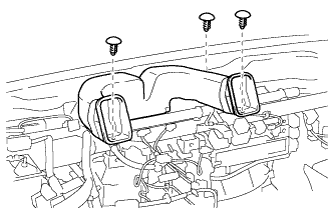 |
Remove the 3 clips and No. 2 heater to register duct.
| 41. REMOVE NO. 1 HEATER TO REGISTER DUCT |
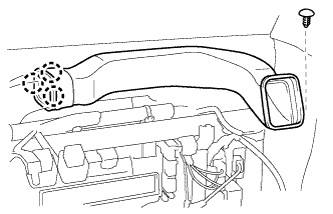 |
Remove the clip.
Detach the 3 claws and remove the No. 1 heater to register duct.
| 42. REMOVE NO. 3 HEATER TO REGISTER DUCT |
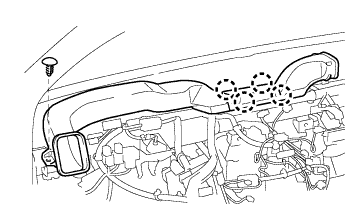 |
Remove the clip.
Detach the 4 claws and remove the No. 3 heater to register duct.
| 43. REMOVE DEFROSTER NOZZLE ASSEMBLY |
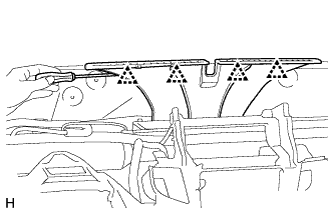 |
Using a screwdriver, detach the 4 clips and remove the defroster nozzle assembly.
| 44. REMOVE ROOF HEADLINING ASSEMBLY |
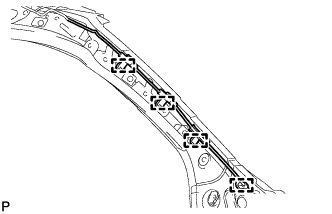 |
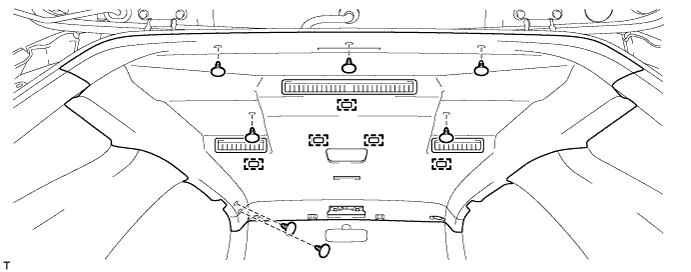
Detach the 4 clamps from the front pillar.
for LHD:
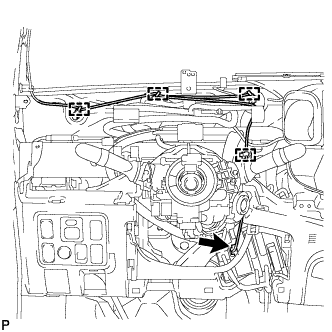 |
Disconnect the connectors and detach the 4 clamps.
Using a clip remover, remove the 7 clips.
Detach the 5 fasteners.
for RHD:
Disconnect the connectors and detach the 5 clamps.
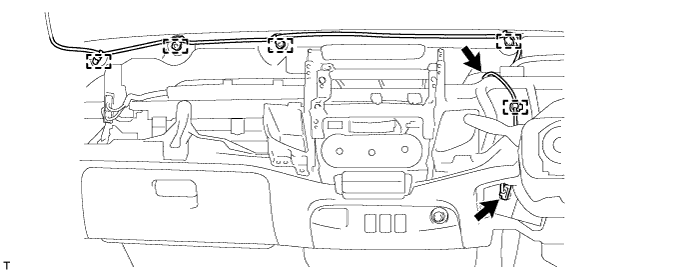
Using a clip remover, remove the clips.
Detach the 5 fasteners.
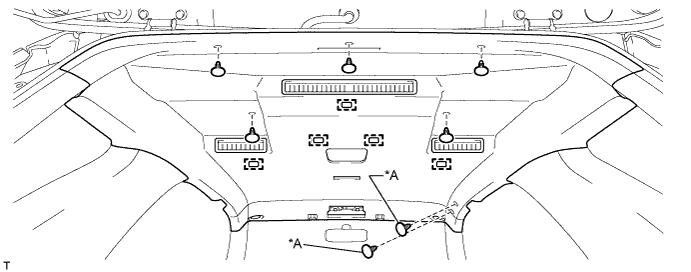
| *A | w/o Assist Grip | - | - |
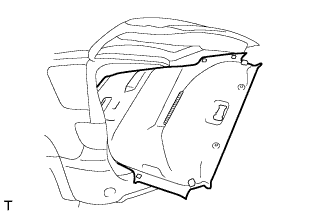 |
Remove the roof headlining as shown in the illustration.
| 45. REMOVE FRONT SIDE RAIL SPACER LH |
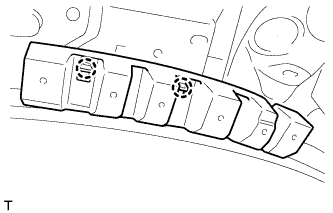 |
Detach the 2 claws and remove the front side rail spacer.
| 46. REMOVE FRONT SIDE RAIL SPACER RH |
| 47. REMOVE SIDE RAIL SPACER (for LHD) |
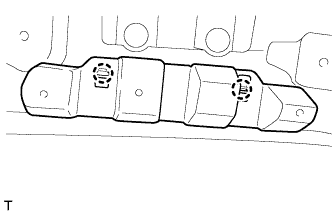 |
Detach the 2 claws and remove the side rail spacer.
| 48. REMOVE SIDE RAIL SPACER (for RHD, w/o Assist Grip) |
| 49. REMOVE REAR NO. 2 SIDE RAIL SPACER LH |
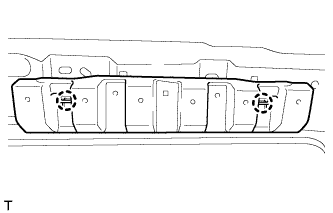 |
Detach the 2 claws and remove the rear No. 2 side rail spacer.
| 50. REMOVE REAR NO. 2 SIDE RAIL SPACER RH |
| 51. REMOVE REAR NO. 3 SIDE RAIL SPACER LH |
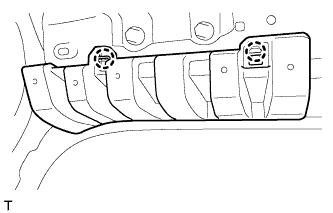 |
Detach the 2 claws and remove the rear No. 3 side rail spacer.
| 52. REMOVE REAR NO. 3 SIDE RAIL SPACER RH |