 |
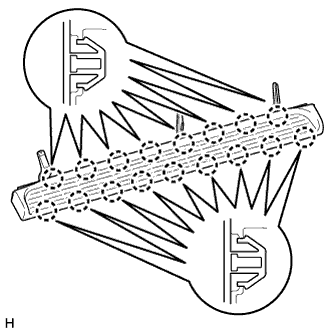
Detach the 17 claws and remove the step plate cover.
SIDE STEP > DISASSEMBLY |
| 1. REMOVE STEP PLATE COVER LH |
|
Detach the 17 claws and remove the step plate cover.
| 2. REMOVE NO. 1 SIDE STEP STAY SUB-ASSEMBLY LH |
Put a 4 mm (0.157 in.) drill bit into a drill.
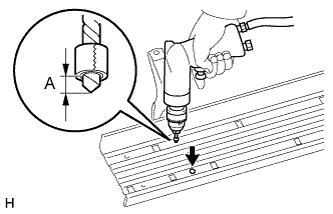 |
Wind tape around the drill bit approximately 5 mm (0.197 in.) from the tip of the drill as shown in the illustration.
| Area | Specified Condition |
| A | 5 mm (0.197 in.) |
Lightly press the drill against the 2 rivets, drill off the flanges of the 2 rivets and remove the No. 1 side step stay.
Using a vacuum cleaner, remove the rivet fragments and shavings from the drilled area.
| 3. REMOVE NO. 2 SIDE STEP BRACKET LH |
Put a 4 mm (0.157 in.) drill bit into a drill.
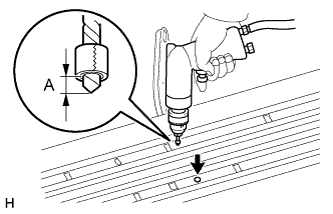 |
Wind tape around the drill bit approximately 5 mm (0.197 in.) from the tip of the drill as shown in the illustration.
| Area | Specified Condition |
| A | 5 mm (0.197 in.) |
Lightly press the drill against the 2 rivets, drill off the flanges of the 2 rivets and remove the No. 2 side step bracket.
Using a vacuum cleaner, remove the rivet fragments and shavings from the drilled area.
| 4. REMOVE NO. 3 SIDE STEP BRACKET LH |
Put a 4 mm (0.157 in.) drill bit into a drill.
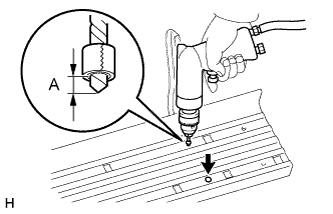 |
Wind tape around the drill bit approximately 5 mm (0.197 in.) from the tip of the drill as shown in the illustration.
| Area | Specified Condition |
| A | 5 mm (0.197 in.) |
Lightly press the drill against the 2 rivets, drill off the flanges of the 2 rivets and remove the No. 3 side step bracket.
Using a vacuum cleaner, remove the rivet fragments and shavings from the drilled area.