P2A00 A/F Sensor Circuit Slow Response (Bank 1 Sensor 1)
Diagnostic trouble codes · Vehicles built from Aug 2012
Also covers:
- P2A03 A/F Sensor Circuit Slow Response (Bank 2 Sensor 1)
Versions by build date: Jun 2011 – Jul 2012 from Aug 2012
DESCRIPTION
Refer to DTC P2195 (Click here).| DTC No. |
DTC Detection Condition |
Trouble Area |
| P2A00 P2A03 |
Calculated test value for A/F sensor response rate deterioration level is less threshold |
|
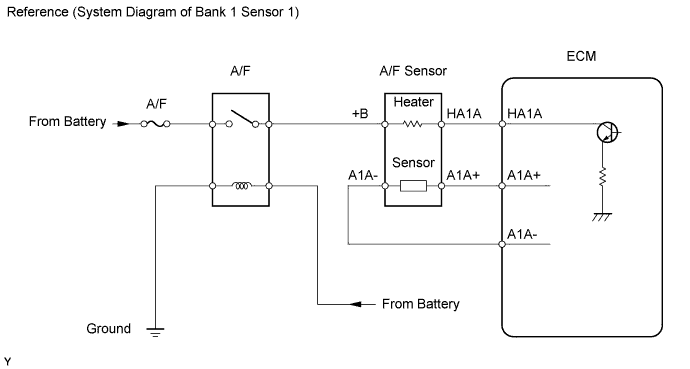
WIRING DIAGRAM
Refer to DTC P2195 (Click here).INSPECTION PROCEDURE
- HINT:
- Intelligent tester only:
- Malfunctioning areas can found by performing the Active Test / Control the Injection volume for A/F sensor operation. The "Control the injection volume for A/F sensor" operation can determine if the A/F sensor, heated oxygen sensor or other potential trouble areas are malfunctioning or not.
- HINT:
- "Control the injection volume for A/F sensor" is an Active Test which changes the injection volume to -12.5% or +25%.
- Connect the intelligent tester to the DLC3.
- Start the engine and turn the tester ON.
- Warm up the engine by running the engine at 2,500 rpm for approximately 90 seconds.
- Enter the following menus: Powertrain / Engine and ECT / Active Test / Control the injection volume for A/F sensor.
- Enter the following monitor items: AFS B1S1 and O2S B1S2 or AFS B2S1 and O2S B2S2.
- Perform the "Control the injection volume for A/F sensor" operation with the engine in a idling condition (press the right or left button).
- HINT:
- The "Control the injection volume for A/F sensor" operation lowers the fuel injection volume by 12.5 % or increases the injection volume by 25 %.
- The "Control the injection volume for A/F sensor" operation lowers the fuel injection volume by 12.5 % or increases the injection volume by 25 %.
- Each sensor reacts in accordance with increases and decreases in the fuel injection volume.
- Each sensor reacts in accordance with increases and decreases in the fuel injection volume.
| Tester Display (Sensor) |
Injection Volume |
Status |
Voltage |
| AFS B1S1 or AFS B2S1 (A/F) |
+25 % |
Rich |
Less than 3.0 |
| AFS B1S1 or AFS B2S1 (A/F) |
-12.5 % |
Lean |
More than 3.35 |
| O2S B1S2 or O2S B2S2 (heated oxygen sensor) |
+25 % |
Rich |
More than 0.55 |
| O2S B1S2 or O2S B2S2 (heated oxygen sensor) |
-12.5 % |
Lean |
Less than 0.4 |
- NOTICE:
- The A/F sensor has an output delay of a few seconds and the heated oxygen sensor has a maximum output delay of approximately 20 seconds.
| Case |
A/F Sensor (Sensor 1) Output Voltage |
Heated Oxygen Sensor (Sensor 2) Output Voltage |
Main Suspected Trouble Areas |
||
| 1 |
Injection volume +25 % -12.5 % |
  |
Injection volume +25 % -12.5 % |
|
- |
| Output voltage More than 3.35 V Less than 3.0 V |
 |
Output voltage More than 0.55 V Less than 0.4 V |
 |
||
| 2 |
Injection volume +25 % -12.5 % |
|
Injection volume +25 % -12.5 % |
|
|
| Output voltage Almost no reaction |
 |
Output voltage More than 0.55 V Less than 0.4 V |
|
||
| 3 |
Injection volume +25 % -12.5 % |
|
Injection volume +25 % -12.5 % |
|
|
| Output voltage More than 3.35 V Less than 3.0 V |
|
Output voltage Almost no reaction |
|
||
| 4 |
Injection volume +25 % -12.5 % |
|
Injection volume +25 % -12.5 % |
|
|
| Output voltage Almost no reaction |
|
Output voltage Almost no reaction |
|
||
- Following the A/F CONTROL procedure enables technicians to check and graph the voltage outputs of both the A/F and heated oxygen sensors.
- Enter the following menus on the tester: Powertrain / Engine and ECT / Active Test / Control the injection volume for A/F sensor and Data List / AFS B1S1 and O2S B1S2 or AFS B2S1 and O2S B2S2.
- HINT:
- Read freeze frame data using the intelligent tester. Freeze frame data records the engine conditions when a malfunction is detected. When troubleshooting, freeze frame data can help determine if the vehicle was running or stopped, if the engine was warmed up or not, if the air-fuel ratio was lean or rich, and other data from the time the malfunction occurred.
- These DTCs are related to the A/F sensor.
- These DTCs are recorded when A/F sensor has malfunction, although the caption is oxygen sensor.
- Read freeze frame data using the intelligent tester. Freeze frame data records the engine conditions when a malfunction is detected. When troubleshooting, freeze frame data can help determine if the vehicle was running or stopped, if the engine was warmed up or not, if the air-fuel ratio was lean or rich, and other data from the time the malfunction occurred.
| 1. CHECK OTHER DTC OUTPUT (BESIDES A/F SENSOR DTC) |

Connect the intelligent tester to the DLC3.
Turn the ignition switch ON and turn the tester ON.
Enter the following menus: Powertrain / Engine and ECT / DTC.
Read DTCs.
- Result:
Display
Proceed to
DTC P2A00 and/or P2A03 are output
A
DTC P2A00 and/or P2A03 and other codes are output
B
- HINT:
- If any other code besides P2A00 and/or P2A03 are output, perform troubleshooting for those DTCs first.
|
|
||||

| A | |
 |
| 2. INSPECT AIR FUEL RATIO SENSOR (HEATER RESISTANCE) |
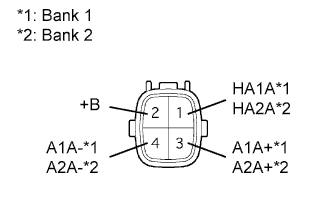 |
Disconnect the A/F sensor connector.
Measure the resistance of the A/F sensor.
- Standard resistance (Bank 1 Sensor 1):
Tester Connection
Condition
Specified Condition
1 (HA1A) - 2 (+B)
20°C (68°F)
1.8 to 3.4 Ω
1 (HA1A) - 4 (A1A-)
-
10 kΩ or higher
- Standard resistance (Bank 2 Sensor 1):
Tester Connection
Condition
Specified Condition
1 (HA2A) - 2 (+B)
20°C (68°F)
1.8 to 3.4 Ω
1 (HA2A) - 4 (A2A-)
-
10 kΩ or higher
|
|
||||
| OK | |
|
| 3. CHECK WIRE HARNESS (A/F SENSOR -ECM) |
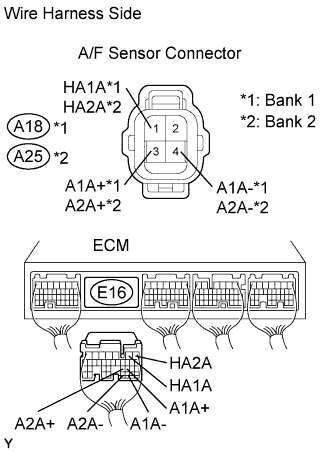  |
Disconnect the A18 or A25 A/F sensor connector.
Disconnect the E6 ECM connector.
Measure the resistance of the wire harness side connectors.
- Standard resistance (Bank 1 Sensor 1):
Tester Connection
Specified Condition
A18-1 (HA1A) - E16-2 (HA1A)
Below 1 Ω
A18-3 (A1A+) - E16-22 (A1A+)
Below 1 Ω
A18-4 (A1A-) - E16-30 (A1A-)
Below 1 Ω
A18-1 (HA1A) or E16-2 (HA1A) - Body ground
10 kΩ or higher
A18-3 (A1A+) or E16-22 (A1A+) - Body ground
10 kΩ or higher
A18-4 (A1A-) or E16-30 (A1A-) - Body ground
10 kΩ or higher
- Standard resistance (Bank 2 Sensor 1):
Tester Connection
Specified Condition
A25-1 (HA2A) - E16-1 (HA2A)
Below 1 Ω
A25-3 (A2A+) - E16-23 (A2A+)
Below 1 Ω
A25-4 (A2A-) - E16-31 (A2A-)
Below 1 Ω
A25-1 (HA2A) or E16-1 (HA2A) - Body ground
10 kΩ or higher
A25-3 (A2A+) or E16-23 (A2A+) - Body ground
10 kΩ or higher
A25-4 (A2A-) or E16-31 (A2A-) - Body ground
10 kΩ or higher
|
|
||||
| OK | |
|
| 4. PERFORM CONFIRMATION DRIVING PATTERN |
| NEXT | |
|
| 5. CHECK WHETHER OUTPUT DTC RECURS (P2A00 OR P2A03) |
Connect the intelligent tester to the DLC3.
Turn the ignition switch ON and turn the tester ON.
Enter the following menus: Powertrain / Engine and ECT / DTC.
Read DTCs.
- Result:
Display
Proceed to
DTC P2A00 and/or P2A03 are not output
A
DTC P2A00 and/or P2A03 are output
B
|
|
||||
| A | |
|
| 6. REPLACE AIR FUEL RATIO SENSOR |
| NEXT | |
|
| 7. PERFORM CONFIRMATION DRIVING PATTERN |
| NEXT | |
|
| 8. CHECK WHETHER DTC OUTPUT RECURS (P2A00 OR P2A03) |
Connect the intelligent tester to the DLC3.
Turn the ignition switch ON and turn the tester ON.
Enter the following menus: Powertrain / Engine and ECT / DTC.
Read DTCs.
- Result:
Display
Proceed to
DTC P2A00 and/or P2A03 are not output
A
DTC P2A00 and/or P2A03 are output
B
|
|
||||
| B | ||
 |
||
| ||