INSTALLATION
Removal / installation · Vehicles built from Aug 2013
Versions by build date: Jun 2011 – Jul 2012 Aug 2012 – Jul 2013 from Aug 2013
| 1. INSTALL FUEL PRESSURE REGULATOR |

Apply a light coat of spindle oil or gasoline to a new O-ring and install it to the fuel pressure regulator.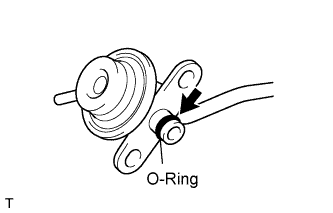

Install the fuel pressure regulator with the 3 bolts.
- Torque:
- 8.5 N*m{ 87 kgf*cm , 75 in.*lbf }
Connect the No. 2 fuel hose.
Connect the vacuum hose.
| 2. INSTALL INTAKE AIR CONNECTOR |
Install the intake air connector with the 2 bolts, and tighten the 2 hose clamps.
- Torque:
- 8.0 N*m{ 82 kgf*cm , 71 in.*lbf } for intake air connector
- 5.0 N*m{ 51 kgf*cm , 44 in.*lbf } for hose clamp
| 3. CONNECT CABLE TO NEGATIVE BATTERY TERMINAL |
| 4. PERFORM INITIALIZATION |
Perform initialization (Click here).
- NOTICE:
- Certain systems need to be initialized after disconnecting and reconnecting the cable from the negative (-) battery terminal.
| 5. CHECK FOR FUEL LEAKS |
Connect the intelligent tester to the DLC3.
Turn the ignition switch ON.
- NOTICE:
- Do not start the engine.
Push the intelligent tester main switch ON.
Select the Active Test and enter the following menus: Powertrain / Engine and ECT / Active Test / Control the Fuel Pump / Speed.
Check for fuel leaks.
Check that there are no fuel leaks after performing maintenance anywhere on the fuel system.