2014 Hilux · Service Manual ENGINE

REMOVAL

Removal / installation · Vehicles built Aug 2012 – Jul 2013

Versions by build date: Jun 2011 – Jul 2012 Aug 2012 – Jul 2013 Aug 2013 – Jul 2014 from Aug 2014


1. DISCHARGE FUEL SYSTEM PRESSURE

CAUTION:
  1. Do not disconnect any part of the fuel system until you have discharged the fuel system pressure.
  2. Even after discharging the fuel pressure, place a cloth or equivalent over fittings as you separate them to reduce risk of fuel spray on yourself or in the engine compartment.

  1. Disconnect the cable from the negative (-) battery terminal.

    CAUTION:
    Wait at least 90 seconds after disconnecting the cable from the negative (-) battery terminal to prevent airbag and seat belt pretensioner activation.

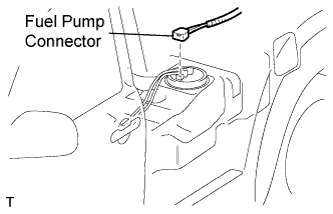
  1. A118150E01
    Disconnect the fuel pump connector.

  1. Connect the cable to the negative (-) battery terminal.

  1. Start the engine. After the engine has stopped on its own, turn the ignition switch OFF.

    HINT:
    DTC P0171/25 (system too lean) may be set.

  1. Crank the engine again, then check that the engine does not start.

  1. Loosen the fuel tank cap, then discharge the pressure in the fuel tank completely.

  1. Connect the fuel pump connector.


2. DISCONNECT CABLE FROM NEGATIVE BATTERY TERMINAL

CAUTION:
Wait at least 90 seconds after disconnecting the cable from the negative (-) battery terminal to prevent airbag and seat belt pretensioner activation.


3. REMOVE ENGINE ASSEMBLY
  1. Remove the engine from the vehicle (Click here).


4. INSTALL ENGINE TO STAND
  1. Place the engine onto the stand.


5. REMOVE IGNITION COIL
  1. Remove the bolt and ignition coil.


6. REMOVE SPARK PLUG

7. REMOVE THROTTLE BODY
  1. Disconnect the throttle position sensor and control motor connector.

  1. Disconnect the 2 water by-pass hoses.

  1. A086829E01
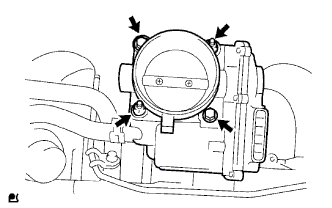
    Remove the 2 bolts, 2 nuts and throttle body.

  1. Remove the gasket.


8. REMOVE INTAKE MANIFOLD

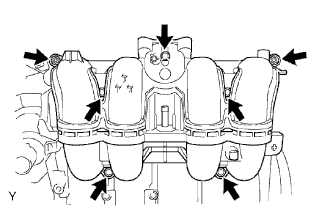
G036020E02
  1. Disconnect the crankshaft position sensor from the clamp.

  1. Remove the 5 bolts, 2 nuts, intake manifold and gasket.


9. REMOVE GENERATOR

  1. A099681E03
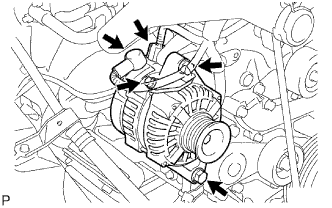
    Remove the nut, bolt and generator wire.

  1. Disconnect the generator connector.

  1. Remove the 2 bolts and generator.


10. REMOVE NO. 1 COMPRESSOR MOUNTING BRACKET

  1. A099203E02
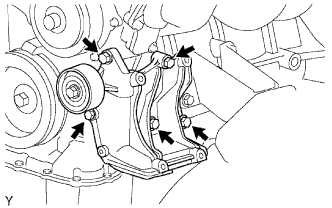
    Remove the 5 bolts and No. 1 compressor mounting bracket.


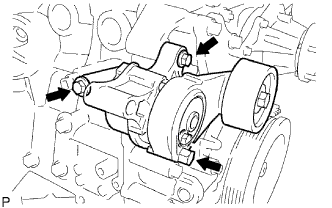
11. REMOVE DRIVE BELT TENSIONER

G035081E03
  1. Remove the 3 bolts and belt tensioner.


12. REMOVE WATER INLET
  1. Remove the bolt, 2 nuts, water inlet and gasket.


13. REMOVE THERMOSTAT
  1. Remove the thermostat and gasket.


14. REMOVE NO. 1 IDLER PULLEY
  1. Remove the bolt, pulley plate, idler pulley and spacer.


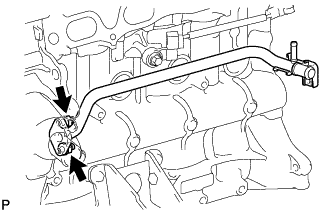
15. REMOVE NO. 1 WATER BY-PASS PIPE

  1. A289060
    Remove the 2 nuts, water by-pass pipe and gasket.


16. REMOVE OIL FILLER CAP

17. REMOVE CYLINDER HEAD COVER
  1. Remove the 19 bolts, 2 nuts, head cover and 2 gaskets.


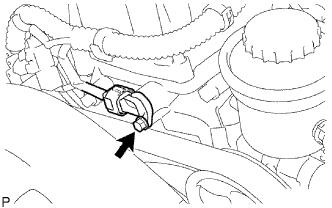
18. REMOVE CAMSHAFT POSITION SENSOR

  1. A099146E01
    Disconnect the sensor connector.

  1. Remove the bolt and sensor.


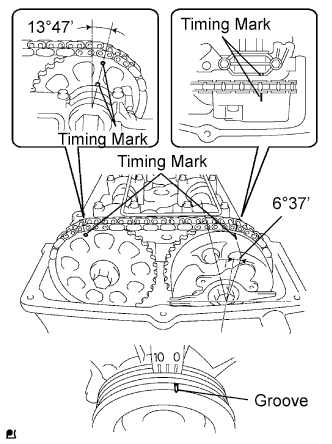
19. REMOVE CRANKSHAFT PULLEY

G038864E05
  1. Turn the crankshaft pulley, and align its groove with timing mark 0 of the timing chain cover.

  1. Check that the timing marks of the camshaft timing gear and sprocket are aligned with the timing marks of the No. 1 bearing cap, as shown in the illustration.

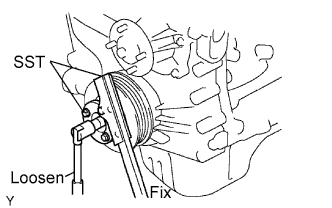
  1. A099211E02
    Using SST, loosen the pulley bolt.
    SST
    09213-54015   (91651-60855)

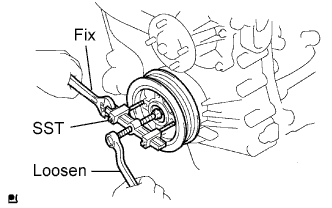
  1. G035121E02
    Using SST, remove the pulley bolt and pulley.
    SST
    09330-00021  
    09950-50013   (09951-05010, 09952-05010, 09953-05010, 09954-05021)


20. REMOVE NO. 2 OIL PAN

  1. A099215E07
    Remove the drain plug and gasket.

  1. Remove the 20 bolts and 2 nuts.

  1. Insert the blade of oil pan seal cutter between the oil pans. Cut through the applied sealer and remove the oil pan.

    NOTICE:
    Be careful not to damage the contact surfaces of the oil pans.


21. REMOVE OIL STRAINER
  1. Remove the bolt, 2 nuts, oil strainer and gasket.


22. REMOVE NO. 1 OIL PAN

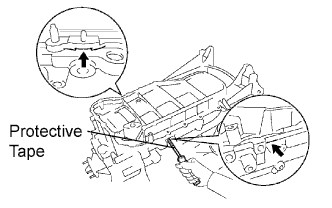
  1. G036411E02
    Remove the 16 bolts and 2 nuts.

  1. Remove the oil pan by prying between the oil pan and cylinder block with a screwdriver.

    HINT:
    Tape the screwdriver tip before use.

    NOTICE:
    Be careful not to damage the contact surfaces of the cylinder block and oil pan.

  1. Remove the O-ring.


23. REMOVE CRANKSHAFT POSITION SENSOR

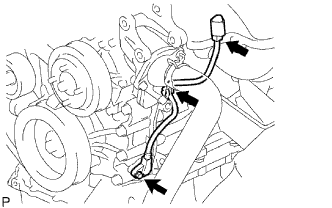
  1. A099147E04
    Disconnect the sensor connector.

  1. Disconnect the connector from the connector bracket.

  1. Detach the harness clamp.

  1. Remove the bolt and sensor.


24. REMOVE TIMING CHAIN COVER (OIL PUMP BODY)

  1. G036504E01
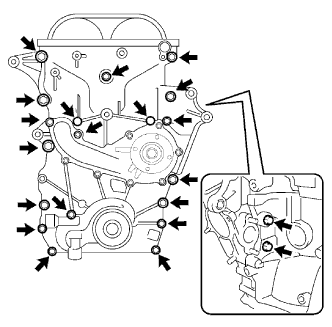
    Remove the 19 bolts and 2 nuts shown in the illustration.
  1. A097897E02
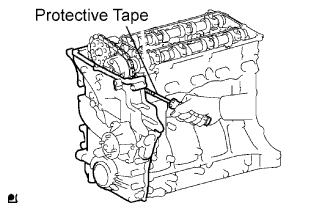
    Remove the timing chain cover by prying between the timing chain cover and cylinder head or cylinder block with a screwdriver.

    HINT:
    Tape the screwdriver tip before use.

    NOTICE:
    Be careful not to damage the contact surfaces of the cylinder head, cylinder block and timing chain cover.

  1. Remove the 3 O-rings.

  1. G036021E02
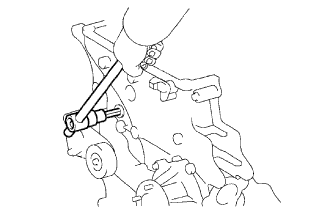
    Using a 10 mm socket hexagon wrench, remove the timing gear case plug.


25. REMOVE WATER PUMP

  1. A087223E03
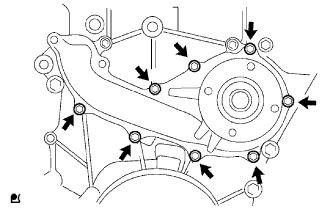
    Remove the 8 bolts, water pump and gasket.


26. REMOVE TIMING CHAIN COVER OIL SEAL

  1. A097898E01
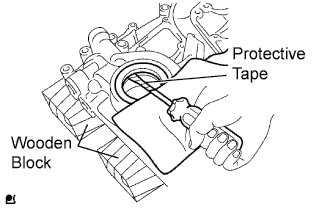
    Place the timing chain cover on wooden blocks.

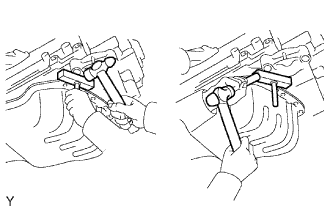
  1. Using a screwdriver with its tip taped, pry out the oil seal.

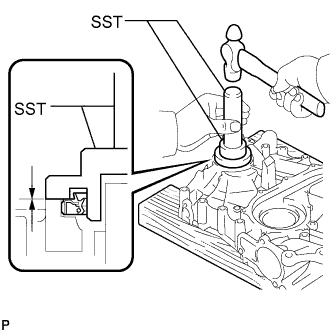
  1. A172563E01
    Using SST and a hammer, tap in a new oil seal until its surface is flush with the timing chain cover edge.
    SST
    09223-75010  
    09950-70010   (09951-07150)

    NOTICE:
    1. Keep the lip free from foreign matter.
    2. Do not tap the oil seal at an angle.

    HINT:
    When installing the crankshaft pulley, check the shape of the pulley. The correct pulley has a groove (Click here).

  1. Apply a light coat of MP grease to a new oil seal lip.

← REMOVAL (Jun 2011 – Jul 2012)REMOVAL (Aug 2013 – Jul 2014) →