REPLACEMENT
Removal / installation · Vehicles built from Jun 2011
| 1. REMOVE NO. 1 ENGINE UNDER COVER |
| 2. REMOVE NO. 2 ENGINE UNDER COVER |
| 3. DRAIN DIFFERENTIAL OIL |

for front differential:
Stop the vehicle on a level surface.
Using SST and the 10 mm straight hexagon wrench, 10 mm union nut wrench and socket adaptor, remove the differential filler plug and gasket.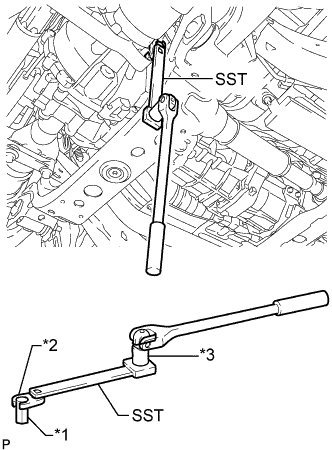

- SST
- 09961-00950
Text in Illustration *1
10 mm Straight Hexagon Wrench
*2
10 mm Union Nut Wrench
*3
Socket Adaptor
Remove the drain plug and gasket, and drain the oil.
Install a new gasket and the drain plug.
- Torque:
- 65 N*m{ 660 kgf*cm , 48 ft.*lbf }
for rear differential:
Stop the vehicle on a level surface.
Remove the differential filler plug and gasket.
Remove the drain plug and gasket, and drain the oil.
Install a new gasket and the drain plug.
- Torque:
- 49 N*m{ 500 kgf*cm , 36 ft.*lbf }
| 4. REMOVE FRONT PROPELLER SHAFT ASSEMBLY |
for TSAM Made:
(Click here)
for TMT Made:
(Click here)
| 5. REMOVE FRONT DRIVE PINION COMPANION FLANGE NUT |
Using SST and a hammer, loosen the staked part of the nut.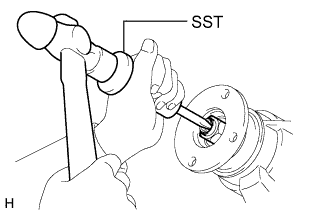
- SST
- 09930-00010
(09931-00010, 09931-00020)
Using SST to hold the companion flange, remove the nut.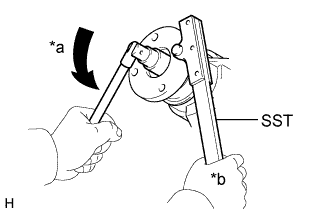
- SST
- 09330-00021
(09330-00030)
Text in Illustration *a
Turn
*b
Hold
| 6. REMOVE FRONT DRIVE PINION COMPANION FLANGE SUB-ASSEMBLY WITH DUST DEFLECTOR |
Using SST, remove the companion flange with dust deflector.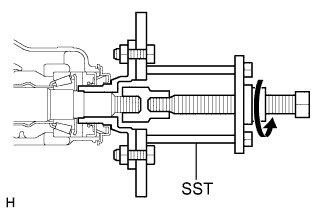
- SST
- 09950-30012
(09951-03010, 09953-03010, 09954-03010, 09955-03030, 09956-03020)
- NOTICE:
- Before using SST (center bolt), apply hypoid gear oil to its threads and tip.
| 7. REMOVE FRONT DIFFERENTIAL CARRIER OIL SEAL |
Using SST, remove the oil seal.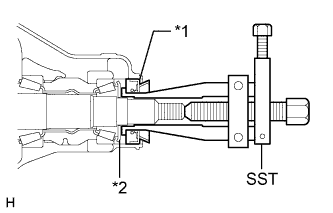
- SST
- 09308-10010
Text in Illustration *1
Oil Seal
*2
Oil Slinger
| 8. REMOVE FRONT DIFFERENTIAL DRIVE PINION OIL SLINGER |
Remove the oil slinger from the drive pinion.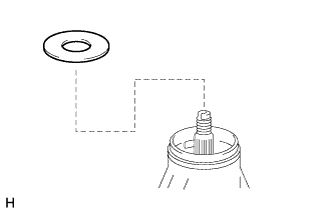
| 9. REMOVE FRONT DRIVE PINION REAR TAPERED ROLLER BEARING |
Using SST, remove the roller bearing (inner).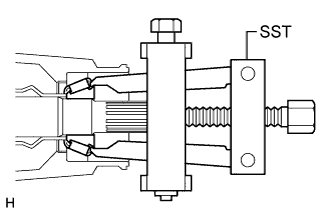
- SST
- 09556-22010
Using SST, tap out the roller bearing (outer).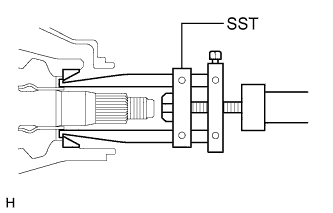
- SST
- 09308-00010
| 10. REMOVE FRONT DIFFERENTIAL OIL STORAGE RING |
Using a screwdriver and hammer, tap out the oil storage ring.
| 11. REMOVE FRONT DIFFERENTIAL DRIVE PINION BEARING SPACER |
Remove the bearing spacer from the drive pinion.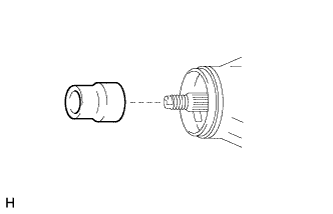
| 12. INSTALL FRONT DIFFERENTIAL DRIVE PINION BEARING SPACER |
Install a new bearing spacer.
- HINT:
- Make sure the spacer is installed correctly.
| 13. INSTALL FRONT DIFFERENTIAL OIL STORAGE RING |
Using a brass bar and hammer, tap in a new oil storage ring.
- NOTICE:
- Be careful not to damage the oil storage ring.
| 14. INSTALL FRONT DRIVE PINION REAR TAPERED ROLLER BEARING |
Using SST and a hammer, install the roller bearing (outer).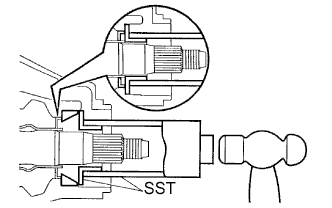
- SST
- 09316-60011
(09316-00011)
Install the roller bearing (inner).
| 15. INSTALL FRONT DIFFERENTIAL DRIVE PINION OIL SLINGER |
Install the oil slinger to the drive pinion.
| 16. INSTALL FRONT DIFFERENTIAL CARRIER OIL SEAL |
Apply MP grease to the lip of a new oil seal.
Using SST and a hammer, tap in the oil seal.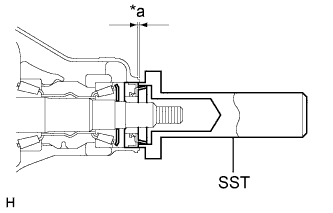
- SST
- 09554-22010
Text in Illustration *a
Oil Seal Depth
- Oil seal depth:
- 4.35 +/-0.45 mm (0.171 +/-0.0177 in.)
| 17. INSTALL FRONT DRIVE PINION COMPANION FLANGE SUB-ASSEMBLY WITH DUST DEFLECTOR |
Using SST, install the companion flange with dust deflector.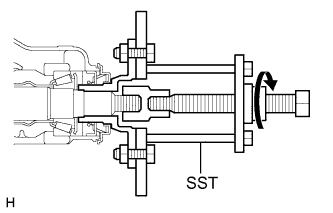
- SST
- 09950-30012
(09951-03010, 09953-03010, 09954-03010, 09955-03030, 09956-03020)
- NOTICE:
- Before using SST (center bolt), apply hypoid gear oil to its threads and tip.
Apply hypoid gear oil LSD to drive pinion thread and nut seat face.
Using SST to hold the companion flange, install a new nut.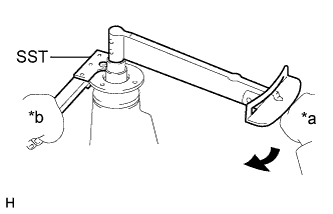
- SST
- 09330-00021
(09330-00030)
Text in Illustration *a
Turn
*b
Hold
- Torque:
- 370 N*m{ 3773 kgf*cm , 27 ft.*lbf } or less
| 18. INSPECT DIFFERENTIAL DRIVE PINION PRELOAD |
Using a torque wrench, measure the preload.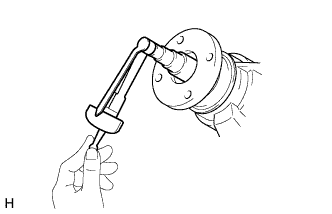
- Preload (Starting Torque):
Item
Specified Condition
New bearing
1.0 to 1.5 N*m (10 to 16 kgf*cm, 9 to 13 in.*lbf)
Reused bearing
0.5 to 0.7 N*m (6 to 7 kgf*cm, 5 to 6 in.*lbf)
- If the result is not as specified, adjust the preload (Click here).
| 19. INSPECT TOTAL PRELOAD |
Using a torque wrench, measure the preload with the teeth of the drive pinion and ring gear in contact.
- Standard total preload (starting torque):
- 0.3 to 0.8 N*m (4 to 8 kgf*cm, 3 to 7 in.*lbf) + drive pinion preload
| 20. STAKE FRONT DRIVE PINION COMPANION FLANGE NUT |
Using a chisel and hammer, stake the nut.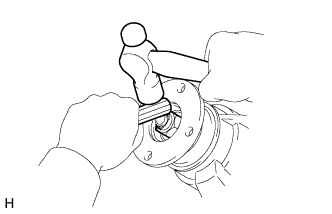
| 21. INSTALL FRONT PROPELLER SHAFT ASSEMBLY |
for TSAM Made:
(Click here)
for TMT Made:
(Click here)
| 22. ADD DIFFERENTIAL OIL |
Add differential oil so that the oil level is within 5 mm (0 to 0.196 in.) from the bottom lip of the differential filler plug hole.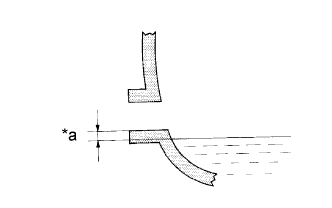
Text in Illustration *a
0 to 5 mm (0 to 0.196 in.)
- NOTICE:
- After changing the oil seal, drive the vehicle and then check the oil level again.
- Too much or too little oil will lead to differential problems.
- After changing the oil seal, drive the vehicle and then check the oil level again.
- HINT:
- If necessary, fill the differential carrier assembly with hypoid gear oil.
- Recommended viscosity:
Item
Temperature
Viscosity
Front differential (w/ A.D.D.)
SAE 75W-90
Front differential (w/o A.D.D.)
Rear differential
Above -18°C (0°F)
SAE 90
Below -18°C (0°F)
SAE 80W-90 or SAE 80W
- Differential oil type:
Item
Oil type
Front differential
Rear differential
Hypoid gear oil API GL-5 or equivalent
Rear differential (for LSD)
Hypoid gear oil LSD API GL-5 or equivalent
- Standard front differential oil capacity:
Item
Capacity
w/o A.D.D.
1.40 to 1.50 liters (1.48 to 1.58 US qts., 1.23 to 1.32 Imp. qts.)
w/ A.D.D.
1.60 to 1.70 liters (1.69 to 1.79 US qts., 1.41 to 1.49 Imp. qts.)
- TMT made Standard rear differential oil capacity:
Item
Capacity
2WD and w/ LSD
3.15 to 3.25 liters (3.33 to 3.43 US qts., 2.78 to 2.86 Imp. qts.)
4WD and w/o LSD
3.30 to 3.40 liters (3.49 to 3.59 US qts., 2.91 to 2.99 Imp. qts.)
- TSAM made :
Item
Capacity
2WD and made for DANA
2.30 to 2.40 liters (2.43 to 2.54 US qts., 2.02 to 2.11 Imp. qts.)
4WD, Pre-runner and made for DANA
(w/o LSD, A.D.D.)
2.40 to 2.50 liters (2.54 to 2.64 US qts., 2.11 to 2.20 Imp. qts.)
w/ LSD for 2WD
3.15 to 3.25 liters (3.33 to 3.43 US qts., 2.78 to 2.86 Imp. qts.)
w/ LSD for 4WD
3.30 to 3.40 liters (3.49 to 3.59 US qts., 2.91 to 2.99 Imp. qts.)
w/ Differential lock
2.85 to 2.95 liters (3.01 to 3.12 US qts., 2.51 to 2.60 Imp. qts.)
Check for oil leakage when the oil level is low.
for front differential:
Using SST and the 10 mm straight hexagon wrench, 10 mm union nut wrench and socket adaptor, install a new gasket and the differential filler plug.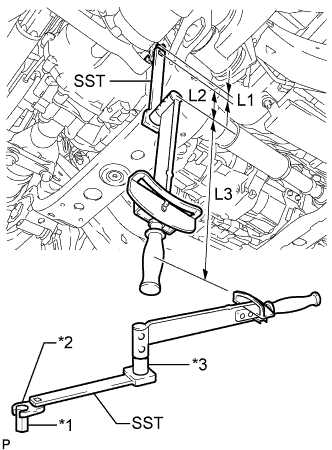
- SST
- 09961-00950
Text in Illustration *1
10 mm Straight Hexagon Wrench
*2
10 mm Union Nut Wrench
*3
Socket Adaptor
- Torque:
- 39 N*m{ 400 kgf*cm , 29 ft.*lbf }
- NOTICE:
- Make sure all the tools are connected in a straight line.
- Use the formula to calculate special torque values for situations where a union nut wrench is combined with a torque wrench.
- Formula:
- T' = T x L3 / (L1 + L2 + L3)
- T' = Spec. value of torque wrench
- T = Value of specified tightening torque
- L1 = Length of union nut wrench
- L2 = Length of SST
- L3 = Length of torque wrench
- Make sure all the tools are connected in a straight line.
for rear differential:
Install a new gasket and the differential filler plug.
- Torque:
- 49 N*m{ 500 kgf*cm , 36 ft.*lbf }
| 23. INSTALL NO. 2 ENGINE UNDER COVER |
- Torque:
- 28 N*m{ 286 kgf*cm , 21 ft.*lbf }
| 24. INSTALL NO. 1 ENGINE UNDER COVER |
- Torque:
- 28 N*m{ 286 kgf*cm , 21 ft.*lbf }