INSTALLATION
Removal / installation · Vehicles built Aug 2012 – Jul 2013
Versions by build date: Jun 2011 – Oct 2011 Nov 2011 – Mar 2012 Apr 2012 – Jul 2012 Aug 2012 – Jul 2013 Aug 2013 – Jul 2014 from Aug 2014
- HINT:
- Use the same procedure for the RH and LH sides.
- The procedure listed below is for the LH side.
| 1.
INSTALL FRONT SPRING BUMPER |
 |
Install the front spring bumper to the vehicle.
-
Torque:
- 31 N*m{
316 kgf*cm
, 23 ft.*lbf
}
| 2.
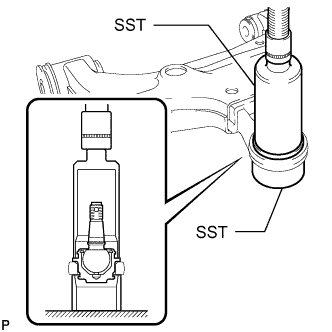
INSTALL LOWER BALL JOINT ASSEMBLY |
|
- Using SST and press, press in a new lower ball joint.
- SST
- 09226-10010
09631-32020
Install a new snap ring.
- NOTICE:
- Make sure the snap ring is securely installed in the groove.
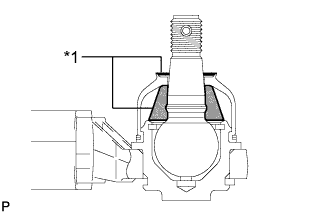
- Pack the upper ball joint with MP grease No. 2.
Text in Illustration
*1
|
MP grease No. 2
|
- Grease capacity:
- 8.0 g (0.282 oz.)
Apply MP grease to the locations shown in the illustration.
- NOTICE:
- Do not apply MP grease No. 2 to the tapered or threaded parts of the ball joint.
Install a new dust cover to the lower arm.
Install a new dust cover set ring.
| 3.
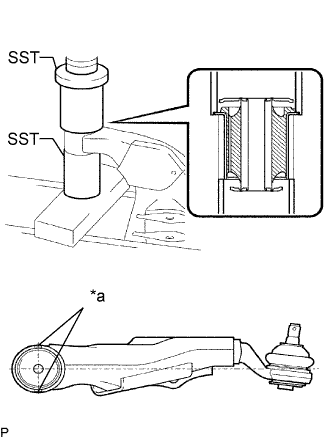
INSTALL FRONT NO. 2 LOWER ARM BUSH |
|
- Using SST and a press, install a new bush.
Text in Illustration
*a
|
Bush Positioning Protrusion
|
- SST
- 09710-20011
(09710-03081)
09726-27012
(09726-02041)
- NOTICE:
- Press the bush while making sure the bush positioning protrusions are perpendicular to the lower arm as shown in the illustration.
| 4.
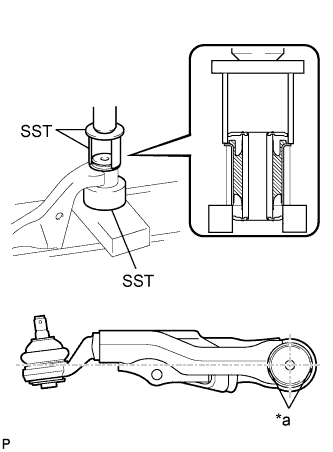
INSTALL FRONT NO. 1 LOWER ARM BUSH |
|
- Using SST and a press, press in a new bush.
Text in Illustration
*a
|
Bush Positioning Protrusion
|
- SST
- 09710-20011
(09710-06071)
09710-22021
(09710-01071)
- NOTICE:
- Press the bush while making sure the bush positioning protrusions are perpendicular to the lower arm as shown in the illustration.
| 5.
INSTALL FRONT LOWER BALL JOINT ATTACHMENT |
|
Install the ball joint attachment with the nut and a new cotter pin.
-
Torque:
- 140 N*m{
1428 kgf*cm
, 103 ft.*lbf
}
| 6.
TEMPORARILY INSTALL FRONT LOWER SUSPENSION ARM SUB-ASSEMBLY LH |
|
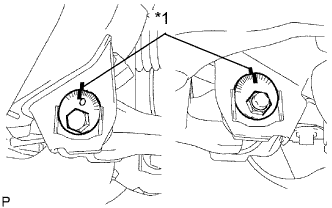
Temporarily install the lower arm, and No. 1 and No. 2 camber adjusting cams with the 2 camber adjusting cams and 2 nuts.
Text in Illustration
*1
|
Matchmark
|
Align the matchmarks on the No. 1 camber adjusting cam and No. 2 camber adjusting cam with the corresponding matchmarks on the vehicle frame.
Install the ball joint attachment with the 2 bolts.
-
Torque:
- 160 N*m{
1632 kgf*cm
, 118 ft.*lbf
}
| 7.
TEMPORARILY INSTALL FRONT SHOCK ABSORBER WITH COIL SPRING |
|
Temporarily install the shock absorber with coil spring with the bolt and nut.
| 8.
INSTALL FRONT WHEEL
|
|
-
Torque:
- 105 N*m{
1,071 kgf*cm
, 77 ft.*lbf
}
| 9.
STABILIZE SUSPENSION
|
|
Lower the vehicle.
Press down on the vehicle several times to stabilize the suspension.
| 10.
TIGHTEN FRONT LOWER SUSPENSION ARM SUB-ASSEMBLY LH |
|
Tighten the 2 nuts.
-
Torque:
- 140 N*m{
1428 kgf*cm
, 103 ft.*lbf
}
| 11.
TIGHTEN FRONT SHOCK ABSORBER WITH COIL SPRING |
|
Fix the nut in place and tighten the bolt.
-
Torque:
- 95 N*m{
969 kgf*cm
, 70 ft.*lbf
}
- NOTICE:
- Do not tighten the nut.
| 12.
INSPECT AND ADJUST FRONT WHEEL ALIGNMENT |
|
(Click here)