INSTALLATION
Removal / installation · Vehicles built from Jun 2011
| 1. INSTALL NOZZLE HOLDER AND NOZZLE SET |

Place 4 new injection nozzle seat gaskets and 4 injection nozzle seats into the injection nozzle holes of the cylinder head.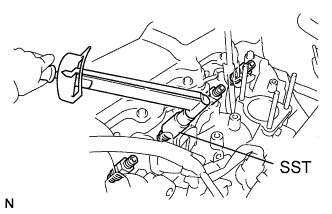

Using SST, install the 4 nozzle holders and nozzle sets.
- SST
- 09268-64010
(09268-64020)
- Torque:
- 64 N*m{ 650 kgf*cm , 47 ft.*lbf }
| 2. INSTALL NOZZLE LEAKAGE PIPE ASSEMBLY |
Install 4 new ring packing washers and the leakage pipe with the 4 nuts.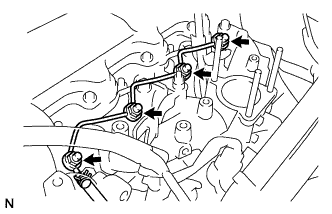
- Torque:
- 29.5 N*m{ 300 kgf*cm , 22 ft.*lbf }
Connect the fuel hose to the leakage pipe.
| 3. INSTALL NO. 1 GLOW PLUG CONNECTOR |
Remove the nut and wire harness.
Remove the 4 screw grommets, 4 nuts and glow plug connector.
| 4. INSTALL INJECTION PIPE SET |
Connect the 2 lower clamps on the intake manifold.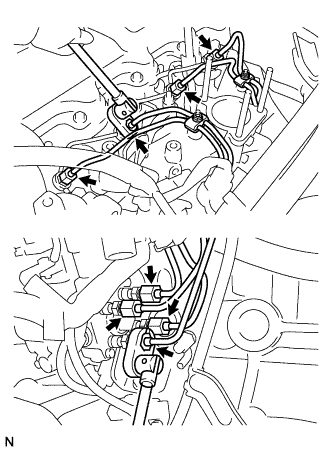
Using a union nut wrench, install the 4 injection pipes.
- Torque:
- 24.5 N*m{ 250 kgf*cm , 18 ft.*lbf }
Secure the injection pipes with the 2 upper pipe clamps and 2 nuts.
- Torque:
- 5.0 N*m{ 51 kgf*cm , 44 in.*lbf }
| 5. BLEED INJECTION PIPE |
Move the priming pump in the upper part of the fuel filter assembly up and down, and fill the injection pump assembly and fuel system with fuel.
Loosen one of the union nuts (in the nozzle side).
Crank the engine until fuel comes out from the union nut (in the nozzle side).
Tighten the union nut.
- Torque:
- 22 N*m{ 224 kgf*cm , 16 ft.*lbf } for use with SST
- 24.5 N*m{ 250 kgf*cm , 18 ft.*lbf } for use without SST
Perform the procedures above for each injection pipe.
| 6. INSTALL VENTURI |
Place a new gasket and the venturi on the intake manifold.
Connect the throttle control motor connector.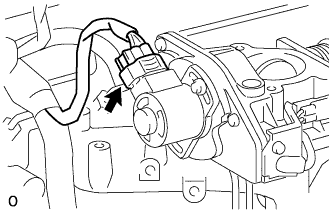
Connect the throttle open switch connector.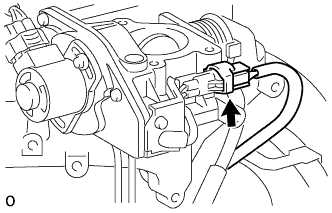
| 7. INSTALL INTAKE PIPE ASSEMBLY |
Connect the intake pipe to the intake flange with the clamp.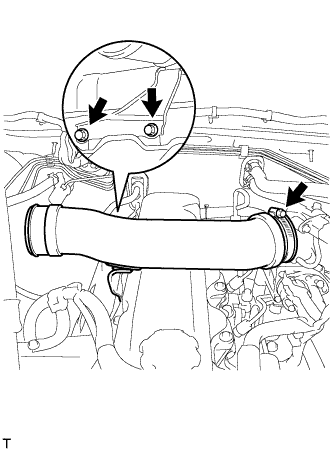
Fix the intake pipe in place with the 2 bolts and clamp.
- Torque:
- 18 N*m{ 184 kgf*cm , 13 ft.*lbf } for bolt
- 6.0 N*m{ 61 kgf*cm , 53 in.*lbf } for clamp
| 8. CONNECT AIR CLEANER HOSE |
Connect the air cleaner hose to the air cleaner and intake pipe with the 2 clamps.
Fix the intake pipe in place with the 2 clamps.
- Torque:
- 5.0 N*m{ 51 kgf*cm , 44 in.*lbf }
Connect the IAT sensor connector.
Attach the clamp of the IAT sensor harness.
| 9. CONNECT CABLE TO NEGATIVE BATTERY TERMINAL |
| 10. CHECK FOR FUEL LEAKS |
Check that there are no fuel leaks anywhere on the fuel system after performing maintenance.
- HINT:
- When checking for fuel leaks, make sure that there is pressure in fuel line.