REASSEMBLY
Removal / installation · Vehicles built Aug 2012 – Jul 2013
Versions by build date: Jun 2011 – Jul 2012 Aug 2012 – Jul 2013 from Aug 2013
- HINT:
- Use the same procedure for RHD and LHD vehicles.
- The procedure listed below is for LHD vehicles.
- Use the same procedure for RHD and LHD vehicles.
| 1. INSTALL NO. 1 COOLER THERMISTOR |

  |
- NOTICE:
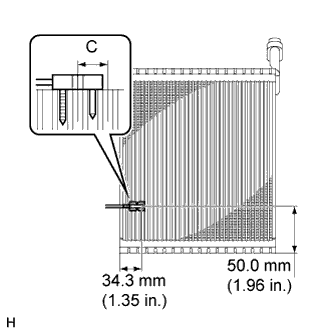
- If reusing the evaporator, do not insert the sensor at a location where the sensor was previously inserted. Insert the sensor within range C shown in the illustration.
Insert the No. 1 cooler thermistor (front evaporator temperature sensor) as shown in the illustration to install it.
| 2. INSTALL COOLER EXPANSION VALVE |
Sufficiently apply compressor oil to 2 new O-rings and the fitting surface of the hose joint.
- Compressor oil:
- ND-OIL 8 or equivalent
Install the 2 O-rings to the cooler evaporator.
Using a 4 mm socket hexagon wrench, install the cooler expansion valve with the 2 hexagon bolts.
- Torque:
- 3.5 N*m{ 35 kgf*cm , 30 in.*lbf }
| 3. INSTALL NO. 1 COOLER EVAPORATOR SUB-ASSEMBLY |
Install the No. 1 cooler evaporator sub-assembly to the case.
Attach the clamp.
Attach the 3 claws to install the cover.
Install the 4 screws.
| 4. INSTALL MODE DAMPER SERVO SUB-ASSEMBLY |
Install the mode damper servo sub-assembly with the 3 screws.
Set the mode damper servo sub-assembly so that the tooth of the gear engages with the cutout part as shown in the illustration to install the lever.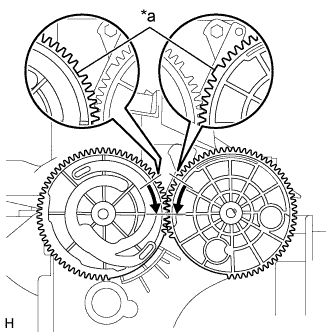
Text in Illustration *a
Cut Part
Attach the claw.
| 5. INSTALL AIR MIX DAMPER SERVO SUB-ASSEMBLY |
Install the air mix damper servo sub-assembly with the 3 screws.
| 6. INSTALL HEATER RADIATOR UNIT SUB-ASSEMBLY |
Attach the evaporator case to the blower case.
Install the heater radiator unit sub-assembly with the screw.
| 7. INSTALL QUICK HEATER ASSEMBLY |
Install the quick heater assembly with the 2 screws.
Attach the 2 clamps.
| 8. INSTALL BLOWER ASSEMBLY |
Attach the blower assembly with the 3 screws.