HOW TO PROCEED WITH TROUBLESHOOTING
Specifications · Vehicles built Aug 2012 – Jul 2013
Versions by build date: Jun 2011 – Jul 2012 Aug 2012 – Jul 2013 from Aug 2013
| OPERATION FLOW |
- HINT:
- Perform troubleshooting in accordance with the procedures below. The following is an outline of basic troubleshooting procedures. Confirm the troubleshooting procedures for the circuit you are working on before beginning troubleshooting.
| 1.VEHICLE BROUGHT TO WORKSHOP |
| |||||

| 2.CUSTOMER PROBLEM ANALYSIS |
Ask the customer about the conditions and environment when the problem occurred.
| |||||
| 3.INSPECT BATTERY VOLTAGE |
- Standard voltage:
- 11 to 14 V
| |||||
| 4.SYMPTOM CONFIRMATION AND DTC (AND FREEZE FRAME DATA) CHECK |
Visually check the wire harnesses, connectors and fuses for open and short circuits.
Warm up the engine to the normal operating temperature.
Confirm the problem symptoms and conditions, and check for DTCs.
Result Result
Proceed to
DTC is output
A
DTC is not output
B
|
|||||
| |||||

| 5.DTC CHART |
Check the results obtained in the DTC check. Then find the output DTC in the DTC chart. Look at the "Trouble Area" column for a list of potentially malfunctioning circuits and / or parts.
|
| 6.PROBLEM SYMPTOMS TABLE |
Check the results obtained in the symptom confirmation. Then find the problem symptoms in the problem symptoms table. Look at the "Suspected Area" column for a list of potentially malfunctioning circuits and / or parts.
| |||||
| 7.CIRCUIT INSPECTION OR PARTS INSPECTION |
Confirm the malfunctioning circuit or part.
| |||||
| 8.ADJUST, REPAIR OR REPLACE |
Adjust, repair or replace the malfunctioning circuit or parts.
| |||||
| 9.CONFIRMATION TEST |
After the adjustment, repairs or replacement, confirm that the malfunction no longer exists. If the malfunction does not reoccur, perform a confirmation test under the same conditions and in the same environment as when the malfunction occurred the first time.
| |||||
| CUSTOMER PROBLEM ANALYSIS |
- HINT:
- In troubleshooting, confirm that the problem symptoms have been accurately identified. Preconceptions should be discarded in order to make an accurate judgment. To clearly understand what the problem symptoms are, it is extremely important to ask the customer about the problem and the conditions at the time the malfunction occurred.
- Gather as much information as possible for reference. Past problems that seem unrelated may also help in some cases.
- In troubleshooting, confirm that the problem symptoms have been accurately identified. Preconceptions should be discarded in order to make an accurate judgment. To clearly understand what the problem symptoms are, it is extremely important to ask the customer about the problem and the conditions at the time the malfunction occurred.
- The 5 following questions are important points in the problem analysis:
What
Vehicle model, system name
When
Date, time, occurrence frequency
Where
Road conditions
Under what conditions?
Running conditions, driving conditions, weather conditions
How did it happen?
Problem symptoms
| SYMPTOM CONFIRMATION AND DIAGNOSTIC TROUBLE CODE |
- HINT:
- The diagnostic system in the HILUX has various functions.
- The first function is the Diagnostic Trouble Code (DTC) check. A DTC is a code stored in the ECU memory whenever a malfunction in the signal circuits to the ECU occurs. In a DTC check, a previous malfunction's DTC can be checked by a technician during troubleshooting.
- The first function is the Diagnostic Trouble Code (DTC) check. A DTC is a code stored in the ECU memory whenever a malfunction in the signal circuits to the ECU occurs. In a DTC check, a previous malfunction's DTC can be checked by a technician during troubleshooting.
- Another function is the Input Signal Check, which checks if the signals from various switches are sent to the ECU correctly.
By using these functions, the problem areas can be narrowed down and troubleshooting will be more effective. Diagnostic functions are incorporated in the following system in the HILUX.System
DTC Check
(Normal Mode)
DTC Check
(Check Mode)
Freeze Frame Data
Sensor Check/Test Mode (Input Signal Check)
Data List
Active Test
Customize Parameter
SFI System (for 1GR-FE)
○
○
○
-
○
○
-
ECD System (for 1KD-FTV, w/ DPF)
○
○
○
-
○
○
-
ECD System (for 1KD-FTV, w/ EGR Cooler)
○
○
○
-
○
○
-
ECD System (for 1KD-FTV, w/o EGR Cooler)
○
○
○
-
○
○
-
ECD System (for 2KD-FTV, w/ DPF)
○
○
○
-
○
○
-
ECD System (for 2KD-FTV, w/ EGR Cooler)
○
○
○
-
○
○
-
ECD System (for 2KD-FTV, w/o EGR Cooler)
○
○
○
-
○
○
-
ECD System (for 5L-E)
○
○
○
-
○
○
-
SFI System (for 1TR-FE)
○
○
○
-
○
○
-
SFI System (for 2TR-FE)
○
○
○
-
○
○
-
Charging System (for 1GR-FE)
-
-
-
-
-
-
-
Charging System (for 1KD-FTV)
-
-
-
-
-
-
-
Charging System (for 2KD-FTV)
-
-
-
-
-
-
-
Charging System (for 5L-E)
-
-
-
-
-
-
-
Charging System (for 1TR-FE)
-
-
-
-
-
-
-
Charging System (for 2TR-FE)
-
-
-
-
-
-
-
Automatic Transmission System (for A340E)
○
○
○
-
○
○
-
Automatic Transmission System (for A340F, 2KD-FTV)
○
○
○
-
○
○
-
Electronic Controlled Automatic Transmission System (for A340F, 1KD-FTV)
○
○
○
-
○
○
-
Automatic Transmission System (for A343E)
○
○
○
-
○
○
-
Automatic Transmission System (for A343F)
○
○
○
-
○
○
-
Electronic Controlled Automatic Transmission System (for A750E)
○
○
○
-
○
○
-
Automatic Transmission System (for A750F, for 1KD-FTV)
○
○
○
-
○
○
-
Electronic Controlled Automatic Transmission System (for A750F, for 1GR-FE)
○
○
○
-
○
○
-
Anti-lock Brake System
○
-
○
○
○
○
-
Anti-lock Brake System (w/ Rear Differential Lock)
○
-
○
○
○
○
-
Vehicle Stability Control System
○
-
○
○
○
○
-
Air Conditioning System (for Manual Air Conditioning System)
-
-
-
-
-
-
-
Air Conditioning System (for Cold Area)
-
-
-
-
-
-
-
Air Conditioning System (Automatic Air Conditioning System)
○
-
-
-
○
-
-
Airbag System
○
○
-
-
○
-
-
Seat Belt Warning System
-
-
-
-
-
-
-
Theft Deterrent System
-
-
-
-
-
-
-
Engine Immobiliser System
○
-
-
-
○
○
-
Cruise Control System
○
-
-
-
○
-
-
Lighting System
-
-
-
-
-
-
-
Wiper and Washer System
-
-
-
-
-
-
-
Power Door Lock Control System
-
-
-
-
-
-
○
Power Door Lock Control System (for 2 Step Unlock Function)
-
-
-
-
-
-
○
Wireless Door Lock Control System (for Built-in Type Door Control Receiver)
-
-
-
-
-
-
○
Wireless Door Lock Control System (for Non-built-in Type Door Control Receiver)
-
-
-
-
-
-
-
Meter / Gauge System
-
-
-
-
○
○
○
Audio and Visual System (for Radio Receiver Type)
○
-
-
-
-
-
-
Audio and Visual System (for Radio and Display Type)
○
-
-
-
-
-
-
Rear View Monitor System
-
-
-
-
-
-
-
Horn System
-
-
-
-
-
-
-
Power Window Control System
-
-
-
-
-
-
-
Window Defogger System
-
-
-
-
-
-
-
Power Mirror Control System
-
-
-
-
-
-
-
Front Power Seat Control System
-
-
-
-
-
-
-
Seat Heater System
-
-
-
-
-
-
-
CAN Communication System (w/ VSC)
-
-
-
-
-
-
-
- Another function is the Input Signal Check, which checks if the signals from various switches are sent to the ECU correctly.
- In the DTC check, it is very important to determine whether the problem indicated by the DTC is either: 1) still occurring, or 2) occurred in the past but has since returned to normal. In addition, the DTC should be compared to the problem symptom to see if they are related. For this reason, DTCs should be checked before and after confirmation of symptoms (i.e., whether or not problem symptoms exist) to determine current system conditions, as shown in the flowchart below.
- In the DTC check, it is very important to determine whether the problem indicated by the DTC is either: 1) still occurring, or 2) occurred in the past but has since returned to normal. In addition, the DTC should be compared to the problem symptom to see if they are related. For this reason, DTCs should be checked before and after confirmation of symptoms (i.e., whether or not problem symptoms exist) to determine current system conditions, as shown in the flowchart below.
- Never skip the DTC check. Failing to check DTCs may, depending on the case, result in unnecessary troubleshooting for systems operating normally or lead to procedures not related to the problem. Follow the procedures listed in the flowchart in the correct order.
- Never skip the DTC check. Failing to check DTCs may, depending on the case, result in unnecessary troubleshooting for systems operating normally or lead to procedures not related to the problem. Follow the procedures listed in the flowchart in the correct order.
- The following flowchart shows how to proceed with troubleshooting using the DTC check. Directions from the flowchart will indicate how to proceed either to DTC troubleshooting or to the troubleshooting of each problem symptom.
- The following flowchart shows how to proceed with troubleshooting using the DTC check. Directions from the flowchart will indicate how to proceed either to DTC troubleshooting or to the troubleshooting of each problem symptom.
| 1.DTC CHECK |
| |||||
| 2.MAKE A NOTE OF DTCS DISPLAYED AND THEN CLEAR MEMORY |
| |||||
| 3.SYMPTOM CONFIRMATION |
| Result |
Proceed to |
| No symptoms exist |
A |
| Symptoms exist |
B |
|
|||||
| |||||
| 4.SIMULATION TEST USING SYMPTOM SIMULATION METHODS |
| |||||
| 5.DTC CHECK |
| Result |
Proceed to |
| DTC is not output |
A |
| DTC is output |
B |
|
|||||
| |||||
| 6.SYMPTOM CONFIRMATION |
| Result |
Proceed to |
| No symptoms exist |
A |
| Symptoms exist |
B |
|
|||||
| |||||
| SYMPTOM SIMULATION |
- HINT:
- The most difficult case in troubleshooting is when no problem symptoms occur. In such a case, a thorough problem analysis must be carried out. A simulation of the same or similar conditions and environment in which the problem occurred in the customer's vehicle should be performed. No matter how much skill or experience a technician has, troubleshooting without confirming the problem symptoms will lead to important repairs being overlooked and mistakes or delays.
- For example:
- With a problem that only occurs when the engine is cold or as a result of vibration caused by the road during driving, the problem cannot be determined if the symptoms are being checked on a stationary vehicle or a vehicle with a warmed-up engine. Vibration, heat or water penetration (moisture) is difficult to reproduce. The symptom simulation tests below are effective substitutes for the conditions and can be applied on a stationary vehicle.
Important points in the symptom simulation test: In the symptom simulation test, the problem symptoms as well as the problem area or parts must be confirmed. First, narrow down the possible problem circuits according to the symptoms. Then, connect the tester and carry out the symptom simulation test, judging whether the circuit being tested is defective or normal. Also, confirm the problem symptoms at the same time. Refer to the problem symptoms table for each system to narrow down the possible causes.
To reproduce DTCs, it is necessary to satisfy the respective DTC detection conditions.
VIBRATION METHOD: When a malfunction seems to occur as a result of vibration.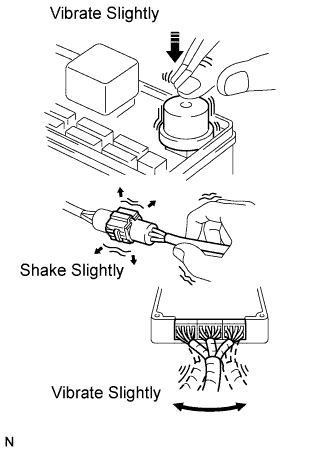

PART AND SENSOR
Apply slight vibration with a finger to the part of the sensor suspected to be the cause of the problem, and check whether or not the malfunction occurs.- NOTICE:
- Applying strong vibration to relays may open relays.
CONNECTORS
Slightly shake the connector vertically and horizontally.WIRE HARNESS
Slightly shake the wire harness vertically and horizontally.- HINT:
- The connector joint and fulcrum of the vibration are the major areas that should be checked thoroughly.
HEAT METHOD: When a malfunction seems to occur as a result of heat.
Heat the component that is the possible cause of the malfunction with a hair dryer or similar device. Check if the malfunction occurs.
- NOTICE:
- Do not heat to more than 60°C (140°F). Exceeding this temperature may damage components.
- Do not apply heat directly to the parts in an ECU.
- Do not heat to more than 60°C (140°F). Exceeding this temperature may damage components.
WATER SPRINKLING METHOD: When a malfunction seems to occur on a rainy day or in high humidity.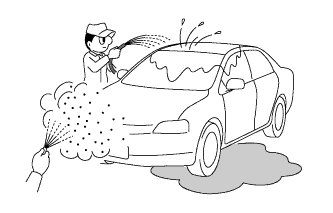
Sprinkle water onto the vehicle and check if the malfunction occurs.
- NOTICE:
- Never sprinkle water directly into the engine compartment. Indirectly change the temperature and humidity by spraying water onto the front of the radiator.
- Never apply water directly onto the electronic components.
- Never sprinkle water directly into the engine compartment. Indirectly change the temperature and humidity by spraying water onto the front of the radiator.
- HINT:
- If the vehicle has or had a water leakage problem, the leakage may have damaged ECUs or connections. Look for evidence of corrosion or short circuits. Proceed with caution during water tests.
HIGH ELECTRICAL LOAD METHOD: When a malfunction seems to occur when the electrical load is excessive.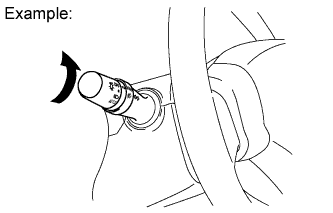
Turn on the heater blower, headlights, rear window defogger and all other electrical loads. Check if the malfunction occurs.
| DIAGNOSTIC TROUBLE CODE CHART |
| Item |
Description |
| DTC No. |
Indicates the diagnostic trouble code. |
| Detection Item |
Indicates the system or details of the problem. |
| Trouble Area |
Indicates the suspected areas of the problem. |
| See Page |
Indicates where the inspection procedures for each circuit can be found, or gives instructions for checking and repairs. |
| PROBLEM SYMPTOMS TABLE |
- HINT:
- In some cases, the problem is not detected by the diagnostic system even though a problem symptom is present. It is possible that the problem is occurring outside the detection range of the diagnostic system, or that the problem is occurring in a completely different system.
| Item |
Description |
| Symptom |
- |
| Suspected Area |
Indicates the circuit or part which needs to be checked. |
| See Page |
Indicates where the flowchart for each circuit is located. |
| CIRCUIT INSPECTION |
| Item |
Description |
| Description |
The major role of the circuit, its operation and its component parts are explained. |
| DTC No., DTC Detection Condition, Trouble Area |
Indicates the diagnostic trouble codes, diagnostic trouble code detection conditions, and trouble areas of a problem. |
| Wiring Diagram |
This shows a wiring diagram of a circuit. Use this diagram together with an ELECTRICAL WIRING DIAGRAM to thoroughly understand the circuit. |
| Inspection Procedures |
Use the inspection procedures to determine if the circuit is normal or abnormal. If abnormal, use the inspection procedures to determine whether the problem is located in the sensors, actuators, wire harnesses or ECU. |
| Indicates the condition of the connector of the ECU during the check |
Connector being checked is connected. Connections of tester are indicated by (+) or (-) after the terminal name. Connector being checked is disconnected. For illustrations of inspections between a connector and body ground, information about the body ground is not shown in the illustration. |