DATA LIST / ACTIVE TEST
System information · Vehicles built Jun 2011 – Jul 2012
Versions by build date: Jun 2011 – Jul 2012 from Aug 2012
| READ DATA LIST |
- HINT:
- Using the intelligent tester's Data List allows switch, sensor, actuator, and other item values to be read without removing any parts. Reading the Data List early in troubleshooting is one way to save time.
- NOTICE:
- In the table below, the values listed under "Normal Condition" are reference values. Do not depend solely on these reference values when deciding whether a part is faulty or not.
Warm up the engine.
Turn the ignition switch OFF.
Connect the intelligent tester to the DLC3.
Turn the ignition switch ON.
Turn the intelligent tester ON.
Enter the following menus: Powertrain / Engine and ECT / Data List.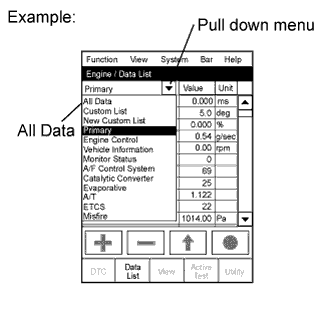

- HINT:
- To display the entire Data List, press the pull down menu button next to Primary. Then select All Data.
Read the Data List.
Tester Display
Measurement Item/Range
Normal Condition
Diagnostic Note
Vehicle Speed
Vehicle speed:
Min.: 0 km/h, Max.: 255 km/h
Actual vehicle speed
Speed indicated on speedometer
Engine Speed
Engine speed:
Min.: 0 rpm, Max.: 16,383.75 rpm
700 to 800 rpm: Idling after engine warmed up
-
Calculate Load
Calculated load by ECM:
Min.: 0%, Max.: 100%
- 10 to 40%: Idling after engine warmed up
- 10 to 40%: Running without load (2500 rpm)
-
MAF
Air flow rate from MAF meter:
Min.: 0 g/sec., Max.: 655.35 g/sec.
- 3 to 10 g/sec.: Idling after engine warmed up
- 20 to 28 g/sec.: Running without load (2000 rpm)
If value approximately 0 g/sec.: - Mass air flow meter power source circuit open
- VG circuit open or shorted
- EVG circuit open
Atmosphere Pressure
Atmospheric pressure value:
Min.: 0 kPa,
Max.: 255 kPa
Actual atmospheric pressure
-
MAP
Absolute pressure inside intake manifold:
Min.: 0 kPa, Max.: 255 kPa
- 95 to 105 kPa: Idling after engine warmed up
- 95 to 115 kPa: Running without load (2000 rpm)
- 120 to 140 kPa: Running without load (3000 rpm)
-
Coolant Temp
Engine coolant temperature:
Min.: -40°C, Max.: 140°C
80 to 95°C (176 to 203°F):
After engine warmed up
If value is -40°C (-40°F) or 140°C (284°F), sensor circuit open or shorted
Intake Air
Intake air temperature:
Min.: -40°C, Max.: 140°C
Equivalent to temperature at location of mass air flow meter
If value is -40°C (-40°F) or 140°C (284°F), sensor circuit open or shorted
Intake Air Temp (Turbo)
Intake air temperature after intercooler:
Min.: -40°C, Max.: 140°C
Changes depending on operating conditions
-
Engine Run Time
Engine run time:
Min.: 0 seconds,
Max.: 65,535 seconds
Time after engine started
Service data
Initial Engine Coolant Temp
Initial engine coolant temperature:
Min.: -40°C, Max.: 120°C
ECT when engine starts
-
Initial Intake Air Temp
Initial intake air temperature:
Min.: -40°C, Max.: 120°C
Intake air temperature when engine starts
-
Battery Voltage
Battery voltage:
Min.: 0 V,
Max.: 65.535 V
9 to 14 V: Idling
-
Alternate Duty Ratio
Alternate duty ratio:
Min.: 0%, Max.: 100%
- No electrical load:
20 to 60%
- High electrical load:
100%
-
Pre Glow
Pre-glow operation:
ON or OFF
-
This is the ECM command.
After Glow
After-glow operation:
ON or OFF
-
This is the ECM command.
Accel Position
Accelerator position status:
Min.: 0%, Max.: 99.60%
- Accelerator pedal released:
0%
- Accelerator pedal depressed:
99.60%
Read value with ignition switch ON (do not start engine)
Accel Sens. No.1 Volt %
Accelerator position No. 1:
Min.: 0%, Max.: 100%
- Accelerator pedal released:
10 to 22%
- Accelerator pedal fully depressed:
52 to 90%
Read value with ignition switch ON (do not start engine)
Accel Sens. No.2 Volt %
Accelerator position No. 2:
Min.: 0%, Max.: 100%
- Accelerator pedal released:
24 to 40%
- Accelerator pedal fully depressed:
68 to 99%
Read value with ignition switch ON (do not start engine)
Target Throttle Position
Target throttle position:
Min.: -128%, Max.: 127%
- Throttle valve fully opened:
0%
- Throttle valve fully closed:
100%
If there is a malfunction of the throttle actuator, compare the target and actual throttle position values for troubleshooting.
Actual Throttle Position
Actual diesel throttle position:
Min.: -20%, Max.: 120%
-
-
Throttle Close Learning Val.
Throttle fully closed position learned value:
Min.: 0 deg, Max.: 84 deg
-
-
Diesel Throttle Learn Status
Diesel throttle learning status:
OK or NG
OK
-
Injection Volume
Injection volume:
Min.: 0 mm3/st, Max.: 1,279.98 mm3/st
3 to 10 mm3/st: Idling
-
Inj. FB Vol. for Idle
Idle stability status integral control volume:
Min.: -80 mm3/st, Max.: 79.9975 mm3/st
-10 to 10 mm3/st
-
Inj Vol Feedback Learning
Injection volume compensation learned value:
Min.: -10 mm3/st, Max.: 9.92 mm3/st
-4.0 to 4.0 mm3/st: Idling
-
Injection Feedback Val #1
Injection volume correction for cylinder 1:
Min.: -10 mm3/st, Max.: 10 mm3/st
-3.0 to 3.0 mm3/st: Idling
- "Injection Feedback Val" more than 3.0 mm3/st: Injector breakdown is causing injection volume deviation, or insufficient compression is causing poor combustion.
- Even if "Injection Feedback Val" for a cylinder is less than -3.0 mm3/st, the cylinder with this value does not necessarily have a problem.
- HINT:
- The ECM adjusts each cylinder so that the average "Injection Feedback Val" of the 4 cylinders is approximately 0 mm3/st.
- If more than one cylinder has a positive correction value, a normal cylinder may have a value less than -3.0 mm3/st.
- The ECM adjusts each cylinder so that the average "Injection Feedback Val" of the 4 cylinders is approximately 0 mm3/st.
Injection Feedback Val #2
Injection volume correction for cylinder 2:
Min.: -10 mm3/st, Max.: 10 mm3/st
-3.0 to 3.0 mm3/st: Idling
Injection Feedback Val #3
Injection volume correction for cylinder 3:
Min.: -10 mm3/st, Max.: 10 mm3/st
-3.0 to 3.0 mm3/st: Idling
Injection Feedback Val #4
Injection volume correction for cylinder 4:
Min.: -10 mm3/st, Max.: 10 mm3/st
-3.0 to 3.0 mm3/st: Idling
Pilot 1 Injection Period
Pilot 1 injection period:
Min.: 0 μs, Max.: 65,535 μs
350 to 450 μs: Idling
-
Pilot 2 Injection Period
Pilot 2 injection period:
Min.: 0 μs, Max.: 65,535 μs
350 to 450 μs: Idling
-
Main Injection Period
Main injection period:
Min.: 0 μs, Max.: 65,535 μs
450 to 640 μs: Idling
-
After Injection Period
After injection period:
Min.: 0 μs, Max.: 65,535 μs
-
-
Pilot 1 Injection Timing
Pilot 1 injection timing:
Min.: -70°CA, Max.: 20°CA
-14.2 to -13.2°CA: Idling after engine warmed up and vehicle is under normal atmospheric pressure
-
Pilot 2 Injection Timing
Pilot 2 injection timing:
Min.: -50°CA, Max.: 20°CA
-7.7 to -6.7°CA: Idling after engine warmed up and vehicle is under normal atmospheric pressure
-
Main Injection Timing
Main injection timing:
Min.: -90°CA, Max.: 90°CA
2.8°CA: Idling after engine warmed up and vehicle is under normal atmospheric pressure
-
After Injection Timing
After injection timing:
Min.: -10°CA, Max.: 50°CA
-
-
Injector Memory Error
Injector Memory Error:
No Error or Error
No Error
If the fuel injector compensation codes are not input into the new ECM, or if a fuel injector compensation code of a different injector model or a compensation code representing a value which exceeds the compensation setting range is input into the new ECM, DTC P1601 is stored and "Injector Memory Error" displays "Error".
Reju Pilot Quantity Learning
Pilot quantity learning prohibition state:
READY or NG
-
-
Pilot Quantity Learning
State of "Pilot Quantity Learning":
Standby / Wait / Learn / Stop / Comple
-
If "Pilot Quantity Learning" is incomplete, the MIL illuminates and DTC P1601 is stored.
Injection Pressure Correction
Injection pressure correction:
Min.: -500 mm3/st,
Max.: 780 mm3/st
-400 to 400 mm3/st
-
Target Common Rail Pressure
Target common rail pressure:
Min.: 0 kPa, Max.: 655350 kPa
20000 to 180000 kPa
-
Fuel Press
Fuel pressure:
Min.: 0 kPa, Max.: 655350 kPa
25000 to 35000 kPa: Idling
-
Common Rail Pres Sens 2
Common rail pressure sensor (Sub)
Min.: 0 kPa, Max.: 655350 kPa
25000 to 35000 kPa: Idling
-
Fuel Temperature
Fuel temperature:
Min.: -40°C, Max.: 215°C
Actual fuel temperature
ECD freeze frame data
Fuel Return Temp
Fuel return temperature:
Min.: -40°C, Max.: 215°C
Idling after engine warmed up: 35 to 85°C
If the "Fuel Return Temp" value is not between 35°C (95°F) and 110°C (230°F), "Pilot Quantity Learning" is prohibited.
Target Pump SCV Current
Pump current target final value:
Min.: 0 mA, Max.: 4000 mA
-
-
Pressure Discharge Valve
Pressure discharge valve operation:
ON or OFF
ON: Pressure discharge valve open
This is the ECM command.
Target EGR Position
EGR valve target opening angle:
Min.: 0%, Max.: 100%
Level surface, engine warmed up and engine idling:
50 to 100%
-
Actual EGR Valve Pos.
EGR valve position:
Min.: 0%, Max.: 100%
Idling after engine warmed up:
60 to 80%
-
EGR Lift Sensor Volt %
EGR lift position:
Min.: 0%, Max.: 99.6%
-
-
EGR Close Learn Val.
EGR valve lift volume learned value:
Min.: 0 V, Max.: 5 V
idling: 0 to 1V
-
EGR Close Lrn. Val.
EGR fully closed position learned value:
Min.: 0 V, Max.: 5 V
Level surface, room temperature, engine warmed up and engine idling:
0 to 1V
-
EGR Close Lrn. Status
EGR valve fully closed position learning status:
OK or NG
OK
-
EGR Operation Prohibit
EGR operation prohibition:
OK or NG
OK: Possible to perform "Control the EGR Step Position" Active Test
- OK: "EGR Valve Control Active Test Possible" Condition.
- NG: "Not Possible" Condition.
Target Booster Pressure
Target booster pressure:
Min.: 0 kPa, Max.: 320 kPa
Idling and vehicle under normal atmospheric pressure:
95 to 105 kPa
-
VN Turbo Command
VN turbo command:
Min.: 0%, Max.: 100%
0 to 100%
"VN Turbo Command" is a command value.
VN Turbo Type
VN turbo type:
Not or Commo or Vacuum
Commo
-
VN Turbo Max Angle
VN turbo max angle:
Min.: 0%, Max.: 100%
90%: Idling after engine warmedup
-
VN Turbo Min Angle
VN turbo min angle:
Min.: 0%, Max.: 100%
20 to 30%: Full throttle
-
Starter Signal
Starter signal:
ON or OFF
ON: Cranking
-
Clutch Switch
Clutch switch:
ON or OFF
ON: Clutch pedal depressed
-
Stop Light Switch
Stop light switch:
ON or OFF
- ON: Brake pedal depressed
- OFF: Brake pedal released
-
A/C Signal
A/C signal:
ON or OFF
ON: A/C ON
-
Immobiliser Communication
Immobiliser communication:
ON or OFF
- ON: Normal
- OFF: Engine cannot be started due to immobiliser communication malfunction
-
Check Mode
Check mode:
ON or OFF
ON: Check mode ON
-
SPD Test Result
Check mode result for vehicle speed sensor:
Compl or Incompl
-
-
# Codes(Include History)
Number of codes:
Min.: 0, Max.: 255
-
Number of detected DTCs
MIL
MIL status:
ON or OFF
ON: MIL ON
-
MIL ON Run Distance
MIL ON run distance:
Min.: 0 km, Max.: 65535 km
Distance after DTC detected
-
Running Time from MIL ON
Running time from MIL ON:
Min.: 0 minutes, Max.: 65535 minutes
Equivalent to running time after MIL turned ON
-
Time After DTC Cleared
Time after DTC cleared:
Min.: 0 minutes,
Max.: 65,535 minutes
Equivalent to time after DTCs were erased
-
Distance from DTC Cleared
Distance after DTC cleared:
Min.: 0 km,
Max.: 65,535 km
Equivalent to driving distance after DTCs were erased
-
Warmup Cycle Cleared DTC
Warmup cycles after DTC cleared:
Min.: 0,
Max.: 255
-
Number of warmup cycles after DTC cleared
OBD Requirements
Identifying OBD requirement
-
-
Number of Emission DTC
Number of emissions-related DTCs
-
-
TC and TE1
TC and TE1 terminal of DLC3:
ON or OFF
-
Active Test support data
Engine Start Time
Engine start time:
Min.: 0 ms,
Max.: 267000 ms
-
Time necessary for the engine to start.
Engine Speed (Starter Off)
Engine speed when starter off:
Min.: 0 rpm,
Max.: 1593 rpm
-
Engine speed immediately after starting the engine.
Starter Count
Starter on count:
Min.: 0,
Max.: 255
-
Number of times the starter turned on from the time the ignition switch was turned to ON.
Run Dist of Previous Trip
Distance driven during previous trip:
Min.: 0 km,
Max.: 326 km
-
Used to confirm the driving conditions of the previous trip (before the malfunction occurred).
Electric Duty Feedback Value
Electric load feedback value:
Min.: 0 mm3/st,
Max.: 39.8 mm3/st
0 to 10 mm3/st
Expected injection volume increase after the electrical load turns from off to on.
A/C Duty Feedback Value
A/C load feedback value:
Min.: 0 mm3/st,
Max.: 39.8 mm3/st
0 to 10 mm3/st
Expected injection volume increase after the A/C turns from off to on.
PS Duty Feedback Value
Power steering load feedback value:
Min.: 0 mm3/st,
Max.: 39.8 mm3/st
0 to 10 mm3/st
Expected injection volume increase after the power steering turns from off to on.
Idle Injection Volume (Min)
Injection volume feedback learned value:
Min.: 0 mm3/st,
Max.: 39.8 mm3/st
0 to 5 mm3/st
- When the engine is warmed up and in a stable idling condition, this learning will be performed.
- Only when the ignition switch is turned off is the learned value updated gradually.
Swirl Control Valve VSV
VSV for swirl control valve status:
ON or OFF
ON: Idling
-
ACT VSV
A/C cut status for Active Test:
ON or OFF
-
Active Test support data
Model Code
Model code
-
Identifying model code
Engine Type
Engine type
-
Identifying engine type:
2KDFTV
Cylinder Number
Cylinder number:
Min.: 0, Max.: 255
-
Identifying cylinder number:
4
Transmission Type
Transmission type
-
Identifying transmission type:
MT / ECT 4th / ECT 5th
Destination
Destination
-
Identifying destination:
W / Q
Model Year
Model year:
Min.: 1900, Max.: 2155
-
Identifying model year:
200#
System Identification
System Identification
-
-
Engine Speed of Cyl #1
Engine speed for No. 1 cylinder:
Min.: 0 rpm, Max.: 51199 rpm
"Engine speed" of all cylinders almost same
- Output only when the Active Test "Check the Cylinder Compression" is performed.
- Indicates the speed of each cylinder when cranking.
Engine Speed of Cyl #2
Engine speed for No. 2 cylinder:
Min.: 0 rpm, Max.: 51199 rpm
"Engine speed" of all cylinders almost same
As above
Engine Speed of Cyl #3
Engine speed for No. 3 cylinder:
Min.: 0 rpm, Max.: 51199 rpm
"Engine speed" of all cylinders almost same
As above
Engine Speed of Cyl #4
Engine speed for No. 4 cylinder:
Min.: 0 rpm, Max.: 51199 rpm
"Engine speed" of all cylinders almost same
As above
Av Engine Speed of All Cyl
Engine speed for all cylinders:
Min.: 0 rpm, Max.: 51199 rpm
-
As above
- HINT:
- Normal Condition: If no idling conditions are specified, the shift lever should be in the neutral position, and the A/C switch and all accessory switches should be OFF.
- 10 to 40%: Idling after engine warmed up
| PERFORM ACTIVE TEST |
- HINT:
- Performing the intelligent tester's Active Test allows relay, VSV, actuator and other items to be operated without removing any parts. Performing the Active Test early in troubleshooting is one way to save time.
- The Data List can be displayed during the Active Test.
Connect the intelligent tester to the DLC3.
Turn the ignition switch ON.
Turn the intelligent tester ON.
Enter the following menus: Powertrain / Engine and ECT / Active Test.
Perform the Active Test.
Tester Display
Test Part
Control Range
Diagnostic Note
Activate the VSV for Swirl Control Valve
Activate the VSV for swirl control valve
ON/OFF
-
Control the A/C cut Signal
Control the A/C signal
ON/OFF
-
Connect the TC and TE1
Turn on TC and TE1 connection
ON/OFF
-
Activate the VSV for EGR Cut
Activate VSV (for EGR Cut)
ON/OFF
-
Control the EGR Step Position
Control the electric EGR control valve assembly
0 to 100%
Test is possible when the following conditions are met: - Ignition switch ON.
- Engine is stopped.
Activate the EGR Valve Close
Activate the electric EGR control valve assembly
ON/OFF
Confirm that the vehicle is stopped and the engine is idling
Activate the VN Turbo Open
Activate the turbocharger
ON/OFF
Confirm that the engine is running.
Test the Turbo Charger Step Motor
Activate the turbocharger
40 to 100%
Test is possible when the following conditions are met: - Ignition switch ON.
- Engine is stopped.
Test the Fuel Leak
Pressurizes common rail internal fuel pressure, and checks for fuel leaks
Stop/Start
- Fuel pressure inside common rail pressurized to specified value and engine speed increased to 2,000 rpm when ON is selected
- Above conditions preserved while test is ON
Control the Cylinder#1 Fuel Cut
Cut off fuel injection from No. 1 injector
ON/OFF
Fuel injection stopped while test is ON
Control the Cylinder#2 Fuel Cut
Cut off fuel injection from No. 2 injector
ON/OFF
As above
Control the Cylinder#3 Fuel Cut
Cut off fuel injection from No. 3 injector
ON/OFF
As above
Control the Cylinder#4 Fuel Cut
Cut off fuel injection from No. 4 injector
ON/OFF
As above
Check the Cylinder Compression*
Check the cylinder compression pressure
ON/OFF
Fuel injection stops in all cylinders.
- Ignition switch ON.
- HINT:
- *: When cranking the engine, the Active Test measures the speed of each cylinder. In this Active Test, the fuel of all cylinders is cut when the engine is cranked for approximately 10 seconds.
- Warm up the engine.
- Turn the ignition switch off.
- Connect the intelligent tester to the DLC3.
- Turn the ignition switch to ON and turn the tester on.
- Enter the following menus: Powertrain / Engine and ECT / Active Test / Check the Cylinder Compression.
- HINT:
- If the results are not displayed normally, select the display items from the Data List before performing the Active Test. Enter the following menus: Powertrain / Engine and ECT / Data List / Compression / Engine Speed of Cyl #1, Engine Speed of Cyl #2, Engine Speed of Cyl #3, Engine Speed of Cyl #4 and Av Engine Speed of All Cyl.
- While the engine is not running, press the RIGHT or LEFT button to change Check the Cylinder Compression to ON.
- HINT:
- After performing the above procedure, the Active Test Check the Cylinder Compression will start. Fuel injection for all cylinders is prohibited, and the engine speed measurement of each cylinder will enter standby mode.
- Crank the engine for about 10 seconds.
- Monitor the engine speed (Engine Speed of Cyl #1 to #4, Av Engine Speed of All Cyl) displayed on the tester.
- HINT:
- At first, the tester display will show the engine speed measurement of each cylinder to be extremely high. After approximately 10 seconds of engine cranking, the engine speed measurement of each cylinder will change to the actual engine speed.
- NOTICE:
- After the Active Test Check the Cylinder Compression is turned on, it will automatically turn off after 255 seconds.
- When the Check the Cylinder Compression test is off and the engine is cranked, the engine will start.
- If the Check the Cylinder Compression test needs to be performed after it is turned on and performed once, press EXIT to return to the Active Test menu screen. Then perform the Check the Cylinder Compression test again.
- Use a fully-charged battery.
- After the Active Test Check the Cylinder Compression is turned on, it will automatically turn off after 255 seconds.
| SYSTEM CHECK |
Activate the Pressure Discharge Valve Check
- HINT:
- This is the procedure for troubleshooting fuel pressure control malfunctions and combustion problems.
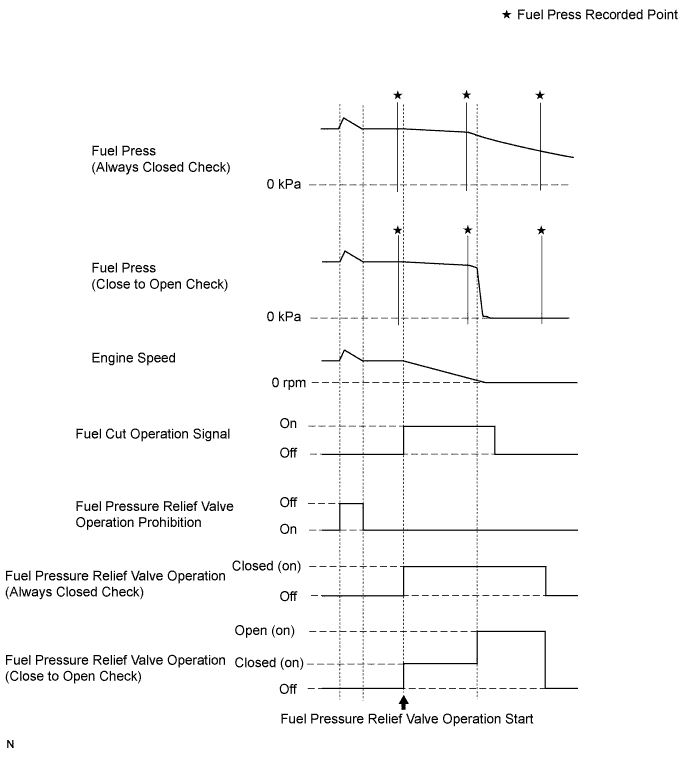
- Malfunctions can be determined by checking the fuel pressure when performing a fuel cut and operating the pressure discharge valve with the intelligent tester.
- During "Pressure Discharge Valve Check", the intelligent tester measures the fuel pressure while the engine is running, after the engine is stopped, and after the pressure discharge valve operates.
- This is the procedure for troubleshooting fuel pressure control malfunctions and combustion problems.
Connect the intelligent tester to the DLC3.
Turn the ignition switch to ON.
Turn the tester on.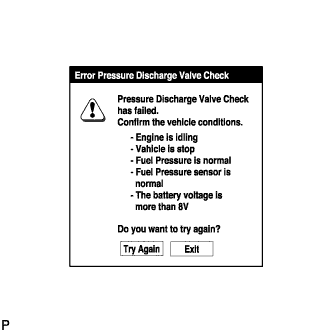
- NOTICE:
- Confirm the following conditions:
- Engine is idling.
- Vehicle is stopped.
- Fuel pressure is not extremely high (less than 100000 kPa).
- Fuel pressure sensor is normal.
- Battery voltage is more than 8 V.
- Engine is idling.
Enter the following menus: Powertrain / Engine and ECT / Utility / Pressure Discharge Valve Check.
Press "Next".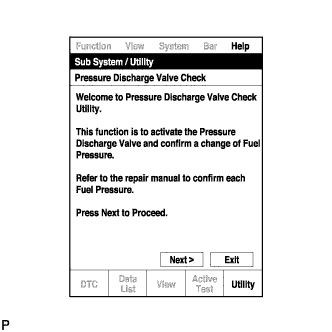
Press "Next" again to proceed.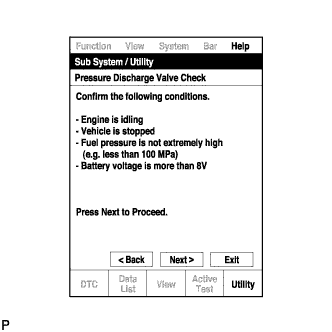
Select the "Pressure Discharge Valve Check" type.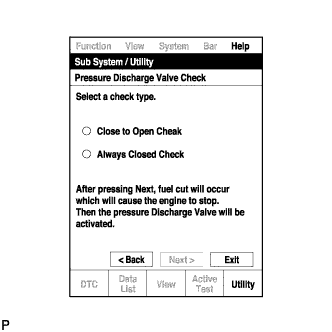
- HINT:
- "Close to Open Check" opens the pressure discharge valve after the engine stops.
- "Always Closed Check" holds the pressure discharge valve closed during the check.
- "Close to Open Check" opens the pressure discharge valve after the engine stops.
Press "Next".
Perform troubleshooting based on the measurement results.
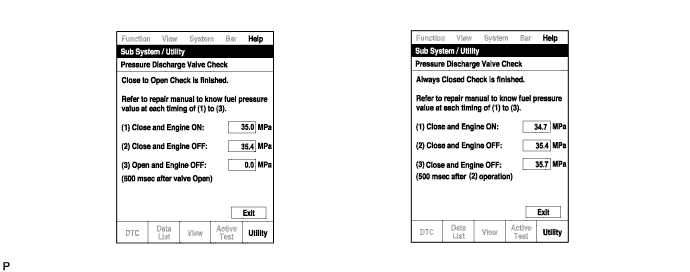
- HINT:
- During "Close to Open Check", if there is no large change in fuel pressure when the pressure discharge valve is closed while the engine is running and after the engine is stopped, and if the value is 0 kPa when the pressure discharge valve is open, the system is normal.
- Perform "Always Closed Check" if the value is not 0 kPa when the pressure discharge valve is open during "Close to Open Check". If the results are the same as during "Close to Open Check", there is a pressure discharge valve operation malfunction.
- If the fuel temperature is high, perform "Pressure Discharge Valve Check" after the fuel has cooled to the outside air temperature.
- If a large amount of fuel is leaking, the fuel pressure decreases when the engine is stopped. However, the condition of the pressure discharge valve can still be determined by comparing the measurement results of "Close to Open Check" and "Always Closed Check".
- During "Close to Open Check", if there is no large change in fuel pressure when the pressure discharge valve is closed while the engine is running and after the engine is stopped, and if the value is 0 kPa when the pressure discharge valve is open, the system is normal.
-