INSTALLATION
Removal / installation · Vehicles built from Aug 2013
Versions by build date: Jun 2011 – Jul 2012 Aug 2012 – Jul 2013 from Aug 2013
| 1.
INSTALL STEERING COLUMN ASSEMBLY |
 |
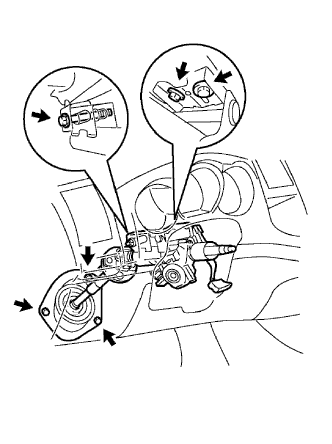
Install the steering column with the 3 bolts.
-
Torque:
- 21 N*m{
214 kgf*cm
, 15 ft.*lbf
}
| 2.
INSTALL STEERING COLUMN HOLE COVER SUB-ASSEMBLY |
|
- Install the cover with the 3 bolts.
-
Torque:
- 5.0 N*m{
51 kgf*cm
, 44 in.*lbf
}
| 3.
CONNECT CONNECTOR |
|
Connect the connectors.
| 4.
INSTALL STEERING SLIDING YOKE |
|
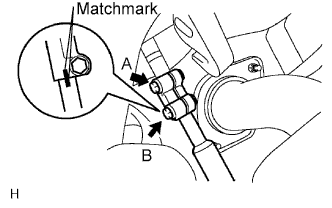
- Align the matchmarks on the steering yoke and steering intermediate shaft.
Install the bolt labeled B.
-
Torque:
- 35 N*m{
357 kgf*cm
, 26 ft.*lbf
}
Tighten the bolt labeled A.
-
Torque:
- 35 N*m{
357 kgf*cm
, 26 ft.*lbf
}
| 5.
INSTALL HEADLIGHT DIMMER SWITCH ASSEMBLY
|
|
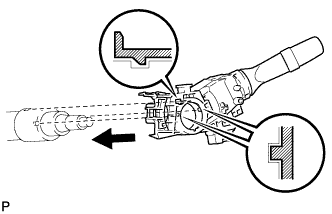
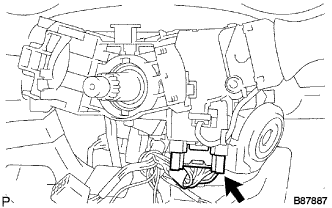
- Install the headlight dimmer switch with the claw as shown in the illustration.
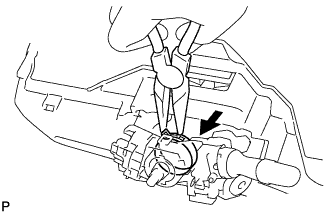
- Install the headlight dimmer switch with the clamp.
- Connect the connector.
| 6.
INSTALL WIPER AND WASHER SWITCH ASSEMBLY
|
|
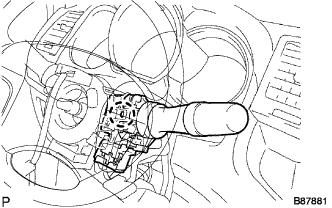
- Attach the claw to install the windshield washer switch.
- NOTICE:
- Do not push the claw with excessive force as damage may occur.
Connect the connectors.
| 7.
INSTALL SPIRAL CABLE SUB-ASSEMBLY
|
|
Check that the front wheels are facing straight ahead.
Set the turn signal switch to the neutral position.
- NOTICE:
- Make sure that the turn signal switch is in the neutral position, as the pin of the turn signal switch may be snapped.
Install the spiral cable.
- NOTICE:
- When replacing the spiral cable with a new one, remove the lock pin before installing the steering wheel.
Connect the connectors to the spiral cable.
- NOTICE:
- When handling the airbag connector, do not damage the airbag wire harness.
| 8.
INSTALL LOWER INSTRUMENT PANEL FINISH PANEL SUB-ASSEMBLY
|
|
Attach the 3 guides, 2 claws and 3 clips to install the lower instrument panel finish panel.
| 9.
INSTALL STEERING COLUMN UPPER COVER |
|
| 10.
INSTALL STEERING COLUMN LOWER COVER |
|
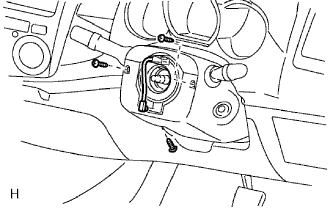
Install the cover lower with the 3 screws.
| 11.
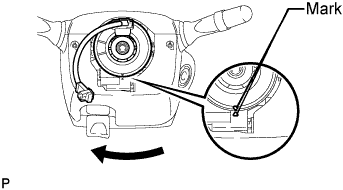
ADJUST SPIRAL CABLE
|
|
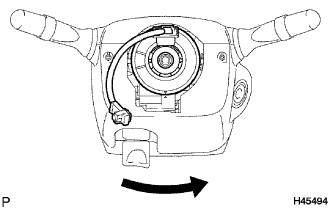
Slowly rotate the spiral cable counterclockwise by hand until it feels firm.
- NOTICE:
- Do not use the airbag wire harness to turn the spiral cable.
- Rotate the spiral cable clockwise approximately 2.5 turns to align the marks.
- NOTICE:
- Do not use the airbag wire harness to turn the spiral cable.
- HINT:
- The spiral cable will rotate approximately 2.5 turns to the left and right from the center.
| 12.
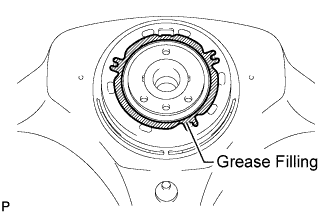
INSTALL STEERING WHEEL ASSEMBLY |
|
- for 3 spoke:
Apply the silicon grease to the steering wheel.
Align the matchmarks on the steering wheel and main shaft.
Install the steering set nut.
-
Torque:
- 50 N*m{
510 kgf*cm
, 37 ft.*lbf
}
| 13.
INSTALL STEERING WHEEL ORNAMENT NO.2 (for 4 Spoke without Steering Pad Switch) |
|
Attach the 2 pins and install the steering wheel ornament.
Install the screw.
| 14.
INSTALL STEERING WHEEL ORNAMENT NO.1 (for 4 Spoke without Steering Pad Switch) |
|
Attach the 2 pins and install the steering wheel ornament.
Install the screw.
| 15.
INSTALL STEERING PAD SWITCH ASSEMBLY (for 4 Spoke with Steering Pad Switch) |
|
(Click here)
| 16.
INSTALL STEERING PAD ASSEMBLY (for 4 Spoke) |
|
(Click here)
| 17.
INSTALL STEERING PAD ASSEMBLY (for 3 Spoke) |
|
Connect the horn wire.
Attach the 3 pins and install the steering pad.
| 18.
PLACE FRONT WHEELS FACING STRAIGHT AHEAD |
|
| 19.
CONNECT CABLE TO NEGATIVE BATTERY TERMINAL |
|
| 20.
PERFORM INITIALIZATION |
|
Perform initialization (Click here).
- NOTICE:
- Certain systems need to be initialized after disconnecting and reconnecting the cable from the negative (-) battery terminal.