INSTALLATION
Removal / installation · Vehicles built from Aug 2013
Versions by build date: Jun 2011 – Jul 2012 Aug 2012 – Jul 2013 from Aug 2013
| 1. CLEAN TURBOCHARGER SUB-ASSEMBLY |
| 2. INSTALL NO. 1 TURBO WATER PIPE SUB-ASSEMBLY |

Connect the No. 1 turbo water hose to the No. 1 turbo water pipe sub-assembly.
Install a new gasket and No. 1 turbo water pipe sub-assembly with the bolt and 2 nuts.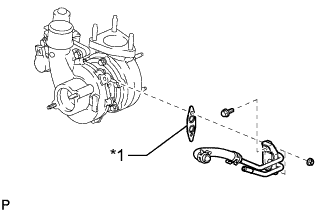

- Torque:
- for bolt:
- 8.0 N*m{ 82 kgf*cm , 71 in.*lbf }
- for nut:
- 12 N*m{ 122 kgf*cm , 9 ft.*lbf }
Text in Illustration *1
New Gasket
| 3. INSTALL TURBOCHARGER SUB-ASSEMBLY |
Temporarily install a new gasket and the turbocharger sub-assembly with 3 new nuts.
- HINT:
- When installing the turbo oil pipe sub-assembly, loosely tighten the 3 nuts so that the turbocharger sub-assembly and cylinder head can be aligned easily.
Temporarily install the turbo oil pipe sub-assembly.
- HINT:
- Before installing the turbo oil pipe sub-assembly, clean it.
Temporarily install a new gasket and the turbo oil pipe sub-assembly with the 2 nuts.
- NOTICE:
- The notch (narrow part) of the gasket must face the engine.
Temporarily install a new gasket and the turbo oil pipe sub-assembly with the 2 bolts.
- NOTICE:
- The claws of the gasket must face the pipe.
Temporarily install a new gasket and the turbo oil pipe sub-assembly with the union bolt.
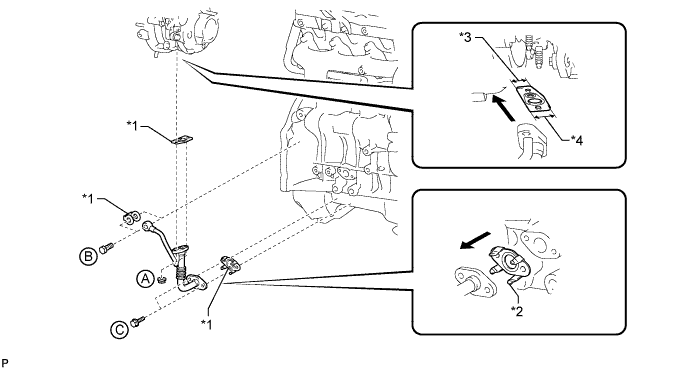
Text in Illustration *1
New Gasket
*2
Claw
*3
Narrow
*4
Wide

Outside
-
-
Temporarily install the turbocharger stay with the 2 bolts and nut.
Tighten the 3 nuts of the turbocharger sub-assembly.
- Torque:
- 52 N*m{ 530 kgf*cm , 38 ft.*lbf }
Tighten the 2 nuts labeled A.
- Torque:
- 13 N*m{ 133 kgf*cm , 10 ft.*lbf }
Tighten the union bolt labeled B.
- Torque:
- 26 N*m{ 265 kgf*cm , 19 ft.*lbf }
Tighten the 2 bolts labeled C.
- Torque:
- 12 N*m{ 122 kgf*cm , 9 ft.*lbf }
Tighten the 2 bolts and nut of the turbocharger stay in the order shown in the illustration.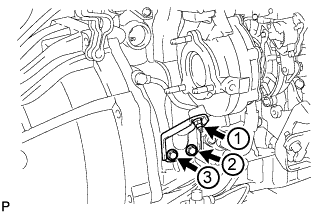
- Torque:
- 38 N*m{ 387 kgf*cm , 28 ft.*lbf }
| 4. INSTALL TURBINE OUTLET ELBOW |
Install a new gasket and the outlet elbow with the 3 nuts.
- Torque:
- 26 N*m{ 265 kgf*cm , 19 ft.*lbf }
| 5. INSTALL NO. 1 EXHAUST MANIFOLD HEAT INSULATOR |
Temporarily install the heat insulator with the 2 bolts.
Tighten the bolt of the turbo insulator, and the 2 bolts of the heat insulator.
- Torque:
- 12 N*m{ 122 kgf*cm , 9 ft.*lbf }
| 6. INSTALL NO. 1 TURBO INSULATOR |
Temporarily install the turbo insulator with the bolt.
| 7. INSTALL COMPRESSOR INLET ELBOW (for RHD) |
Connect the 2 No. 1 turbo water hoses to the No. 2 water by-pass pipe sub-assembly and the cylinder block.
Install a new gasket and inlet elbow with the 2 nuts.
- Torque:
- 19 N*m{ 194 kgf*cm , 14 ft.*lbf }
Connect the 2 connectors and attach the wire harness clamp.
| 8. INSTALL COMPRESSOR INLET ELBOW (for LHD) |
Install the No. 12 water by-pass hose to the compressor inlet elbow.
Install the No. 7 water by-pass hose to the compressor inlet elbow.
Install a new gasket and the compressor inlet elbow with the 2 nuts.
- Torque:
- 19 N*m{ 194 kgf*cm , 14 ft.*lbf }
Connect the No. 13 water by-pass hose to the No. 2 water by-pass pipe sub-assembly.
Connect the No. 2 water by-pass hose and the No. 1 turbo water pipe sub-assembly.
Connect the No. 1 turbo water hose to the cylinder block.
Connect the 2 connectors and attach the wire harness clamp.
| 9. INSTALL VENTILATION PIPE |
Install the ventilation pipe with the bolt.
- Torque:
- 20 N*m{ 204 kgf*cm , 15 ft.*lbf }
for LHD:
Connect the No. 12 water by-pass hose and No. 13 water by-pass hose.
| 10. INSTALL INTERCOOLER ASSEMBLY |
| 11. INSTALL AIR CLEANER ASSEMBLY |
Install the air cleaner assembly with the 2 bolts.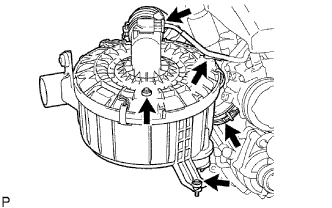
- Torque:
- 14 N*m{ 143 kgf*cm , 10 ft.*lbf }
Tighten the hose clamp of the compressor inlet elbow.
Connect the mass air flow meter connector and install the clamp.
| 12. INSTALL FRONT EXHAUST PIPE ASSEMBLY |
Using a vernier caliper, measure the free length of the compression spring.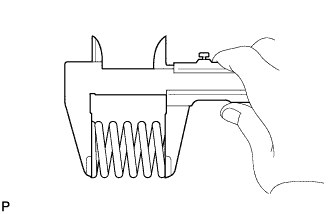
- Minimum length:
- 40 mm (1.57 in.)
Install the front pipe to the pipe support.
Install a new gasket to the outlet pipe.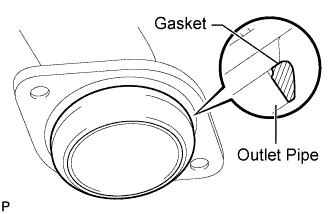
- NOTICE:
- Be careful with the installation direction of the gasket.
- Be careful with the installation direction of the gasket.
- Do not reuse the gasket.
- Do not reuse the gasket.
- To ensure a proper seal, do not use the front pipe to force the gasket onto the outlet pipe.
- To ensure a proper seal, do not use the front pipe to force the gasket onto the outlet pipe.
- HINT:
- Using a plastic-faced hammer, uniformly strike the gasket so that the gasket and outlet pipe are properly fit.
Install the front pipe with the 2 compression springs and 2 bolts. Alternately tighten the bolts in several passes.
- Torque:
- 43 N*m{ 438 kgf*cm , 32 ft.*lbf }
- CAUTION:
- Do not reuse the gasket.
| 13. INSTALL FRONT FENDER SEAL |
Install the front fender seal with the 5 clips.
| 14. INSTALL FRONT FENDER APRON SEAL UPPER |
for 4WD:
Install the front fender apron seal upper with the 5 clips.
for 2WD:
Install the front fender apron seal upper with the 6 clips.
| 15. CONNECT CABLE TO NEGATIVE BATTERY TERMINAL |
- NOTICE:
- When disconnecting the cable, some systems need to be initialized after the cable is reconnected (Click here).
| 16. ADD ENGINE COOLANT |
Tighten the radiator drain cock plug by hand.
Tighten the cylinder block drain cock plug.
- Torque:
- 8.0 N*m{ 82 kgf*cm , 71 in.*lbf }
Fill the radiator with TOYOTA Super Long Life Coolant (SLLC) to the reservoir tank's B line.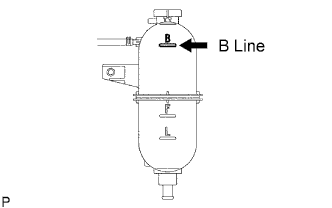
- Standard capacity:
Item
Specified Condition
A/T
11.1 liters (11.7 US qts, 9.8 Imp. qts)
M/T
9.8 liters (10.4 US qts, 8.6 Imp. qts)
- HINT:
- TOYOTA vehicles are filled with TOYOTA SLLC at the factory. In order to avoid damage to the engine cooling system and other technical problems, only use TOYOTA SLLC or similar high quality ethylene glycol based non-silicate, non-amine, non-nitrite, non-borate coolant with long-life hybrid organic acid technology (coolant with long-life hybrid organic acid technology consists of a combination of low phosphates and organic acids).
- TOYOTA vehicles are filled with TOYOTA SLLC at the factory. In order to avoid damage to the engine cooling system and other technical problems, only use TOYOTA SLLC or similar high quality ethylene glycol based non-silicate, non-amine, non-nitrite, non-borate coolant with long-life hybrid organic acid technology (coolant with long-life hybrid organic acid technology consists of a combination of low phosphates and organic acids).
- Please contact your TOYOTA dealer for further details.
- Please contact your TOYOTA dealer for further details.
- NOTICE:
- Never use water as a substitute for engine coolant.
Press the inlet and outlet radiator hoses several times by hand, and then check the level of the coolant.
If the coolant level drops below the B line, add TOYOTA SLLC to the B line.
Install the radiator reservoir cap.
Using a wrench, install the vent plug.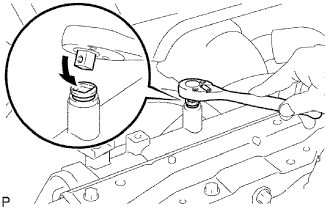
- Torque:
- 2.0 N*m{ 20 kgf*cm , 18 in.*lbf }
Bleed air from the cooling system.
Warm up the engine until the thermostat opens. While the thermostat is open, circulate the coolant for several minutes.
Maintain the engine speed at 2,500 to 3,000 rpm.
Press the inlet and outlet radiator hoses several times by hand to bleed air.
- CAUTION:
- When pressing the radiator hoses:
- Wear protective gloves.
- Wear protective gloves.
- Be careful as the radiator hoses are hot.
- Be careful as the radiator hoses are hot.
- Keep your hands away from the radiator fan.
- Keep your hands away from the radiator fan.
Stop the engine and wait until the coolant cools down to ambient temperature.
- CAUTION:
- Do not remove the radiator reservoir cap while the engine and radiator are still hot. Pressurized, hot engine coolant and steam may be released and cause serious burns.
After the coolant cools down, check that the coolant level is at the F line.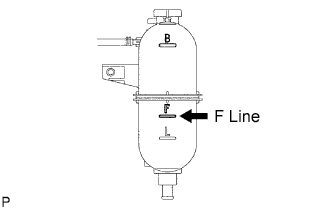
If the coolant level is below the F line, add TOYOTA SLLC to the F line.
| 17. INSPECT FOR COOLANT LEAK |
| 18. INSPECT FOR OIL LEAK |
| 19. INSPECT ENGINE OIL LEVEL |
| 20. INSTALL NO. 2 ENGINE UNDER COVER (for 4WD) |
- Torque:
- 28 N*m{ 286 kgf*cm , 21 ft.*lbf }
| 21. INSTALL NO. 1 ENGINE UNDER COVER (for 4WD) |
- Torque:
- 28 N*m{ 286 kgf*cm , 21 ft.*lbf }