INSPECTION
Inspection · Vehicles built from Jun 2011
| INSPECT INJECTION GEAR BEARING |

Check that the bearing is not rough or worn.
If necessary, replace the injection gear.
| INSPECT NO. 1 IDLE GEAR OIL CLEARANCE |
Using a cylinder gauge, measure the inside diameter of the idle gear.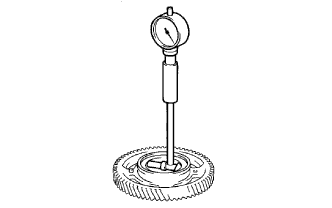

- Standard idle gear inside diameter:
- 44.000 to 44.025 mm (1.7323 to 1.7333 in.)
Using a micrometer, measure the diameter of the idle gear shaft.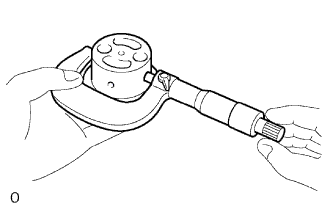
- Standard idle gear shaft diameter:
- 43.955 to 43.990 mm (1.7305 to 1.7319 in.)
Subtract the idle gear shaft diameter measurement from the idle gear inside diameter measurement.
- Standard oil clearance:
- 0.01 to 0.07 mm (0.0004 to 0.0028 in.)
- Maximum oil clearance:
- 0.20 mm (0.0079 in.)
| INSPECT INTAKE MANIFOLD |
Using a precision straightedge and feeler gauge, measure the warpage of the surface of the intake manifold that contacts the cylinder head.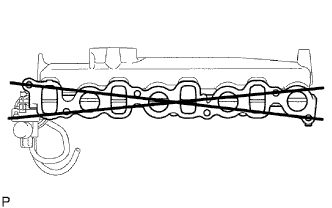
- Maximum warpage:
- 0.4 mm (0.0157 in.)
| INSPECT EXHAUST MANIFOLD |
Using a precision straightedge and feeler gauge, measure the warpage of the surface of the exhaust manifold that contacts the cylinder head.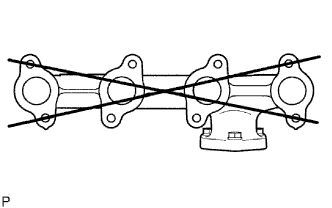
- Maximum warpage:
- 0.4 mm (0.0157 in.)
| INSPECT CAMSHAFT |
Inspect the circle runout.
Place the camshaft on V-blocks.
Using a dial indicator, measure the circle runout at the center journal.
- Maximum circle runout:
- 0.03 mm (0.0012 in.)
Inspect the cam lobe height.
Using a micrometer, measure the cam lobe height.
- Standard cam lobe height:
- 46.99 to 47.09 mm (1.850 to 1.854 in.)
- Minimum cam lobe height:
- 46.57 mm (1.833 in.)
Inspect the diameter of the camshaft journal.
Using a micrometer, measure the diameter of the camshaft journal for the camshaft bearing.
- Standard diameter:
- 27.969 to 27.985 mm (1.1011 to 1.1018 in.)
Using a dial indicator, measure the backlash.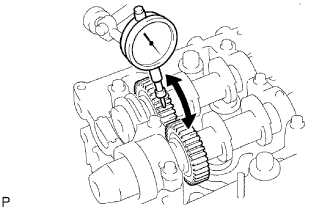
Install the 2 camshafts.
Using a dial indicator, measure the backlash.
- Standard backlash:
- 0.035 to 0.089 mm (0.0014 to 0.0035 in.)
- Maximum backlash:
- 0.189 mm (0.0074 in.)
Remove the 2 camshafts.
| INSPECT NO. 2 CAMSHAFT |
Inspect the circle runout.
Place the camshaft on V-blocks.
Using a dial indicator, measure the circle runout at the center journal.
- Maximum circle runout:
- 0.03 mm (0.0012 in.)
Inspect the cam lobe height.
Using a micrometer, measure the cam lobe height.
- Standard cam lobe height:
- 48.31 to 48.41 mm (1.902 to 1.906 in.)
- Minimum cam lobe height:
- 48.16 mm (1.896 in.)
Inspect the diameter of the camshaft journal.
Using a micrometer, measure the diameter of the camshaft journal for the camshaft bearing.
- Standard diameter:
- 27.969 to 27.985 mm (1.1011 to 1.1018 in.)
| INSPECT CAMSHAFT OIL CLEARANCE |
Clean the bearing caps and journals.
Check the bearings for flaking and scoring.
If the bearings are damaged, replace the bearing caps and cylinder head as a set.
Place the camshaft on the cylinder head.
Lay a strip of Plastigage across each of the journals.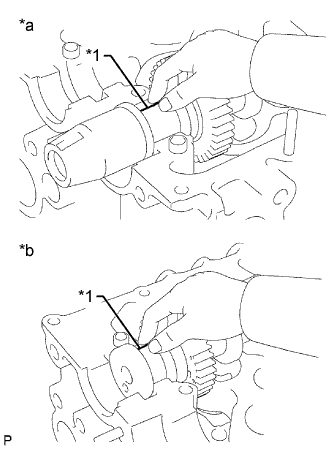
Text in Illustration *1
Plastigage
*a
Intake Side
*b
Exhaust Side
Install the bearing caps.
- NOTICE:
- Do not turn the camshaft.
Remove the bearing caps.
Measure the Plastigage at its widest point.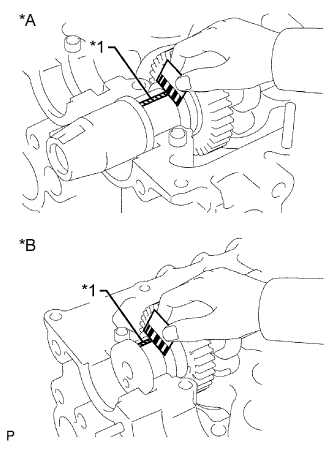
- Standard oil clearance:
- 0.025 to 0.062 mm (0.0010 to 0.0024 in.)
- Maximum oil clearance:
- 0.1 mm (0.0039 in.)
If the oil clearance is more than the maximum, replace the camshaft. If necessary, replace the bearing caps and cylinder head as a set.Text in Illustration *1
Plastigage
*a
Intake Side
*b
Exhaust Side
Completely remove the Plastigage.
Remove the camshaft.
| INSPECT CAMSHAFT THRUST CLEARANCE |
Install the camshaft.
Using a dial indicator, measure the thrust clearance while moving the camshaft back and forth.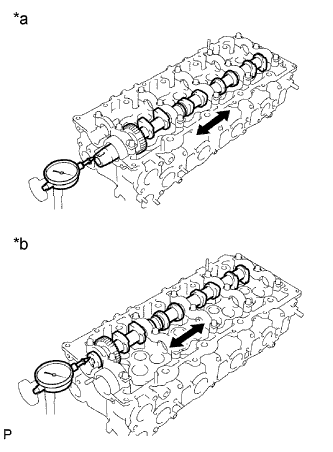
- Standard thrust clearance:
- 0.035 to 0.185 mm (0.0014 to 0.073 in.)
- Maximum thrust clearance:
- 0.25 mm (0.0098 in.)
If the thrust clearance is more than the maximum, replace the camshaft. If necessary, replace the bearing caps and cylinder head as a set.Text in Illustration *a
Intake Side
*b
Exhaust Side
Remove the camshaft.
| INSPECT CYLINDER HEAD SET BOLT |
Using a vernier caliper, measure the diameter of the most elongated threads in the measurement area.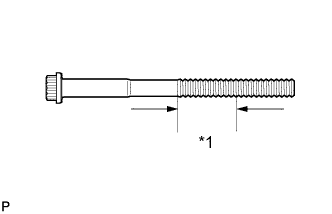
- Standard outside diameter:
- 11.8 to 12.0 mm (0.465 to 0.472 in.)
- Minimum outside diameter:
- 11.6 mm (0.457 in.)
Text in Illustration *1
Measuring Area
- HINT:
- If a visual check reveals no excessively thin areas, check the center of the bolt (see illustration) and find the area that has the smallest diameter.
| INSPECT CYLINDER BLOCK OIL ORIFICE |
Check the oil orifice for damage or clogging.
If necessary, replace the cylinder block oil orifice.
| INSPECT OIL CHECK VALVE SUB-ASSEMBLY |
Push the ball of the oil check valve with a wooden stick to check if it is stuck.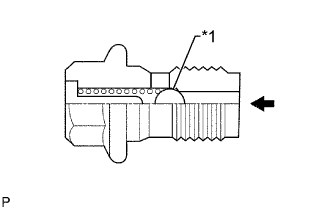
If the ball of the oil check valve is stuck, replace the oil check valve sub-assembly.Text in Illustration *1
Ball

Push
| INSPECT NO. 1 OIL NOZZLE SUB-ASSEMBLY |
Check the No. 1 oil nozzle for damage or clogging.
If necessary, replace the No. 1 oil nozzle sub-assembly.
| CLEAN CYLINDER BLOCK SUB-ASSEMBLY |
Using a gasket scraper, remove all the gasket material from the top surface of the cylinder block.
Using a soft brush and solvent, thoroughly clean the cylinder block sub-assembly.
| INSPECT CYLINDER BLOCK FOR WARPAGE |
Inspect for warpage.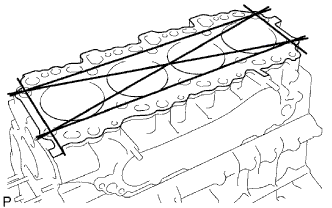
Using a precision straightedge and feeler gauge, measure the surface of the cylinder block that contacts the cylinder head for warpage.
- Maximum warpage:
- 0.1 mm (0.0039 in.)
Visually check the cylinders for vertical scratches.
If deep scratches are present, rebore all 4 cylinders. If necessary, replace the cylinder block.
| INSPECT CYLINDER BORE |
Inspect the cylinder bore diameter.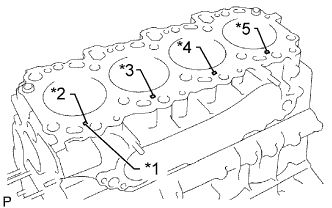
Text in Illustration *1
Mark 1, 2 or 3
*2
No. 1
*3
No. 2
*4
No. 3
*5
No. 4
- HINT:
- There are 3 standard cylinder bore diameter sizes, marked 1, 2 and 3 accordingly. The mark is stamped on the cylinder block.
Using a cylinder gauge, measure the cylinder bore diameter at positions A, B and C in the thrust and axial directions.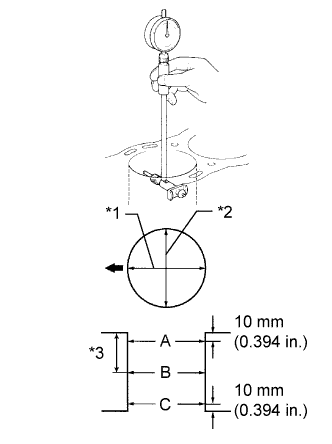
- Standard Diameter:
Item
Specified Condition
STD Mark 1
96.00 to 96.01 mm (3.7795 to 3.7799 in.)
STD Mark 2
96.01 to 96.02 mm (3.7799 to 3.7803 in.)
STD Mark 3
96.02 to 96.03 mm (3.7803 to 3.7807 in.)
O/S 0.50
96.50 to 96.53 mm (3.7992 to 3.8004 in.)
O/S 0.75
96.75 to 96.78 mm (3.8090 to 3.8102 in.)
O/S 1.00
97.00 to 97.03 mm (3.8189 to 3.8201 in.)
- Maximum Diameter:
Item
Specified Condition
STD
96.23 mm (3.7886 in.)
O/S 0.50
96.73 mm (3.8083 in.)
O/S 0.75
96.98 mm (3.8181 in.)
O/S 1.00
97.23 mm (3.8279 in.)
If the diameter is more than the maximum, rebore all 4 cylinders. If necessary, replace the cylinder block sub-assembly.Text in Illustration *1
Axial Direction
*2
Thrust Direction
*3
Center
Front
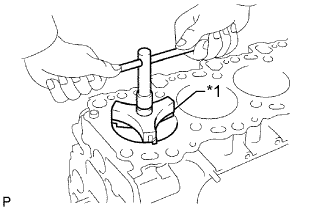
If the wear is less than 0.2 mm (0.0078 in.), using a ridge reamer, grind the top of the cylinder.Text in Illustration *1
Ridge Reamer
| CLEAN PISTON |
Using a groove cleaning tool or broken ring, clean the piston ring grooves.
Using solvent and a brush, thoroughly clean the piston.
- NOTICE:
- Do not use a wire brush.
| INSPECT PISTON WITH PIN SUB-ASSEMBLY |
- HINT:
- When replacing the piston sub-assembly (w/ pin) with a supply part, there are a number of piston diameter sizes to choose from, but there is only one size of piston pin diameter.
Using a micrometer, measure the piston diameter according to the following conditions: 1) measure at a right angle to the piston center line, and 2) measure at the indicated distance from the piston head.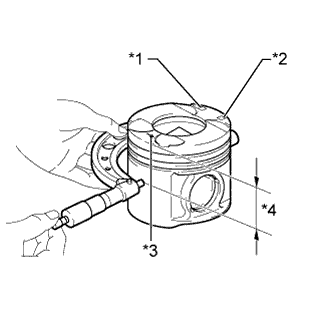
- Distance:
- 63.5 mm (2.50 in.)
- Standard Piston Diameter:
Item
Specified Condition
STD Mark 1
95.92 to 95.93 mm (3.77637 to 3.77676 in.)
STD Mark 2
95.93 to 95.94 mm (3.77676 to 3.77715 in.)
STD Mark 3
95.94 to 95.95 mm (3.77716 to 3.77755 in.)
O/S 0.50
96.42 to 96.45 mm (3.79606 to 3.79723 in.)
O/S 0.75
96.67 to 96.70 mm (3.80598 to 3.80707 in.)
O/S 1.00
96.92 to 96.95 mm (3.81574 to 3.81692 in.)
- Standard Pin Hole Inside Diameter:
Item
Specified Condition
Mark A
34.011 to 34.015 mm (1.3390 to 1.3392 in.)
Mark B
34.015 to 34.019 mm (1.3392 to 1.3393 in.)
Mark C
34.019 to 34.023 mm (1.3393 to 1.3395 in.)
Text in Illustration *1
Size Mark
*2
Piston Pin Hole Inside Diameter Mark
*3
Front Mark (Arrow)
*4
Distance
Using a micrometer, measure the piston pin diameter.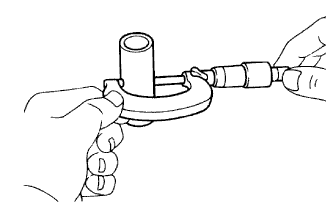
- Standard Piston Pin Diameter:
Item
Specified Condition
Mark A
34.000 to 34.004 mm (1.3386 to 1.3387 in.)
Mark B
34.004 to 34.008 mm (1.3387 to 1.3389 in.)
Mark C
34.008 to 34.012 mm (1.3389 to 1.3391 in.)
Subtract the piston pin diameter measurement from the piston pin hole inside diameter measurement.
- Standard oil clearance:
- 0.007 to 0.015 mm (0.000276 to 0.000591 in.)
Inspect the piston pin fit.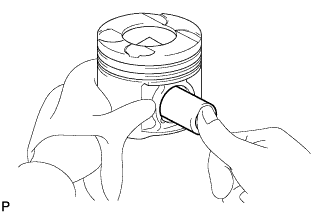
At 80°C (176°F), check that the piston pin can be pushed into the piston pin hole with your thumb.
If the pin can be installed at a lower temperature, replace the piston with pin sub-assembly.
| INSPECT PISTON OIL CLEARANCE |
Measure the cylinder bore diameter in the thrust direction.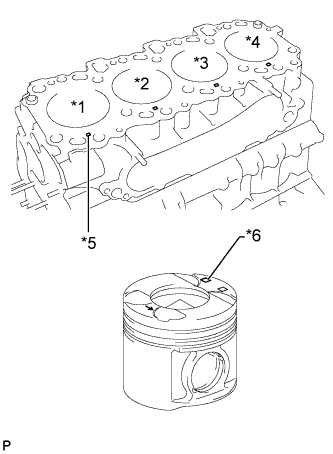
Text in Illustration *1
No. 1
*2
No. 2
*3
No. 3
*4
No. 4
*5
Mark 1, 2 or 3
*6
Size Mark
Subtract the piston diameter measurement from the cylinder bore diameter measurement.
- Standard oil clearance:
- 0.07 to 0.09 mm (0.0028 to 0.0035 in.)
- Maximum oil clearance:
- 0.14 mm (0.0055 in.)
If necessary, replace the cylinder block sub-assembly.- HINT:
- When the cylinder block is replaced, use a piston with the same number mark as the cylinder diameter marked on a new cylinder block.
| INSPECT RING GROOVE CLEARANCE |
Using a feeler gauge, measure the clearance between a new piston ring and the wall of the ring groove.
- Standard Groove Clearance:
Item
Specified Condition
No. 1 piston ring
0.091 to 0.135 mm (0.0036 to 0.0053 in.)
No. 2 piston ring
0.090 to 0.135 mm (0.0036 to 0.0053 in.)
Oil ring
0.030 to 0.075 mm (0.0012 to 0.0027 in.)
| INSPECT PISTON RING END GAP |
Insert the piston ring into the cylinder bore.
Using a piston, push the piston ring a little beyond the bottom of the ring travel, 120 mm (4.72 in.) from the top of the cylinder block.
Using a feeler gauge, measure the end gap.
- Standard End Gap:
Item
Specified Condition
No. 1 piston ring
0.27 to 0.39 mm (0.0106 to 0.0154 in.)
No. 2 piston ring
0.55 to 0.70 mm (0.0217 to 0.0276 in.)
Oil ring
0.20 to 0.40 mm (0.0079 to 0.0157 in.)
- Maximum End Gap:
Item
Specified Condition
No. 1 piston ring
0.85 mm (0.0335 in.)
No. 2 piston ring
1.07 mm (0.0421 in.)
Oil ring
0.77 mm (0.0303 in.)
If the end gap is more than the maximum even with a new piston ring, rebore all 4 cylinders or replace the cylinder block sub-assembly.
| INSPECT PISTON PIN OIL CLEARANCE |
Using a caliper gauge, measure the inside diameter of the connecting rod bush.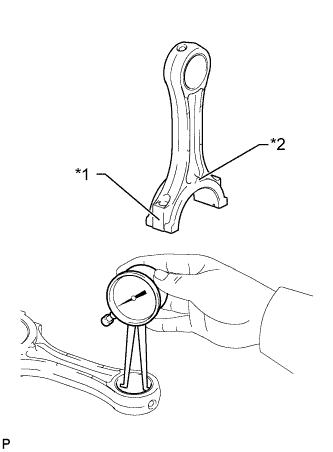
- Standard Bush Inside Diameter:
Item
Specified Condition
Mark A
34.012 to 34.016 mm (1.3390 to 1.3392 in.)
Mark B
34.016 to 34.020 mm (1.3392 to 1.3394 in.)
Mark C
34.020 to 34.024 mm (1.3394 to 1.3395 in.)
Text in Illustration *1
Connecting Rod Bush Inside Diameter Mark A, B or C
*2
Front Mark
Subtract the piston pin diameter measurement from the bush inside diameter measurement.
- Standard oil clearance:
- 0.008 to 0.016 mm (0.0003 to 0.0006 in.)
- Maximum oil clearance:
- 0.03 mm (0.012 in.)
If necessary, replace the piston with pin sub-assembly.
| INSPECT CONNECTING ROD SUB-ASSEMBLY |
Using a rod aligner and feeler gauge, check the connecting rod alignment.
Check if the connecting rod is bent.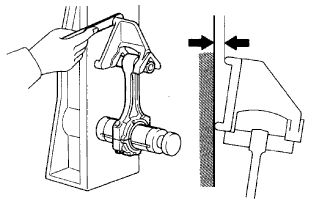
- Maximum bend:
- 0.03 mm (0.0012 in.) per 100 mm (3.94 in.)
Check if the connecting rod is twisted.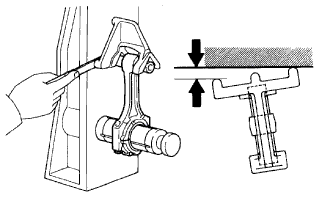
- Maximum twist:
- 0.15 mm (0.0059 in.) per 100 mm (3.94 in.)
| INSPECT CONNECTING ROD BOLT |
Using a vernier caliper, measure the diameter of the tension portion of the bolt.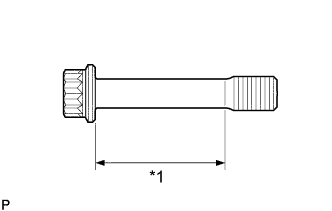
- Standard diameter:
- 8.5 to 8.6 mm (0.3346 to 0.3385 in.)
- Minimum diameter:
- 8.3 mm (0.3268 in.)
If the diameter is less than the minimum, replace the connecting rod bolt.Text in Illustration *1
Tension Portion
| INSPECT NO. 1 BALANCESHAFT SUB-ASSEMBLY |
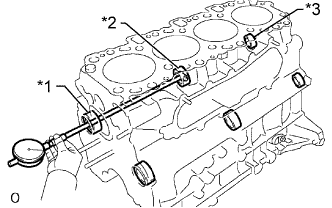 |
Using a cylinder gauge, measure the inside diameter of the balanceshaft bearing.
- Standard Bearing Inside Diameter:
Item
Specified Condition
No. 1
42.000 to 42.020 mm (1.6535 to 1.6543 in.)
No. 2
41.000 to 41.020 mm (1.6142 to 1.6150 in.)
No. 3
32.000 to 32.020 mm (1.2598 to 1.2606 in.)
Text in Illustration *1
No. 1
*2
No. 2
*3
No. 3
Using a micrometer, measure the outside diameter of the balanceshaft main journals.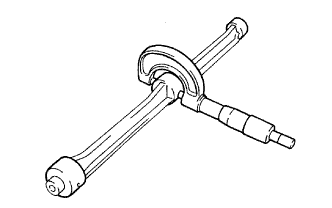
- Standard Main Journal Diameter:
Item
Specified Condition
No. 1
41.941 to 41.960 mm (1.6512 to 1.6520 in.)
No. 2
40.931 to 40.950 mm (1.6115 to 1.6122 in.)
No. 3
31.941 to 31.960 mm (1.2575 to 1.2583 in.)
Subtract the outside diameter of the balanceshaft main journal from the inside diameter of the balanceshaft bearing.
- Standard Oil Clearance:
Item
Specified Condition
No. 1
0.040 to 0.079 mm (0.0016 to 0.0031 in.)
No. 2
0.050 to 0.089 mm (0.0020 to 0.0035 in.)
No. 3
0.040 to 0.079 mm (0.0016 to 0.0031 in.)
- Maximum Oil Clearance:
Item
Specified Condition
No. 1
0.18 mm (0.0071 in.)
No. 2
0.19 mm (0.0075 in.)
No. 3
0.18 mm (0.0071 in.)
| INSPECT NO. 2 BALANCESHAFT SUB-ASSEMBLY |
Using a cylinder gauge, measure the inside diameter of the balanceshaft bearing.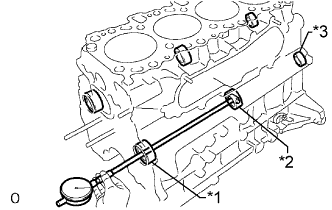
- Standard Bearing Inside Diameter:
Item
Specified Condition
No. 1
42.000 to 42.020 mm (1.6535 to 1.6543 in.)
No. 2
41.000 to 41.020 mm (1.6142 to 1.6150 in.)
No. 3
32.000 to 32.020 mm (1.2598 to 1.2606 in.)
Text in Illustration *1
No. 1
*2
No. 2
*3
No. 3
Using a micrometer, measure the outside diameter of the balanceshaft main journals.
- Standard Main Journal Diameter:
Item
Specified Condition
No. 1
41.941 to 41.960 mm (1.6512 to 1.6520 in.)
No. 2
40.931 to 40.950 mm (1.6115 to 1.6122 in.)
No. 3
31.941 to 31.960 mm (1.2575 to 1.2583 in.)
Subtract the outside diameter of the balanceshaft main journal from the inside diameter of the balanceshaft bearing.
- Standard Oil Clearance:
Item
Specified Condition
No. 1
0.040 to 0.079 mm (0.0016 to 0.0031 in.)
No. 2
0.050 to 0.089 mm (0.0020 to 0.0035 in.)
No. 3
0.040 to 0.079 mm (0.0016 to 0.0031 in.)
- Maximum Oil Clearance:
Item
Specified Condition
No. 1
0.18 mm (0.0071 in.)
No. 2
0.19 mm (0.0075 in.)
No. 3
0.18 mm (0.0071 in.)
| INSPECT CRANKSHAFT |
Inspect for circle runout.
Place the crankshaft on V-blocks.
Using a dial indicator, measure the circle runout at the center journal.
- Maximum circle runout:
- 0.03 mm (0.0012 in.)
Inspect the main journals and crank pins.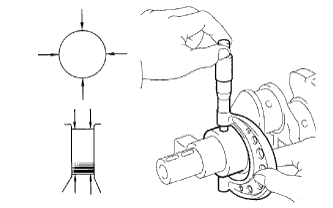
Using a micrometer, measure the diameter of each main journal and crank pin.
- Standard Main Journal Diameter:
Item
Specified Condition
Mark 1
69.994 to 70.000 mm (2.75566 to 2.75590 in.)
Mark 2
69.988 to 69.994 mm (2.75543 to 2.75566 in.)
Mark 3
69.982 to 69.988 mm (2.75519 to 2.75543 in.)
U/S 0.25
69.745 to 69.755 mm (2.7459 to 2.7463 in.)
U/S 0.50
69.495 to 69.505 mm (2.7360 to 2.7364 in.)
- Standard Crank Pin Diameter:
Item
Specified Condition
Mark 1
58.994 to 59.000 mm (2.32259 to 2.32283 in.)
Mark 2
58.988 to 58.994 mm (2.32236 to 2.32259 in.)
Mark 3
58.982 to 58.988 mm (2.32212 to 2.32239 in.)
U/S 0.25
58.745 to 58.755 mm (2.3128 to 2.3132 in.)
U/S 0.50
58.495 to 58.505 mm (2.3029 to 2.3033 in.)
Check each main journal and crank pin for taper and out-of-round as shown in the illustration.
- Maximum taper and out-of-round:
- 0.02 mm (0.0008 in.)
If necessary, grind and hone the main journals and/or crank pins.
Grind and hone the main journals and/or crank pins to the finished undersized diameter (refer to the procedures above).
Install new main journal and/or crank pin undersized bearings.
| INSPECT CRANKSHAFT BEARING CAP SET BOLT |
Using a vernier caliper, measure the diameter of the crankshaft bearing cap set bolt in the measuring area.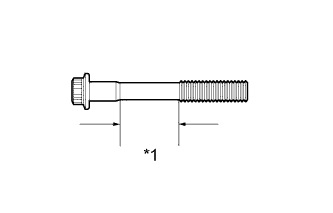
- Standard diameter:
- 13.5 to 14.0 mm (0.5351 to 0.5512 in.)
- Minimum diameter:
- 12.6 mm (0.4961 in.)
If the diameter is less than the minimum, replace the crankshaft bearing cap set bolt.Text in Illustration *1
Measuring Area