REPLACEMENT
Removal / installation · Vehicles built from Jun 2011
| 1. REPLACE TIGHT PLUG |

- NOTICE:
- If coolant leaks from a tight plug or a plug is corroded, replace it.
Remove the tight plugs.
Apply adhesive to new tight plugs.
- Adhesive:
- Toyota Genuine Adhesive 1324, Three Bond 1324 or equivalent
- NOTICE:
- Do not start the engine for 1 hour after installation.
Position A:
Using a 14 mm steel bar and hammer, tap in the tight plug as shown in the illustration.
Other positions:
Using SST and a hammer, tap in the tight plugs as shown in the illustration.
Position B- SST
- 09950-60010
(09951-00180)
09950-70010 (09951-07100)
- SST
- 09950-60010
(09951-00190)
09950-70010 (09951-07100)
- SST
- 09950-60010
(09951-00200)
09950-70010 (09951-07100)
- SST
- 09950-60010
(09951-00350)
09950-70010 (09951-07100)
- SST
- 09950-60010
(09951-00400, 09951-00450)
09950-70010 (09951-07100)
- SST
- 09950-60010
(09951-00450)
09950-70010 (09951-07100)
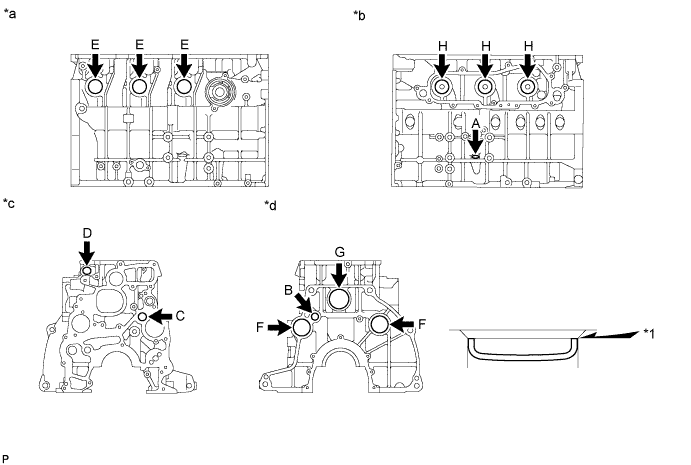

Text in Illustration *1
Stops
-
-
*a
Right Side
*b
Left Side
*c
Front Side
*d
Rear Side
| 2. REPLACE STRAIGHT PIN |
- NOTICE:
- It is not necessary to remove a straight pin unless it is being replaced.
Remove the straight pins.
Using a plastic-faced hammer, tap in new straight pins to the cylinder block.
- Standard Protrusion Height:
Item
Specified Condition
Pin A
7.5 mm (0.295 in.) or less
Pin B
6 mm (0.234 in.) or less
Pin C
12 mm (0.472 in.) or less
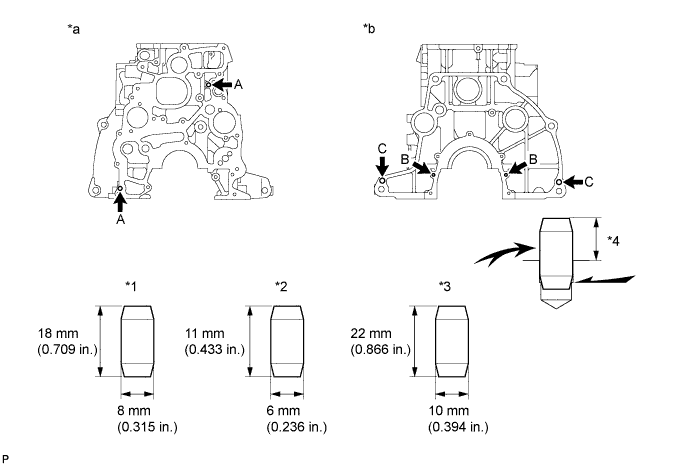
Text in Illustration *1
Pin A
*2
Pin B
*3
Pin C
*4
Protrusion Height
*a
Front Side
*b
Rear Side
| 3. REPLACE RING PIN |
- NOTICE:
- It is not necessary to remove a ring pin unless it is being replaced.
Remove the ring pins.
Using a plastic-faced hammer, tap in new ring pins to the cylinder block.
- Standard Protrusion:
- 6 mm (0.236 in.) or less
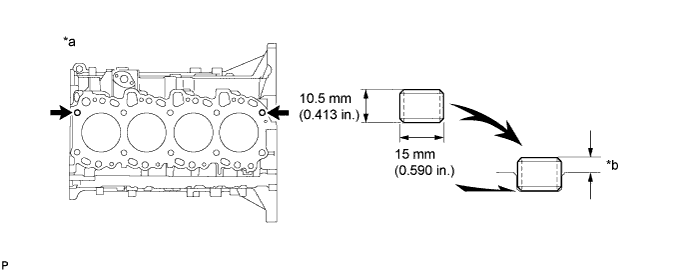
Text in Illustration *a
Cylinder Head Side
*b
6 mm (0.236 in.) or less
| 4. REPLACE TURBO WATER HOSE UNION |
- NOTICE:
- If coolant leaks from a turbo water hose union or a turbo water hose union is corroded, replace the turbo water hose union.
Remove the turbo water hose union from the cylinder block.
Clean the cylinder block side hole and new turbo water hose union with non-residue solvent.
Apply adhesive onto the shaded area of a turbo water hose union as shown in the illustration.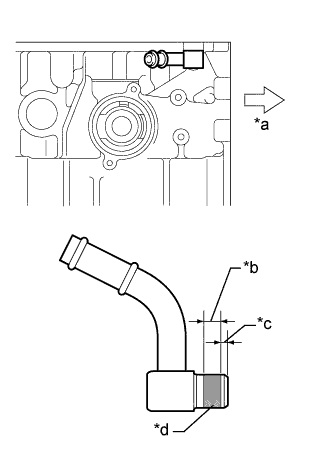
- Adhesive:
- Toyota Genuine Adhesive 1324, Three Bond 1324 or equivalent
Text in Illustration *a
Front
*b
5.0 mm (0.197 in.)
*c
2.0 mm (0.787 in.)
*d
Adhesive
- NOTICE:
- Install the turbo water hose union within 3 minutes after applying adhesive.
Set the turbo water hose union and tap it until the edge of the turbo water hose union fits against the chamfered part of the cylinder block as shown in the illustration.