REASSEMBLY
Removal / installation · Vehicles built from Aug 2013
Versions by build date: Jun 2011 – Jul 2013 from Aug 2013
| 1. INSTALL STARTER CENTER BEARING CLUTCH SUB-ASSEMBLY |

Apply high-temperature grease to the starter pinion drive lever as shown in the illustration.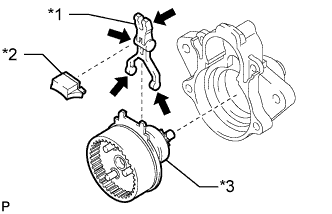

Text in Illustration *1
Starter Drive Pinion Lever
*2
Rubber Plate
*3
Starter Center Bearing Clutch Sub-assembly

High-temperature Grease
Install the starter center bearing clutch sub-assembly, rubber plate and starter pinion drive lever to the starter drive housing assembly.
Apply high-temperature grease to the planetary gears and pins of the starter center bearing clutch sub-assembly as shown in the illustration.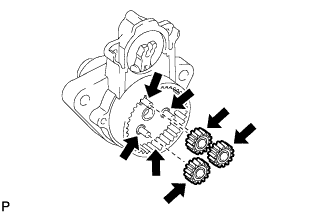
Text in Illustration
High-temperature Grease
Install the 3 planetary gears to the starter center bearing clutch sub-assembly.
| 2. INSTALL STARTER ARMATURE ASSEMBLY |
Install the starter armature assembly to the starter yoke assembly.
- NOTICE:
- The magnet of the starter yoke may attract the starter armature when the starter commutator end frame is installed, causing the magnet to break.
| 3. INSTALL STARTER BRUSH HOLDER ASSEMBLY |
Install the starter brush holder assembly to the starter yoke assembly.
Connect the 4 brushes to the starter brush holder assembly.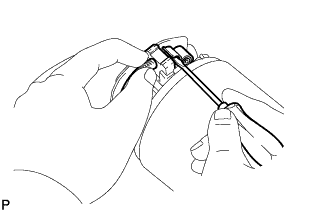
Using a screwdriver, hold back the spring.
Connect the brush to the brush holder assembly.
Insert a grommet between the positive (+) side of the motor lead line and the negative (-) side of the brush holder plate.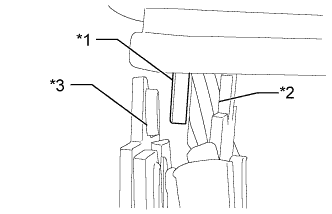
Text in Illustration *1
Grommet
*2
Motor Lead Line Positive (+) Side
*3
Brush Holder Plate Negative (-) Side
Align the rubber part of the starter yoke assembly with the groove of the starter commutator end frame assembly.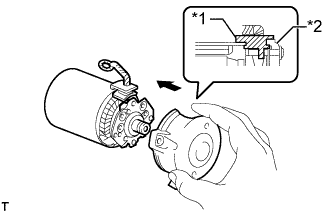
Text in Illustration *1
Rubber Part
*2
Starter Commutator End Frame Assembly
Install the starter commutator end frame assembly with the 2 screws.
- Torque:
- 1.5 N*m{ 15 kgf*cm , 13 in.*lbf }
| 4. INSTALL STARTER YOKE ASSEMBLY |
Install the starter armature plate to the starter yoke assembly.
Check that the notch of the starter armature plate fits over the protrusion of the starter yoke assembly.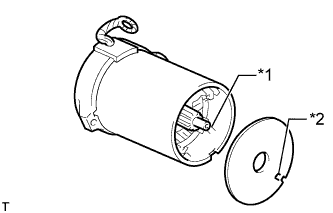
Text in Illustration *1
Protrusion
*2
Notch
Align the protrusion of the starter yoke assembly with the notches inside the starter drive housing assembly and insert the starter yoke assembly into the starter drive housing assembly.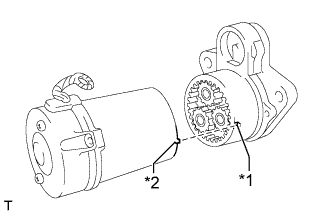
Text in Illustration *1
Notch
*2
Protrusion
Using a T25 "TORX" socket wrench, install the starter drive housing assembly with the 2 through bolts.
- Torque:
- 6.0 N*m{ 61 kgf*cm , 53 in.*lbf }
| 5. INSTALL MAGNET STARTER SWITCH ASSEMBLY |
Apply high-temperature grease to the plunger hook of the magnet starter switch assembly.
Hang the plunger of the magnet starter switch assembly on the starter pinion drive lever from the upper side.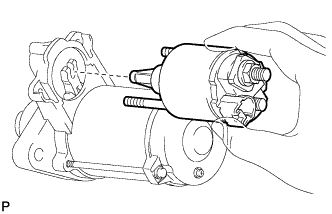
Install the magnet starter switch assembly with the 2 nuts.
- Torque:
- 7.5 N*m{ 76 kgf*cm , 66 in.*lbf }
Connect the lead wire to terminal C with the nut.
- Torque:
- 10 N*m{ 102 kgf*cm , 7 ft.*lbf }