P0335 Crankshaft Position Sensor "A" Circuit
Diagnostic trouble codes · Vehicles built from Aug 2014
Also covers:
- P0339 Crankshaft Position Sensor "A" Circuit Intermittent
Versions by build date: Jun 2011 – Jul 2012 Aug 2012 – Jul 2013 Aug 2013 – Jul 2014 from Aug 2014
DESCRIPTION
The crankshaft position sensor system consists of a crankshaft position sensor plate and pickup coil. The sensor plate has 34 teeth and is installed on the crankshaft. The pickup coil is made of wound copper wire, an iron core and magnet. The sensor plate rotates, and a pulse signal is created as each tooth passes by the pickup coil. The pickup coil generates 34 signals for each revolution. Based on these signals, the ECM calculates the crankshaft position and engine speed. Using these calculations, the common rail injection system is controlled.| DTC Detection Drive Pattern |
DTC Detection Condition |
Trouble Area |
| Crank or start engine |
When the following condition is met (for 5 seconds during cranking or 0.5 seconds during engine start) (1 trip detection logic): No crankshaft position sensor signal is sent to the ECM while cranking. |
|
| DTC Detection Drive Pattern |
DTC Detection Condition |
Trouble Area |
| Engine running at 1000 rpm or more with vehicle stationary |
No crankshaft position sensor signal is input to the ECM for 0.05 seconds or more, and conditions (a), (b) and (c) are met (1 trip detection logic):
|
|
| DTC No. |
Data List |
| P0335 |
Engine Speed |
| P0339 |
- HINT:
- If DTC P0335 and/or P0339 is stored, the following symptoms may appear:
- Difficulty starting
- Misfire
- Combustion noise
- Black smoke
- White smoke
- Lack of power
- If DTC P0335 and/or P0339 is stored, the following symptoms may appear:
WIRING DIAGRAM
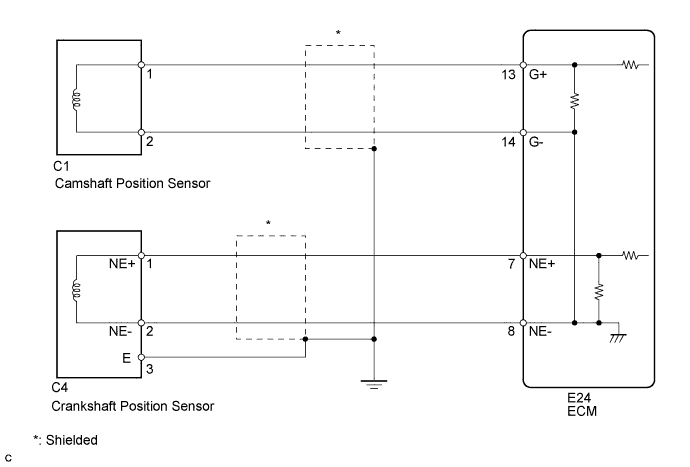

INSPECTION PROCEDURE
- NOTICE:
- Inspect the fuses of circuits related to this system before performing the following inspection procedure.
- After replacing the ECM, the new ECM needs registration (Click here) and initialization (Click here).
- After replacing the fuel supply pump assembly, the ECM needs initialization (Click here).
- After replacing an injector assembly, the ECM needs registration (Click here).
- Inspect the fuses of circuits related to this system before performing the following inspection procedure.
- HINT:
- Read freeze frame data using the intelligent tester. Freeze frame data records the engine condition when malfunctions are detected. When troubleshooting, freeze frame data can help determine if the vehicle was moving or stationary, if the engine was warmed up or not, and other data from the time the malfunction occurred.
- The Data List item Engine Speed is calculated from the output of the crankshaft position sensor.
- A DTC is also stored when the ground of a shielded wire is faulty.
- Read freeze frame data using the intelligent tester. Freeze frame data records the engine condition when malfunctions are detected. When troubleshooting, freeze frame data can help determine if the vehicle was moving or stationary, if the engine was warmed up or not, and other data from the time the malfunction occurred.
| 1. INSPECT CRANKSHAFT POSITION SENSOR |

Inspect the crankshaft position sensor (Click here).
|
|
||||

| OK | |
 |
| 2. CHECK HARNESS AND CONNECTOR (CRANKSHAFT POSITION SENSOR - ECM) |
Disconnect the crankshaft position sensor connector.
Disconnect the ECM connector.
Measure the resistance according to the value(s) in the table below.
- Standard Resistance:
Tester Connection
Condition
Specified Condition
C4-1 (NE+) - E24-7 (NE+)
Always
Below 1 Ω
C4-2 (NE-) - E24-8 (NE-)
Always
Below 1 Ω
C4-1 (NE+) or E24-7 (NE+) - Body ground
Always
10 kΩ or higher
C4-2 (NE-) or E24-8 (NE-) - Body ground
Always
10 kΩ or higher
Reconnect the crankshaft position sensor connector.
Reconnect the ECM connector.
|
|
||||
| OK | |
|
| 3. CHECK CRANKSHAFT POSITION SENSOR (SENSOR INSTALLATION) |
Check the sensor installation.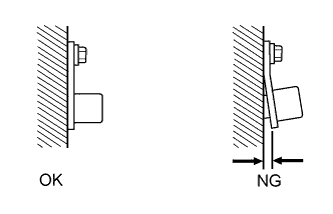
- OK:
- Sensor is installed correctly.
|
|
||||
| OK | |
|
| 4. CHECK NO. 1 CRANKSHAFT POSITION SENSOR PLATE |
Check the teeth of the sensor plate.
- OK:
- The sensor plate teeth do not have any cracks or deformation.
|
|
||||
| OK | |
|
| 5. INSPECT CAMSHAFT TIMING PULLEY |
Check the teeth of the camshaft timing pulley.
- OK:
- The sensor plate teeth do not have any cracks or deformation.
|
|
||||
| OK | |
|
| 6. REPLACE ECM |
Replace the ECM (Click here).
|
|
||||
| 7. REPLACE CRANKSHAFT POSITION SENSOR |
Replace the crankshaft position sensor (Click here).
|
|
||||
| 8. REPAIR OR REPLACE HARNESS OR CONNECTOR |
Repair or replace the harness or connector.
|
|
||||
| 9. SECURELY REINSTALL SENSOR |
Securely reinstall the sensor (Click here).
|
|
||||
| 10. REPLACE NO. 1 CRANKSHAFT POSITION SENSOR PLATE |
Replace the No. 1 crankshaft position sensor plate (Click here).
|
|
||||
| 11. REPLACE CAMSHAFT TIMING PULLEY |
Replace the camshaft timing pulley (Click here).
| NEXT | |
|
| 12. CONFIRM WHETHER MALFUNCTION HAS BEEN SUCCESSFULLY REPAIRED |
Connect the intelligent tester to the DLC3.
Clear the DTCs (Click here).
Turn the ignition switch off for 30 seconds or more.
Start the engine and run it at 1000 rpm or more for 5 seconds or more.
Confirm that the DTC is not output again.
| NEXT | ||
 |
||
| ||