P0400 Exhaust Gas Recirculation Flow
Diagnostic trouble codes · Vehicles built Aug 2012 – Jul 2013
Versions by build date: Jun 2011 – Jul 2012 Aug 2012 – Jul 2013 Aug 2013 – Jul 2014 from Aug 2014
DESCRIPTION
The EGR system recirculates exhaust gases, in order to suit every driving condition. The recirculated gas mingles with intake air, therefore the EGR system can slow combustion speed and keep the combustion temperature down. This helps reduce NOx emission.In order to increase EGR circulation efficiency, the ECM adjusts the lift amount of the EGR valve and throttle valve angle.
| DTC No. |
DTC Detection Condition |
Trouble Area |
| P0400 |
When either condition below is met:
|
|
MONITOR DESCRIPTION
- If the EGR valve is forcibly operated but the intake air amount does not vary, the ECM determines that the EGR valve is malfunctioning. The ECM then illuminates the MIL.
- When the target and actual positions of the EGR valve are different, the ECM interprets this as a malfunction of the EGR valve and illuminates the MIL.
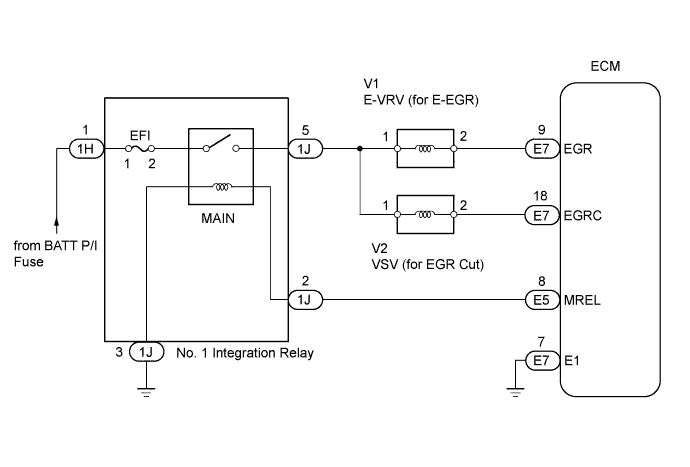
WIRING DIAGRAM

INSPECTION PROCEDURE
- NOTICE:
- If the ECM is replaced, the new ECM needs registration (Click here) and initialization (Click here).
- HINT:
- Read freeze frame data using the intelligent tester. Freeze frame data records the engine conditions when a malfunction is detected. When troubleshooting, freeze frame data can help determine if the vehicle was running or stopped, if the engine was warmed up or not, and other data from the time the malfunction occurred.
- After warming up the engine, DTC P0400 is set 1 second or more after quickly accelerating the engine from idling.
- Read freeze frame data using the intelligent tester. Freeze frame data records the engine conditions when a malfunction is detected. When troubleshooting, freeze frame data can help determine if the vehicle was running or stopped, if the engine was warmed up or not, and other data from the time the malfunction occurred.
| 1. CHECK OTHER DTC OUTPUT (IN ADDITION TO DTC P0400) |

Connect the intelligent tester to the DLC3.
Turn the ignition switch ON and turn the intelligent tester ON.
Enter the following menus: Powertrain / Engine / DTC.
Read DTCs.
- Result:
Display (DTC output)
Proceed to
P0400
A
P0400 and P0405 and/or P0406
B
- HINT:
- If codes other than P0400 are output, perform troubleshooting for those DTCs first.
|
|
||||

| A | |
 |
| 2. INSPECT VACUUM PUMP ASSEMBLY |
Check the negative pressure of the vacuum pump (Click here).
- Standard:
- More than 86.7 kPa (650 mmHg, 26 in.Hg)
|
|
||||
| OK | |
|
| 3. CHECK VACUUM HOSES |
Check the vacuum hoses.
- OK:
- The hoses are not damaged and securely connected.
|
|
||||
| OK | |
|
| 4. CHECK ELECTRIC VACUUM REGULATING VALVE (FOR E-EGR) |
Disconnect the vacuum hose to the EGR valve.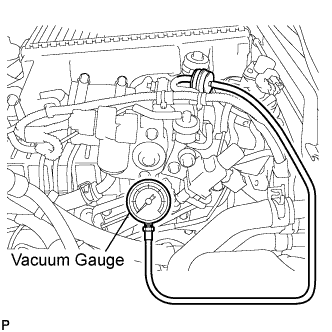
Connect the vacuum gauge.
Connect the intelligent tester to the DLC3.
Start the engine.
Warm up the engine.
- HINT:
- The engine coolant temperature is 80°C (176°F) or more.
Enter the following menus: Powertrain / Engine / Active Test / Control the EGR system.
Check the vacuum change when the Active Test is used to turn the E-VRV (for E-EGR) from OFF to ON.
- Result:
Active Test
Vacuum Gauge
Proceed to
OFF to ON
Changes from above 28 kPa (210 mmHg, 8.3 in.Hg) to 0 kPa (0 mmHg, 0 in.Hg)
A
Stays at 0 kPa (0 mmHg, 0 in.Hg), or stays above 28 kPa (210 mmHg, 8.3 in.Hg)
B
|
|
||||

| A | |
|
| 5. INSPECT NO. 1 VACUUM SWITCHING VALVE (FOR EGR CUT) |
Using a 3-way connector, connect a vacuum gauge to the hose between the VSV (for EGR Cut) and EGR valve.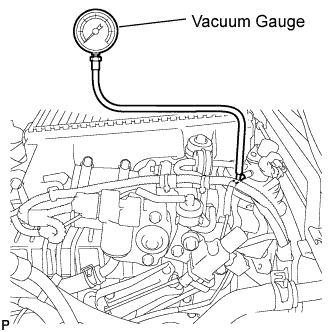
Connect the intelligent tester to the DLC3.
Start the engine and turn the tester ON.
Enter the following menus: Powertrain / Engine / Active Test / Activate the VSV for EGR Cut.
Check the vacuum change when the Active Test is used to turn the VSV (for EGR Cut) from OFF to ON.
- Result:
Active Test
Vacuum Gauge
Proceed to
OFF to ON
Changes from above 28 kPa (210 mmHg, 8.3 in.Hg) to 0 kPa (0 mmHg, 0 in.Hg)
A
Stays at 0 kPa (0 mmHg, 0 in.Hg), or stays above 28 kPa (210 mmHg, 8.3 in.Hg)
B
|
|
||||
| A | |
|
| 6. INSPECT ELECTRIC EGR CONTROL VALVE ASSEMBLY |
Inspect the electric EGR control valve (Click here).
- OK:
- The valve is not stuck and does not have heavy carbon deposits.
|
|
||||
| OK | |
|
| 7. CHECK FOR BLOCKAGE IN EGR GAS PASSAGE (EXHAUST MANIFOLD - ELECTRIC EGR CONTROL VALVE) |
Check for blockage in the EGR gas passage between the exhaust manifold and electric EGR control valve assembly.
- OK:
- No blockage in the EGR gas passage
- HINT:
- When performing the check for deposits check the interior of the EGR valve, EGR pipe, EGR cooler, EGR cooler bypass valve and the entire EGR passage.
|
|
||||
| OK | ||
 |
||
| ||
| 8. INSPECT ELECTRIC VACUUM REGULATING VALVE FOR EGR (E-VRV FOR E-EGR) |
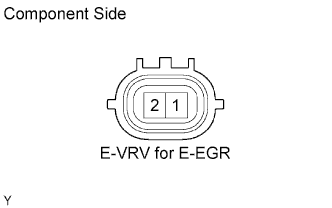 |
Disconnect the V1 E-VRV for E-EGR connector.
Measure the resistance of the E-VRV for E-EGR connector.
- Standard resistance:
Tester Connection
Condition
Specified Condition
1 - 2
20°C (68°F)
11 to 13 Ω
|
|
||||
| OK | |
|
| 9. CHECK HARNESS AND CONNECTOR (E-VRV FOR E-EGR - ECM) |
Disconnect the V1 E-VRV for E-EGR connector.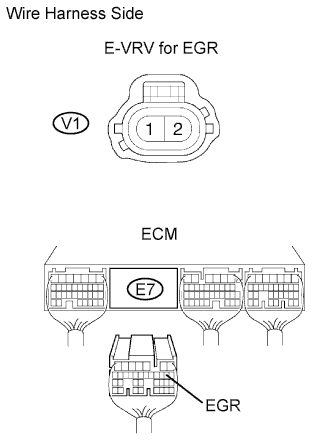
Disconnect the E7 ECM connector.
Measure the resistance of the wire harness side connectors.
- Standard resistance (Check for open):
Tester Connection
Specified Condition
E7-9 (EGR) - V1-2
Below 1 Ω
- Standard resistance (Check for short):
Tester Connection
Specified Condition
E7-9 (EGR) or V1-2 - Body ground
10 kΩ or higher
|
|
||||
| OK | |
|
| 10. CHECK HARNESS AND CONNECTOR (NO. 1 INTEGRATION RELAY (MAIN RELAY) - E-VRV FOR E-EGR) |
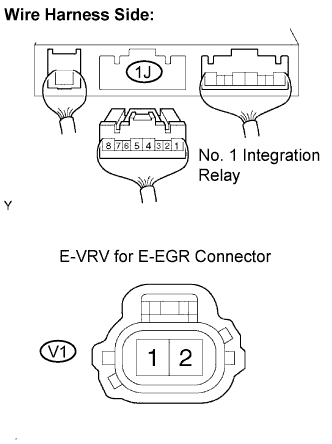 |
Remove the No. 1 integration relay from the engine room junction block (Click here).
Disconnect the 1J No. 1 integration relay connector.
Disconnect the V1 E-VRV connector.
Measure the resistance of the wire harness side connectors.
- Standard resistance (Check for open):
Tester Connection
Specified Condition
1J-5 - V1-1
Below 1 Ω
- Standard resistance (Check for short):
Tester Connection
Specified Condition
1J-5 or V1-1 - Body ground
10 kΩ or higher
|
|
||||
| OK | ||
|
||
| ||
| 11. INSPECT NO. 1 VACUUM SWITCHING VALVE FOR EGR CUT (RESISTANCE) |
Disconnect the V2 VSV for EGR cut connector.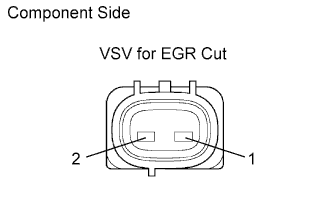
Measure the resistance of the VSV for EGR Cut.
- Standard resistance:
Tester Connection
Condition
Specified Condition
1 - 2
20°C (68°F)
37 to 44 Ω
|
|
||||
| OK | |
|
| 12. CHECK HARNESS AND CONNECTOR (NO. 1 VACUUM SWITCHING VALVE FOR EGR CUT - ECM) |
Disconnect the V2 VSV for EGR Cut connector.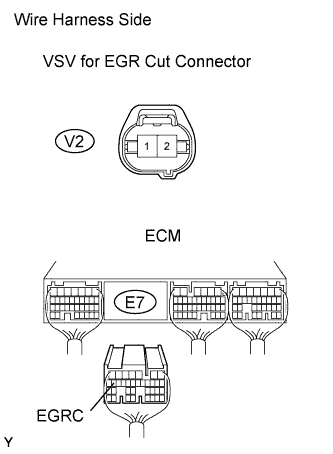
Disconnect the E7 ECM connector.
Measure the resistance of the wire harness side connectors.
- Standard resistance (Check for open):
Tester Connection
Specified Condition
E7-18 (EGRC) - V2-2
Below 1 Ω
- Standard resistance (Check for short):
Tester Connection
Specified Condition
E7-18 (EGRC) or V2-2 - Body ground
10 kΩ or higher
|
|
||||
| OK | |
|
| 13. CHECK HARNESS AND CONNECTOR (NO. 1 INTEGRATION RELAY (MAIN RELAY) - VSV FOR EGR CUT) |
Remove the No. 1 integration relay from the engine room junction block (Click here)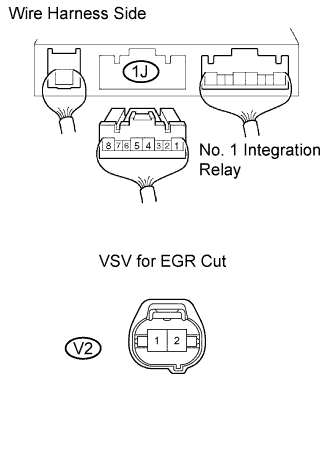
Disconnect the 1J No. 1 integration relay connector.
Disconnect the V2 VSV for EGR Cut connector.
Measure the resistance of the wire harness side connectors.
- Standard resistance (Check for open):
Tester Connection
Specified Condition
1J-5 - V2-1
Below 1 Ω
- Standard resistance (Check for short):
Tester Connection
Specified Condition
1J-5 or V2-1 - Body ground
10 kΩ or higher
|
|
||||
| OK | ||
|
||
| ||