INSTALLATION
Removal / installation · Vehicles built from Aug 2013
Versions by build date: Jun 2011 – Jul 2013 from Aug 2013
- HINT:
- Use the same procedures for the LH side and RH side.
- The procedures listed below are for the LH side.
- Use the same procedures for the LH side and RH side.
| 1. INSTALL DISC BRAKE CYLINDER ASSEMBLY LH |

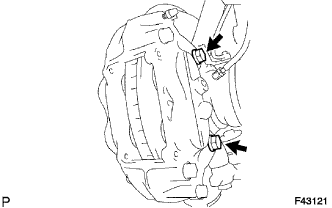  |
Install the cylinder with the 2 bolts.
- Torque:
- 122 N*m{ 1244 kgf*cm , 90 ft.*lbf }
| 2. CONNECT FRONT NO. 1 WHEEL CYLINDER TUBE LH |
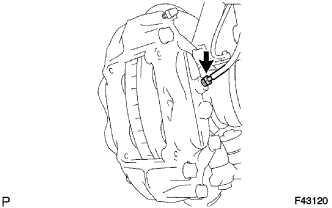 |
Using a union nut wrench, connect the tube to the cylinder.
- Torque:
- 15 N*m{ 155 kgf*cm , 11 ft.*lbf }
- NOTICE:
- Use the formula to calculate special torque values for situations where a union nut wrench is combined with a torque wrench (Click here).
| 3. INSTALL FRONT ANTI-SQUEAL SHIM KIT |
Apply disc brake grease to both sides of each No. 1 shim.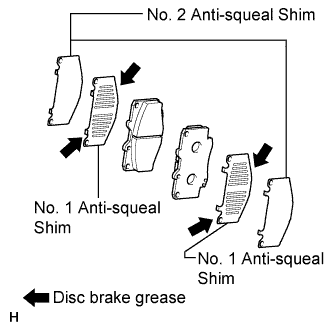
Install the No. 1 and No. 2 shims to each pad.
- NOTICE:
- When replacing worn pads, the shims must be replaced together with the pads.
- Install the shims in the correct position and direction.
- When replacing worn pads, the shims must be replaced together with the pads.
| 4. INSTALL FRONT DISC BRAKE PAD |
Install the 2 disc brake pads to the cylinder.
- NOTICE:
- There should be no oil or grease on the friction surfaces of the pads and disc.
| 5. INSTALL FRONT DISC BRAKE ANTI-RATTLE SPRING (for 16 inch Front Disc Brake) |
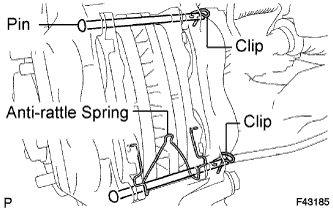 |
Install the 2 pins and anti-rattle spring.
- HINT:
- Install the spring together with the pin on the bottom side.
Install the 2 clips.
- NOTICE:
- When installing the clip, be sure to install the clip with the handle facing the center of the vehicle.
| 6. INSTALL FRONT DISC BRAKE ANTI-RATTLE SPRING (for 15 inch Front Disc Brake) |
for Type A:
Install the anti-rattle spring.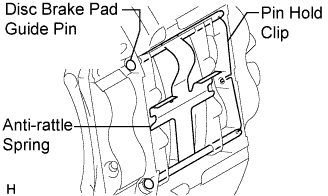
Hold down the spring and insert the 2 pins.
Install the clip.
for Type B:
Install the 2 disc brake pad guide pins and pin hold clip.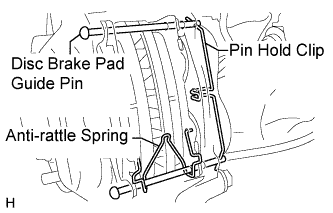
- HINT:
- Install the spring together with the pin on the bottom side.
Install the clip.
| 7. FILL RESERVOIR WITH BRAKE FLUID (w/ VSC) |
- Fluid:
Item
Specified Condition
except TSAM Made
SAE J1703 or FMVSS No. 116 DOT 3
for TSAM Made
SAE J1704 or FMVSS No. 116 DOT 4
| 8. FILL RESERVOIR WITH BRAKE FLUID (for TSAM Made) |
- Fluid:
- SAE J1704 or FMVSS No. 116 DOT 4
| 9. FILL RESERVOIR WITH BRAKE FLUID (for TMT Made) |
- Fluid:
- SAE J1703 or FMVSS No. 116 DOT 3
| 10. BLEED AIR FROM MASTER CYLINDER (w/ VSC) |
- HINT:
- If the master cylinder has been disassembled or if the reservoir becomes empty, bleed air from the master cylinder.
Using a union nut wrench, disconnect the 2 brake lines from the master cylinder.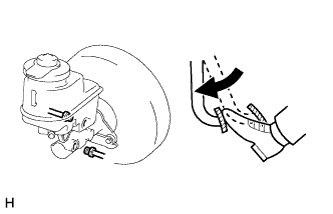
Slowly depress and hold the brake pedal.
Block the tube holes with your fingers, and then release the brake pedal.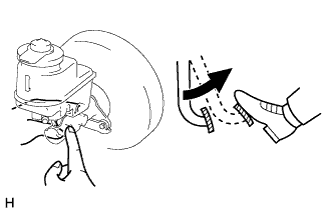
Remove the your fingers, slowly depress and hold the brake pedal, block the tube holes with your fingers again, and then release the brake pedal. Repeat this step 3 or 4 times.
Using a union nut wrench, connect the 2 brake tubes to the brake master cylinder.
- Torque:
- 15 N*m{ 155 kgf*cm , 11 ft.*lbf }
- NOTICE:
- Use the formula to calculate special torque values for situations where a union nut wrench is combined with a torque wrench (Click here).
| 11. BLEED AIR FROM MASTER CYLINDER (for TSAM Made) |
- HINT:
- If the master cylinder has been disassembled or if the reservoir becomes empty, bleed air from the master cylinder.
Using a union nut wrench, disconnect the 2 brake lines from the master cylinder.
Slowly depress and hold the brake pedal.
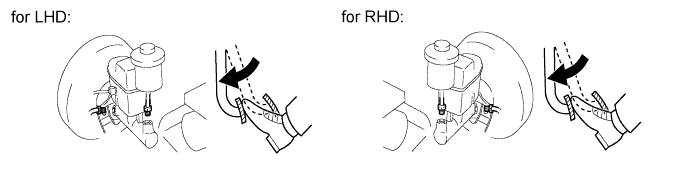
Cover the outer holes with your finger, and release the pedal.
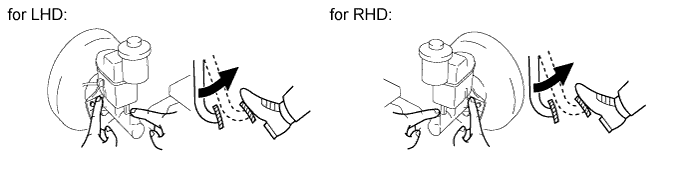
Repeat the 2 previous steps 3 or 4 times.
Using a union nut wrench, connect the 2 brake lines to the master cylinder.
- Torque:
- 15 N*m{ 155 kgf*cm , 11 ft.*lbf }
- NOTICE:
- Use the formula to calculate special torque values for situations where a union nut wrench is combined with a torque wrench (Click here).
| 12. BLEED AIR FROM MASTER CYLINDER (for TMT Made) |
- HINT:
- If the master cylinder has been disassembled or if the reservoir becomes empty, bleed air from the master cylinder.
Using a union nut wrench, disconnect the 2 brake lines from the master cylinder.
Slowly depress and hold the brake pedal.
Cover the outer holes with your finger, and release the pedal.
Repeat the 2 previous steps 3 or 4 times.
Using a union nut wrench, connect the 2 brake lines to the master cylinder.
- Torque:
- 15 N*m{ 155 kgf*cm , 11 ft.*lbf }
- NOTICE:
- Use the formula to calculate special torque values for situations where a union nut wrench is combined with a torque wrench (Click here).
| 13. BLEED AIR FROM BRAKE LINE (w/ VSC) |
Remove the bleeder plug cap.
Connect a vinyl tube to the bleeder plugs.
Depress the brake pedal several times, and then loosen the bleeder plug with the pedal depressed.
When fluid stops coming out, immediately tighten the bleeder plug. Then release the pedal.
Repeat the 2 previous steps until all the air in the brake fluid is gone.
Tighten the bleeder plug.
- Torque:
- for front brake:
- 11 N*m{ 110 kgf*cm , 8 ft.*lbf }
- for rear brake:
- 10 N*m{ 102 kgf*cm , 7 ft.*lbf }
Install the cap.
Bleed air from the brake line for each wheel by repeating the above procedures.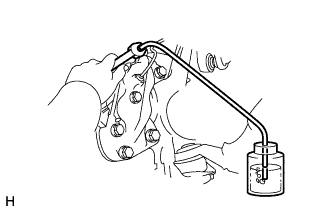
| 14. BLEED AIR FROM BRAKE LINE (for TSAM Made) |
Remove the bleeder plug cap.
Connect the vinyl tube to the bleeder plugs.
Depress the pedal several times, and then loosen the bleeder plug with the pedal depressed.
When fluid stops coming out, immediately tighten the bleeder plug. Then release the pedal.
Repeat the 2 previous steps until all the air in the brake fluid is gone.
Tighten the bleeder plug.
- Torque:
- for front brake (2WD):
- 10 N*m{ 102 kgf*cm , 7 ft.*lbf }
- for front brake (4WD and Pre-Runner):
- 11 N*m{ 110 kgf*cm , 8 ft.*lbf }
- for rear brake (2WD):
- 11 N*m{ 112 kgf*cm , 8 ft.*lbf }
- for rear brake (4WD and Pre-Runner):
- 10 N*m{ 102 kgf*cm , 7 ft.*lbf }
Install the cap.
Bleed air from the brake line for each wheel by repeating the above procedures.
| 15. BLEED AIR FROM BRAKE LINE (for TMT Made) |
Remove the bleeder plug cap.
Connect the vinyl tube to the bleeder plugs.
Depress the pedal several times, and then loosen the bleeder plug with the pedal depressed.
When fluid stops coming out, immediately tighten the bleeder plug. Then release the pedal.
Repeat the 2 previous steps until all the air in the brake fluid is gone.
Tighten the bleeder plug.
- Torque:
- for front brake:
- 11 N*m{ 110 kgf*cm , 8 ft.*lbf }
- for rear brake (2WD):
- 11 N*m{ 112 kgf*cm , 8 ft.*lbf }
- for rear brake (4WD and Pre-Runner):
- 10 N*m{ 102 kgf*cm , 7 ft.*lbf }
Install the cap.
Bleed air from the brake line for each wheel by repeating the above procedures.
| 16. BLEED AIR FROM CLUTCH LINE (for Manual Transmission) |
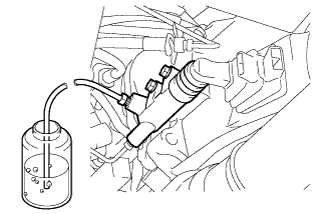 |
Remove the bleeder plug cap.
Connect the vinyl tube to the bleeder plug.
Depress the clutch pedal several times, and then loosen the bleeder plug with the pedal depressed.
At the point when fluid stops coming out, tighten the bleeder plug, and then release the clutch pedal.
Repeat the previous 2 steps until all the air in the fluid is completely bled out.
Tighten the bleeder plug.
- Torque:
- 11 N*m{ 112 kgf*cm , 8 ft.*lbf }
Install the bleeder plug cap.
Check that all the air has been bled out of the clutch line.
| 17. CHECK BRAKE FLUID LEVEL IN RESERVOIR (w/ VSC) |
Check the fluid level.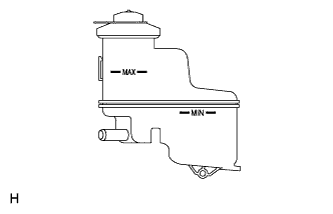
If the brake fluid level is lower than the MIN line, check for leaks and inspect the disc brake pads. If necessary, refill the reservoir with brake fluid to the MAX line after repair or replacement.- Fluid:
Item
Specified Condition
except TSAM Made
SAE J1703 or FMVSS No. 116 DOT 3
for TSAM Made
SAE J1704 or FMVSS No. 116 DOT 4
| 18. CHECK BRAKE FLUID LEVEL IN RESERVOIR (for TSAM Made) |
Check the fluid level.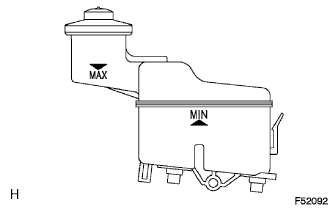
If the brake fluid level is lower than the MIN line, check for leaks and inspect the disc brake pads. If necessary, refill the reservoir with brake fluid to the MAX line after repair or replacement.- Fluid:
- SAE J1704 or FMVSS No. 116 DOT 4
| 19. CHECK BRAKE FLUID LEVEL IN RESERVOIR (for TMT Made) |
Check the fluid level.
If the brake fluid level is lower that the MIN line, check for leaks and inspect the disc brake pads. If necessary, refill the reservoir with brake fluid to the MAX line after repair or replacement.- Fluid:
- SAE J1703 or FMVSS No. 116 DOT 3
| 20. CHECK FOR BRAKE FLUID LEAKAGE |
| 21. INSTALL FRONT WHEEL |
- Torque:
- 105 N*m{ 1071 kgf*cm , 77 ft.*lbf }