INSPECTION
Inspection · Vehicles built from Jun 2011
| INSPECT ELECTRIC EGR CONTROL VALVE ASSEMBLY |

Measure the resistance according to the value(s) in the table below.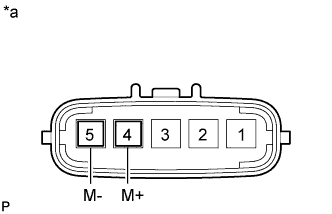

Standard Resistance Tester Connection
Condition
Specified Condition
5 (M-) - 4 (M+)
25°C (77°F)
0.3 to 100 Ω
Text in Illustration *a
Component without harness connected
(Electric EGR Control Valve)
- HINT:
- The temperature indicated under "Condition" is the temperature of the electric EGR control valve assembly.
| VISUAL CHECK ELECTRIC EGR CONTROL VALVE ASSEMBLY |
Visually check the electric EGR control valve for deposits.
If there are deposits, clean the electric EGR control valve.- NOTICE:
- When cleaning the electric EGR control valve, make sure the valve is completely closed.
- Do not forcibly open the valve as it may be damaged or deformed.
- When cleaning the electric EGR control valve, use a piece of cloth soaked with cleaning solvent. Spraying the solvent directly onto this part or soaking the part in solvent may damage the part.
- When cleaning the electric EGR control valve, make sure the valve is completely closed.
Hold the electric EGR control valve up to a light, and then from the side indicated by the arrow in the illustration, visually check that there is no gap between the valve and body.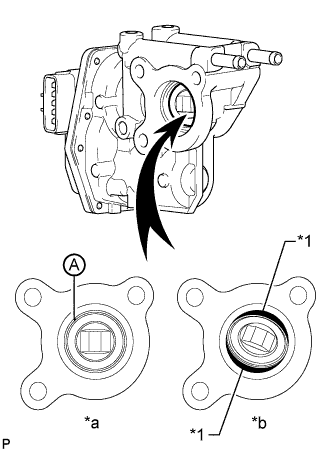
- OK:
- No light passes through (there is no gap between the valve and body).
If light passes through (there is a gap between the valve and body), replace the electric EGR control valve assembly.Text in Illustration *1
Gap
*a
CORRECT
*b
INCORRECT
- HINT:
- Light passes through part A shown in the illustration even if the valve is completely closed. This is not a problem.