2KD-FTV EMISSION CONTROL EXHAUST GAS TEMPERATURE SENSOR INSTALLATION
PROCEDURE

 1.INSTALL NO. 3 EXHAUST GAS TEMPERATURE SENSOR
- NOTICE:
-
If the sensor is dropped, replace it with a new one.
Using a 14 mm union nut wrench, install the No. 3 exhaust gas temperature sensor.
- Torque:
- 30 N*m (306 kgf*cm, 22 ft.*lbf)
- NOTICE:
-
Use the formula to calculate special torque values for situations where a union nut wrench is combined with a torque wrench (See page General>INTRODUCTION>REPAIR INSTRUCTION>PRECAUTION).
2.INSTALL NO. 2 EXHAUST GAS TEMPERATURE SENSOR
- NOTICE:
-
If the sensor is dropped, replace it with a new one.
Using a 14 mm union nut wrench, install the No. 2 exhaust gas temperature sensor.
- Torque:
- 30 N*m (306 kgf*cm, 22 ft.*lbf)
- NOTICE:
-
Use the formula to calculate special torque values for situations where a union nut wrench is combined with a torque wrench (See page General>INTRODUCTION>REPAIR INSTRUCTION>PRECAUTION).
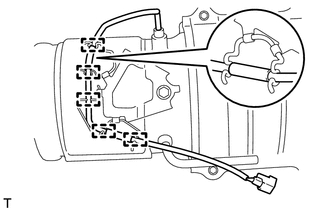
| *1 | Wire Harness |
| *2 | Clamp |
Attach the 5 clamps.
- HINT:
-
Make sure that the part of the wire harness is as shown in the illustration.
3.INSTALL EXHAUST GAS TEMPERATURE SENSOR
- NOTICE:
-
If the sensor is dropped, replace it with a new one.
Using a 14 mm union nut wrench, install the exhaust gas temperature sensor.
- Torque:
- 30 N*m (306 kgf*cm, 22 ft.*lbf)
- NOTICE:
-
Use the formula to calculate special torque values for situations where a union nut wrench is combined with a torque wrench (See page General>INTRODUCTION>REPAIR INSTRUCTION>PRECAUTION).
- HINT:
-
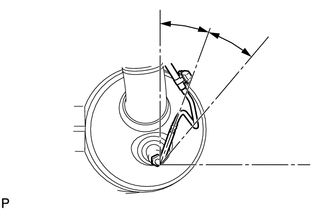 2.396,0.26 2.625,0.427 0.229,0.167 10 false 20° 1.844,0.073 2.094,0.25 0.25,0.177 10 false 20° 1.427,0.042 1.625,0.229 0.198,0.188 10 false *a 3.219,1.604 3.417,1.792 0.198,0.188 10 true *b
*a Top *b LH
-
The sensor should be assembled within 20° of the prescribed position on either side.
4.INSTALL FRONT EXHAUST PIPE ASSEMBLY