1GR-FE INTAKE / EXHAUST INTAKE SYSTEM ON-VEHICLE INSPECTION
PROCEDURE

 1.CHECK INTAKE AIR CONTROL FUNCTION
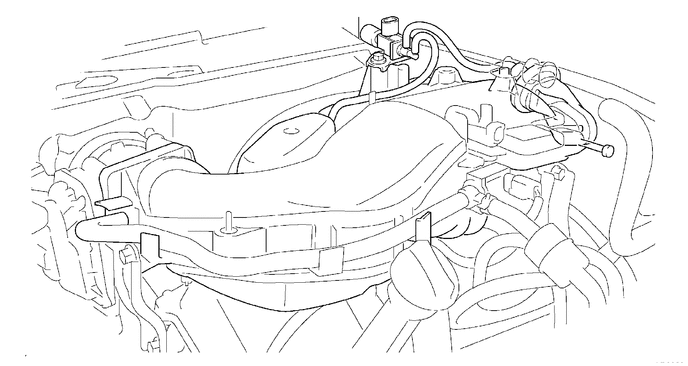
| *1 | Intake Air Control Valve Actuator (for ACIS) | *2 | Vacuum Switching Valve (for ACIS) |
Remove the V-bank cover.
Connect the intelligent tester to the DLC3.
Perform the Active Test and check that the actuator rod operates.
- Powertrain > ECT > Active Test
-
Tester Display Activate the VSV for Swirl Control Valve - 50004 64 43
Start the engine.
Check that the VSV (for ACIS) is ON (seal) under either of the following conditions.
Depressing the accelerator pedal to obtain a throttle valve opening angle of 60°.
Racing the engine above 4700 rpm.
Check that the VSV (for ACIS) is OFF (vent) under either of the following conditions.
The engine is idling.
Releasing the accelerator pedal while under the VSV (for ACIS) ON condition.
If the result is not as specified, inspect the intake air control valve, vacuum tank and VSV (for ACIS) for normal operation. Replace malfunctioning parts as necessary.
Install the V-bank cover.
2.CHECK INTAKE AIR CONTROL VALVE OPERATION
Remove the V-bank cover.
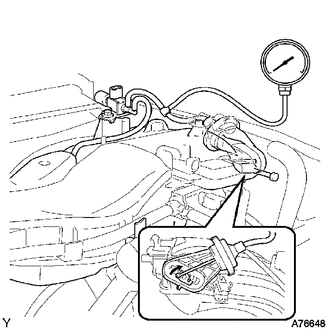
| *1 | Vacuum Gauge |
Using a 3-way connector, connect a vacuum gauge to the actuator hose.
Start the engine.
While the engine is idling, check that the vacuum gauge needle momentarily fluctuates up to approximately 40 kPa (300 mmHg, 11.8 in.Hg) (the actuator rod is pulled out).
Rapidly depress the accelerator pedal to the fully depressed position and check that the vacuum gauge needle points to 0 kPa (0 mmHg, 0 in.Hg) (the actuator rod is returned).
Remove the vacuum gauge and connect the vacuum hose to the actuator.
Install the V-bank cover.
3.INSPECT INTAKE AIR CONTROL VALVE
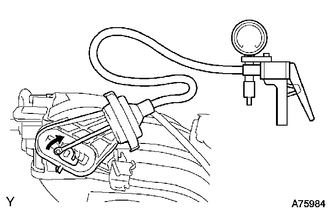
| *1 | Vacuum Pump |
Inspect the diaphragm.
Using a vacuum pump, apply a vacuum of 27 kPa (203 mmHg, 7.97 in.Hg). Check that the lever moves.
If the result is not as specified, replace the intake air surge tank.
4.CHECK AIR INDUCTION SYSTEM
- HINT:
-
The illustration shows the areas that may draw in secondary air, which could lead to idling problems.
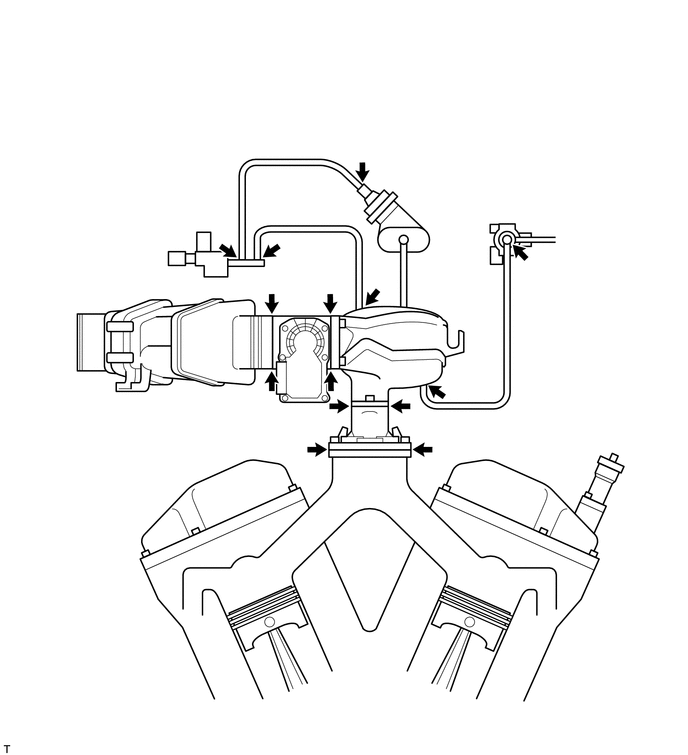
| *1 | Vacuum Switching Valve (for ACIS) | *2 | Intake Air Control Valve Actuator |
| *3 | Purge VSV | *4 | Air Cleaner |
| *5 | Throttle Body | *6 | Intake Air Surge Tank |
| *7 | Intake Manifold | *8 | Vacuum Hose |
Check that the hoses are installed correctly.
Check for cracks, etc. in the hoses.