RM1840EF
_52
Drivetrain
_009612
A750F AUTOMATIC TRANSMISSION / TRANSAXLE
_0052492
AUTOMATIC TRANSMISSION SYSTEM(for 1GR-FE)
J
A750F AUTOMATIC TRANSMISSION / TRANSAXLE AUTOMATIC TRANSMISSION SYSTEM(for 1GR-FE) L4 Position Switch Circuit
DESCRIPTION
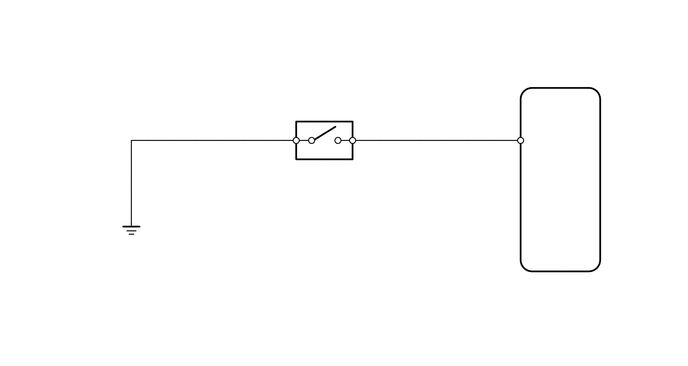
The No. 1 transfer indicator switch (L4 position switch) detects the gear position of the transfer shift lever.
Moving the transfer shift lever to L4 turns the L4 position switch ON. Then the ECM cancels operation of the lock-up clutch.
WIRING DIAGRAM
5.719,2.896 6.125,3.094
0.406,0.198
10
false
C131
5.719,3.063 6.271,3.26
0.552,0.198
10
false
ECM
5.229,1.5 5.448,1.698
0.219,0.198
10
false
13
2.427,1.719 2.802,1.917
0.375,0.198
10
false
C29
3.74,1.479 3.958,1.677
0.219,0.198
10
false
1
2.948,1.49 3.104,1.688
0.156,0.198
10
false
2
2.427,1.896 4.313,2.375
1.885,0.479
10
false
No. 1 Transfer Indicator Switch (L4 Position Switch)
5.531,1.375 5.75,1.573
0.219,0.198
10
false
L4
PROCEDURE
1.CHECK HARNESS AND CONNECTOR (NO. 1 TRANSFER INDICATOR SWITCH - BODY GROUND)
a.
0.49,1 0.948,1.281
0.458,0.281
0.094,0.115 0.406,0.313
0.313,0.198
10
false
*a
0.594,1.073 1.01,1.25
0.417,0.177
9
false
C29
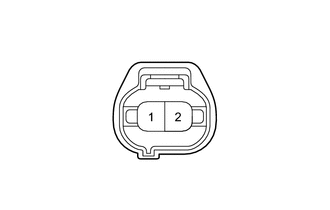
| *a | Front view of wire harness connector
(to No. 1 transfer indicator switch) |
Disconnect the No. 1 transfer indicator switch connector.
b.
Measure the resistance according to the value(s) in the table below.
- Standard Resistance:
Tester Connection Condition Specified Condition C29-2 - Body ground Always Below 1 Ω
- Result:
Proceed to OK NG
OK
2.INSPECT NO. 1 TRANSFER INDICATOR SWITCH (L4 POSITION SWITCH)
NG
REPAIR OR REPLACE HARNESS OR CONNECTOR
2.INSPECT NO. 1 TRANSFER INDICATOR SWITCH (L4 POSITION SWITCH)
a.
0.057,0.0050 0.237,0.207
0.179,0.202
10
*a
0.23,2.85 0.409,3.052
0.179,0.202
10
*c
0.968,2.85 1.148,3.052
0.179,0.202
10
*b
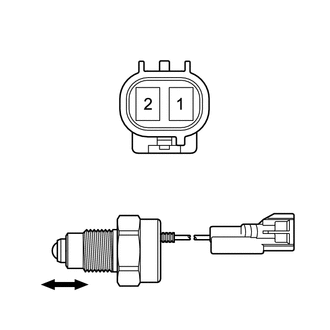
| *a | Component without harness connected
(No. 1 Transfer Indicator Switch) |
| *b | Pushed |
| *c | Not pushed |
Remove the No. 1 transfer indicator switch.
b.
Measure the resistance according to the value(s) in the table below.
- Standard Resistance:
Tester Connection Switch Condition Specified Condition 1 - 2 Pushed Below 1 Ω 1 - 2 Not pushed 10 kΩ or higher
- Result:
Proceed to OK NG
OK
3.CHECK HARNESS AND CONNECTOR (NO. 1 TRANSFER INDICATOR SWITCH - ECM)
NG
REPLACE NO. 1 TRANSFER INDICATOR SWITCH
3.CHECK HARNESS AND CONNECTOR (NO. 1 TRANSFER INDICATOR SWITCH - ECM)
a.
Disconnect the C29 No. 1 transfer indicator switch connector.
b.
Disconnect the C131 ECM connector.
c.
Measure the resistance according to the value(s) in the table below.
- Standard Resistance:
Tester Connection Condition Specified Condition C131-13 (L4) - C29-1 Always Below 1 Ω C131-13 (L4) - Body ground Always 10 kΩ or higher C29-1 - Body ground Always 10 kΩ or higher
- Result:
Proceed to OK NG
OK
PROCEED TO NEXT SUSPECTED AREA SHOWN IN PROBLEM SYMPTOMS TABLE
NG
REPAIR OR REPLACE HARNESS OR CONNECTOR