CLUTCH CLUTCH UNIT INSPECTION
PROCEDURE

 1.INSPECT CLUTCH DISC ASSEMBLY
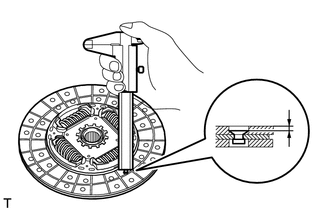
Using a vernier caliper, measure the rivet head depth.
- Minimum rivet head depth:
0.3 mm (0.0118 in.)
If the depth is less than the minimum, replace the clutch disc assembly.
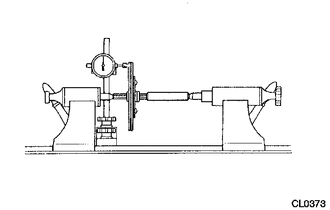
Using a dial indicator, check the disc runout.
- Maximum runout:
0.8 mm (0.0314 in.)
- NOTICE:
-
Be sure to measure on the correct side of the clutch disc.
If the runout is more than the maximum, replace the clutch disc assembly.
2.INSPECT CLUTCH COVER ASSEMBLY
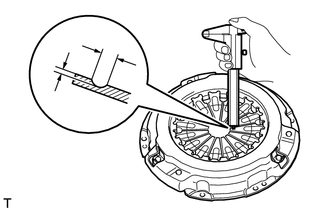
| *a | Width |
| *b | Depth |
Using a vernier caliper, measure the depth and width of the worn areas of the diaphragm spring.
- Maximum width:
6.0 mm (0.236 in.)
- Maximum depth:
0.35 mm (0.0137 in.)
If the depth or width is more than the maximum, replace the clutch cover assembly.
3.INSPECT FLYWHEEL SUB-ASSEMBLY
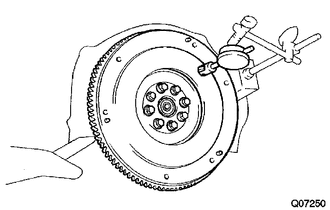
Using a dial indicator, measure the flywheel runout.
- Maximum runout:
0.1 mm (0.00393 in.)
If the runout is more than the maximum, replace the flywheel sub-assembly.
4.INSPECT CLUTCH RELEASE BEARING ASSEMBLY
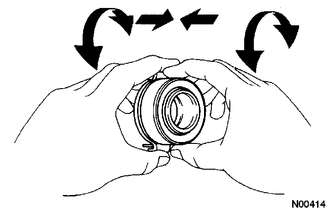
Turn the bearing by hand while applying force in the axial direction and check that the bearing rotates smoothly.
If the bearing sticks or a considerable amount of resistance is felt, replace the release bearing.
- HINT:
-
The bearing is permanently lubricated and requires no cleaning or lubrication.
5.INSPECT INPUT SHAFT FRONT BEARING
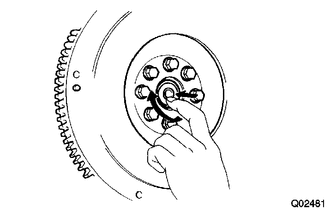
Turn the bearing by hand while applying rotational force and check that the bearing rotates smoothly.
If the bearing sticks or a considerable amount of resistance is felt, replace the input shaft front bearing.
- HINT:
-
The bearing is permanently lubricated and requires no cleaning or lubrication.
6.REPLACE INPUT SHAFT FRONT BEARING
Remove any 2 diametrically opposite bolts.
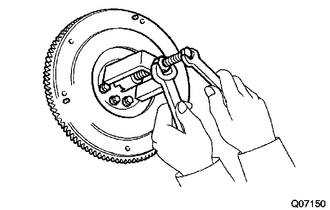
Using SST, remove the input shaft front bearing.
- SST
- 09303-35011
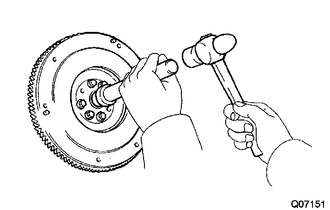
Using SST and a hammer, tap in a new bearing.
- SST
- 09304-12012
- HINT:
-
After installing the bearing to the crankshaft, make sure that it rotates smoothly.
Apply adhesive to 2 or 3 threads of the bolts.
- Adhesive:
Toyota Genuine Adhesive 1324, Three Bond 1324 or equivalent
for TR Engine series:
Install the 2 bolts.
- Torque:
- 27 N*m (270 kgf*cm, 20 ft.*lbf)
- HINT:
-
The mounting bolts are tightened in 2 progressive steps.
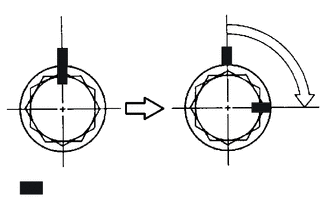
| *a | Paint Mark |
| *b | 90° |
Mark the mounting bolts with paint.
Retighten the mounting bolts by 90°.
Check that the paint marks are now at a 90° angle to the original marked position.
for 1KD-FTV, 2KD-FTV:
Apply adhesive to 2 or 3 threads of the bolts.
- Adhesive:
Toyota Genuine Adhesive 1324, Three Bond 1324 or equivalent
Install the 2 bolts.
- Torque:
- 178 N*m (1815 kgf*cm, 131 ft.*lbf)