DRIVE SHAFT / PROPELLER SHAFT PROPELLER SHAFT ASSEMBLY(for TMT Made) DISASSEMBLY
PROCEDURE

 1.REMOVE CENTER NO. 1 SUPPORT BEARING ASSEMBLY
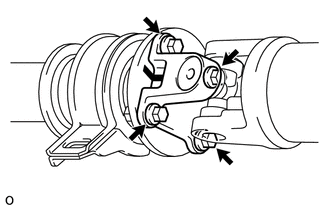
| *1 | Matchmark |
Place matchmarks on the flange coupling and flange yoke.
Remove the 4 nuts and 4 washers.
Disconnect the propeller shaft and intermediate shaft.
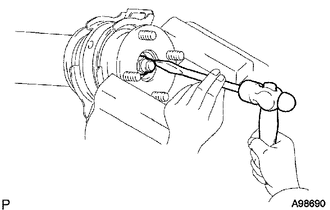
Fix the flange coupling in a vise between aluminum plates at the center bearing section.
- NOTICE:
-
Do not overtighten the vise.
Using a chisel and hammer, loosen the staked part of the lock nut.
- NOTICE:
-
Loosen the staked part of the lock nut completely. Otherwise, the screw of the intermediate shaft may be damaged.
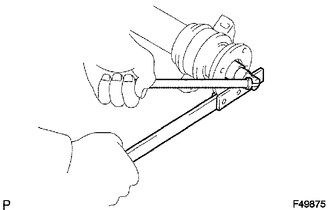
Using SST and a socket wrench, remove the lock nut and washer.
- SST
- 09330-00021
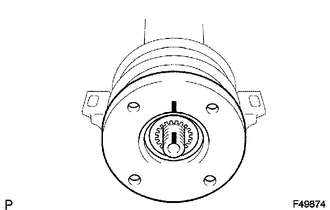
| *1 | Matchmark |
Place matchmarks on the intermediate shaft and flange coupling.
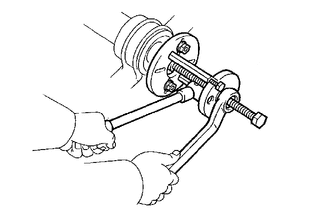
Using SST, remove the flange coupling from the intermediate shaft.
- SST
- 09950-30012 (09951-03010, 09953-03010, 09954-03010, 09955-03030, 09956-03030)
Remove the center support bearing.
2.REMOVE UNIVERSAL JOINT SPIDER ASSEMBLY
- HINT:
-
Use the same procedure for all universal joint spiders.
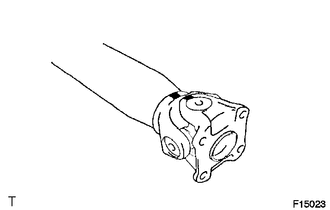
| *1 | Matchmark |
Place matchmarks on the yoke and shaft.
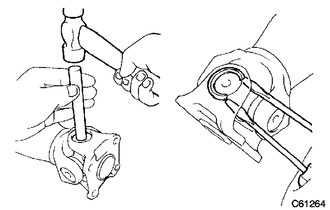
Using a brass bar and hammer, slightly tap in the spider bearing outer races.
Using 2 screwdrivers, remove the 4 snap rings from the grooves.
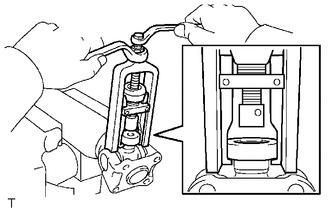
Clamp the shaft in a vise between aluminum plates.
- NOTICE:
-
Do not overtighten the vise.
Using SST, push the yoke side spider bearing until: 1) the spider almost touches the yoke or shaft, and 2) the spider bearing on the opposite side is partially pushed out.
- SST
- 09332-25010
- HINT:
-
Before installing SST, sufficiently raise the part labeled A. If part A is too low, SST may be difficult to install.
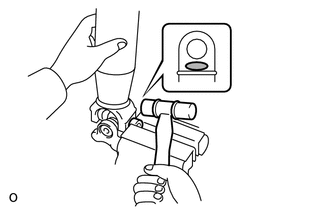
| *1 | Plastic-faced Hammer |
| *a | Hammering Point |
Clamp the pushed out spider bearing outer race in a vise between aluminum plates and tap the shaft to remove the spider bearing.
- NOTICE:
- ·
Do not tap the shaft tube.
·Do not overtighten the vise.
- HINT:
-
Use the same procedure to remove the spider bearing from the opposite side of the spider.
Remove the yoke and spider from the shaft.
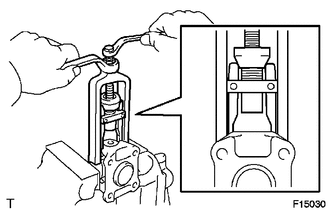
Reinstall the 2 removed spider bearings to the spider and clamp the spider bearings in a vise between aluminum plates.
- NOTICE:
-
Do not overtighten the vise.
Using SST, push the yoke side spider bearing until: 1) the spider almost touches the yoke, and 2) the spider bearing on the opposite side is partially pushed out.
- SST
- 09332-25010
- HINT:
-
Before installing SST, sufficiently raise the part labeled A. If part A is too low, SST may be difficult to install.
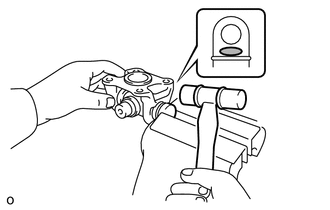
| *1 | Plastic-faced Hammer |
| *a | Hammering Point |
Clamp the pushed out spider bearing outer race in a vise between aluminum plates and tap the yoke to remove the spider bearing.
- NOTICE:
-
Do not overtighten the vise.
- HINT:
-
Use the same procedure to remove the spider bearing from the opposite side of the spider.
Remove the spider from the yoke.