1KD-FTV BATTERY / CHARGING GENERATOR(for BOSCH Made) REASSEMBLY
PROCEDURE

 1.INSTALL GENERATOR DRIVE END FRAME BEARING
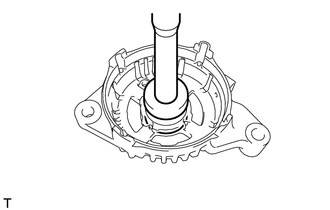
Using SST and a press, press in a new bearing.
- SST
- 09950-60010 (09951-00520)
09950-70010 (09951-07100)
Install the retainer plate with the 4 screws.
- Torque:
- 3.1 N*m (35 kgf*cm, 30 in.*lbf)
2.INSTALL GENERATOR ROTOR ASSEMBLY
- NOTICE:
-
Do not drop the generator rotor assembly.
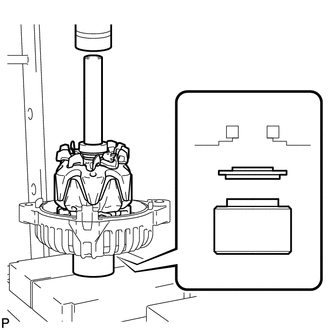
Set the spacer ring, drive end frame, generator rotor and SST1 to SST2 as shown in the illustration.
- SST
- 09285-76010
09630-00014 (09631-00061)
Using SST1, SST2 and a press, slowly press the generator rotor into the drive end frame and spacer ring.
Temporarily install the generator pulley with clutch to the rotor shaft by hand.
3.INSTALL FITTING RING
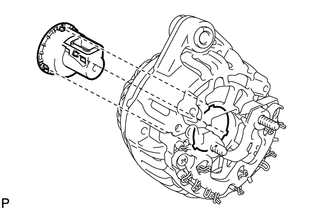
Align the 3 protrusions of the fitting ring with the 3 cutouts of the generator stator with rectifier and install the fitting ring.
4.INSTALL GENERATOR STATOR SUB-ASSEMBLY WITH RECTIFIER
Align the key of the drive end frame with the keyway of the generator stator.
Install the stator with the 4 bolts.
- Torque:
- 4.3 N*m (44 kgf*cm, 38 in.*lbf)
5.INSTALL VOLTAGE REGULATOR ASSEMBLY WITH BRUSH
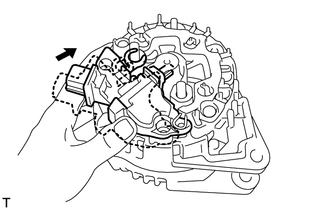
Push in the regulator by hand as shown in the illustration.
Install the regulator with the 3 screws.
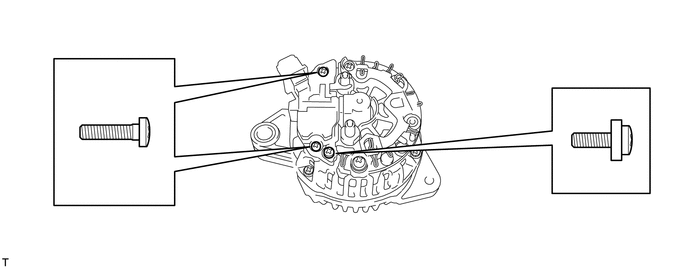
| *1 | Screw A | *2 | Screw B |
- Torque:
- for screw A : 2.5 N*m (25 kgf*cm, 22 in.*lbf)
- for screw B : 1.2 N*m (12 kgf*cm, 11 in.*lbf)
- HINT:
-
Install screw B to the position shown in the illustration.
Install the protective tower.
6.INSTALL GENERATOR REAR END COVER
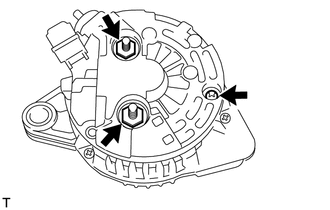
| *1 | Nut A |
| *2 | Nut B |
| *3 | Screw |
Install the rear end cover with the 2 nuts and screw.
- Torque:
- for nut A : 19 N*m (194 kgf*cm, 14 ft.*lbf)
- for nut B : 12 N*m (122 kgf*cm, 9 ft.*lbf)
- for screw : 2.8 N*m (29 kgf*cm, 25 in.*lbf)
- NOTICE:
-
The protective tower must be attached to the end cover.
Install the 2 terminal covers by turning them clockwise.
7.TIGHTEN GENERATOR PULLEY WITH CLUTCH
Mount the generator in a vise between aluminum plates.
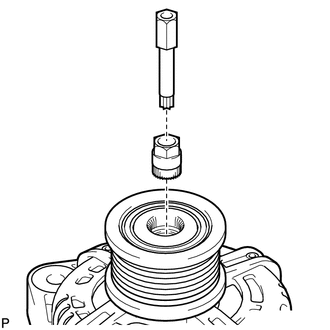
| *1 | 8 mm Bi-hexagon Wrench |
Set SST and an 8 mm bi-hexagon wrench to the pulley as shown in the illustration.
- SST
- 09820-30010
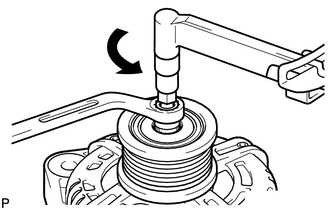
| *1 | 8 mm Bi-hexagon Wrench |
| *a | Hold |

|
Turn |
Hold SST in place, rotate the 8 mm bi-hexagon wrench counterclockwise, and tighten the generator pulley with clutch.
- Torque:
- 80 N*m (816 kgf*cm, 59 ft.*lbf)
8.INSTALL GENERATOR PULLEY CAP
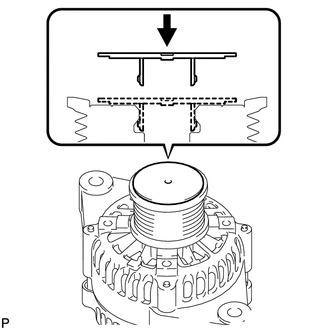
| *1 | Cap Guide |
Install a new generator pulley cap.
- NOTICE:
- ·
Align the cap guide of the generator pulley cap with the hole of the generator pulley and push it in by hand.
·Do not push in the generator pulley cap at an angle.