1GR-FE BATTERY / CHARGING GENERATOR INSPECTION
PROCEDURE

 1.INSPECT GENERATOR ROTOR ASSEMBLY
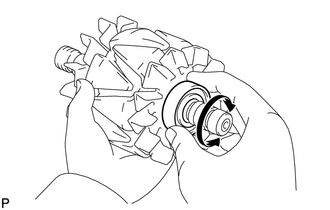
Check that the bearing is not rough or worn and that it rotates smoothly.
If necessary, replace the generator rotor assembly.
Check the resistance.
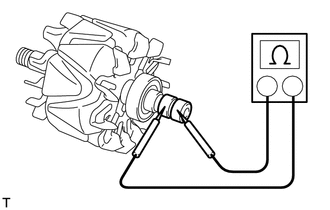
| *1 | Slip Ring |
Measure the resistance according to the value(s) in the table below.
- Standard Resistance:
Tester Connection Condition Specified Condition Slip Ring - Slip Ring 20°C (68°F) 1.8 to 2.8 Ω
If the result is not as specified, replace the generator rotor assembly.
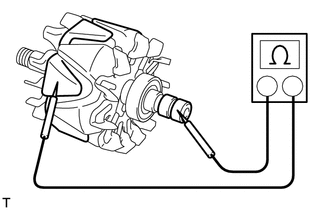
| *1 | Rotor Core |
| *2 | Slip Ring |
Measure the resistance according to the value(s) in the table below.
- Standard Resistance:
Tester Connection Condition Specified Condition Slip Ring - Rotor Core Always 10 kΩ or higher
If the result is not as specified, replace the generator rotor assembly.
Check each slip ring.
Check that the slip rings are not rough or scored.
If rough or scored, replace the generator rotor assembly.
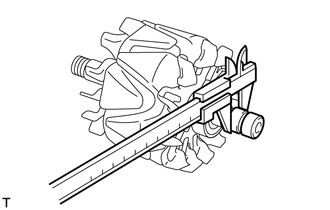
Using a vernier caliper, measure the slip ring diameter.
- Standard diameter:
15.3 to 15.5 mm (0.602 to 0.610 in.)
- Minimum diameter:
14.9 mm (0.587 in.)
If the diameter is less than the minimum, replace the generator rotor assembly.
2.INSPECT GENERATOR STATOR SUB-ASSEMBLY WITH RECTIFIER
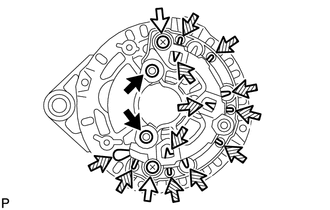

|
Positive (+) Terminal |

|
Negative (-) Terminal |

|
Rectifier Terminal |
- HINT:
-
For terminal positions of the stator generator, refer to the illustration below.
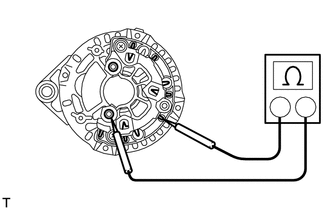
Inspect the positive (+) rectifier.
- HINT:
-
Inspect the positive (+) terminal after pulling it up.
Using an ohmmeter, connect one tester probe to the positive (+) terminal and the other to each rectifier terminal.
Reverse the polarity of the tester probes and repeat the step above.
Check that one shows a resistance of below 1 Ω and the other shows a resistance of 10 kΩ or higher.
If the result is not as specified, replace the generator stator sub-assembly with rectifier.
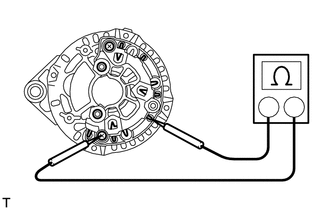
Inspect the negative (-) rectifier.
Using an ohmmeter, connect one tester probe to each negative (-) terminal and the other to each rectifier terminal.
Reverse the polarity of the tester probes and repeat the step above.
Check that one shows a resistance of below 1 Ω and the other shows a resistance of 10 kΩ or higher.
If the result is not as specified, replace the generator stator sub-assembly with rectifier.
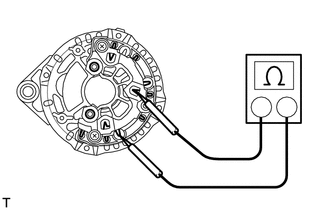
Inspect the stator coil for an open circuit.
Measure the resistance according to the value(s) in the table below.
- Standard Resistance:
Tester Connection Condition Specified Condition Rectifier Terminal - Rectifier Terminal Always Below 1 Ω
If the result is not as specified, replace the generator stator sub-assembly with rectifier.
3.INSPECT VOLTAGE REGULATOR SUB-ASSEMBLY WITH BRUSH
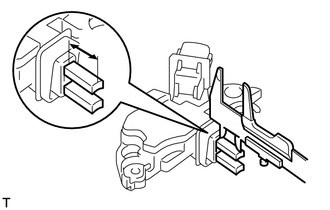
| *1 | Length |
Using a vernier caliper, measure the exposed brush length.
- Standard exposed length:
13.2 mm (0.520 in.)
- Minimum exposed length:
6.0 mm (0.236 in.)
If the exposed length is less than the minimum, replace the voltage regulator sub-assembly with brush.