1GR-FE BATTERY / CHARGING GENERATOR REASSEMBLY
PROCEDURE

 1.INSTALL GENERATOR DRIVE END FRAME BEARING
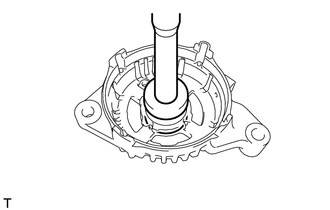
Using SST and a press, press in a new bearing.
- SST
- 09950-60010 (09951-00520)
09950-70010 (09951-07100)
Install the retainer plate with the 4 screws.
- Torque:
- 3.1 N*m (32 kgf*cm, 27 in.*lbf)
2.INSTALL GENERATOR ROTOR ASSEMBLY
- NOTICE:
-
Do not drop the generator rotor assembly.
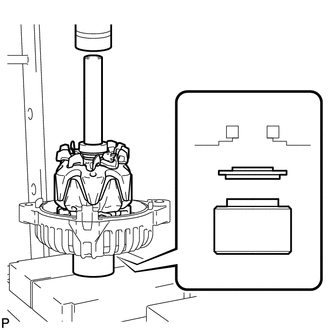
| *1 | Spacer |
Set the spacer ring, drive end frame, generator rotor assembly and SST1 to SST2 as shown in the illustration.
- SST
- 09285-76010
09630-00014 (09631-00061)
Using SST1, SST2 and a press, slowly press the generator rotor into the drive end frame and spacer ring.
3.INSTALL GENERATOR PULLEY
Mount the generator in a vise between aluminum plates.
- NOTICE:
-
Do not damage the generator.
Temporarily install the washer and generator pulley with the nut.
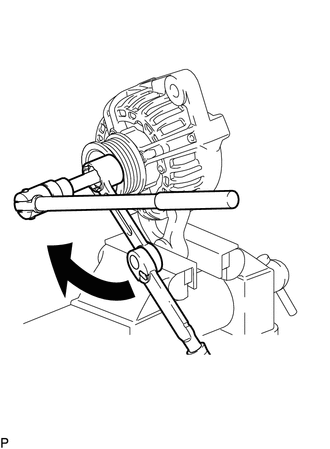
| *1 | 8 mm Bi-hexagon Wrench |
| *2 | Ball Joint Lock Nut Wrench |
| *a | Hold |

|
Turn |
Set SST, a ball joint lock nut wrench and an 8 mm bi-hexagon wrench as shown in the illustration.
- SST
- 09820-30020
Hold the 8 mm bi-hexagon wrench in place and turn SST and the ball joint lock nut wrench clockwise to tighten the nut.
- Torque:
- 80 N*m (816 kgf*cm, 59 ft.*lbf)
- NOTICE:
- ·
Use the formula to calculate special torque values for situations where a ball joint lock nut wrench is combined with a torque wrench (See page General>INTRODUCTION>REPAIR INSTRUCTION>PRECAUTION).
·Do not use a tool such as an impact wrench or equivalent.
Check that the generator pulley rotates smoothly.
4.INSTALL FITTING RING
Align the 3 cutouts of the fitting ring with the stator generator with rectifier.
5.INSTALL GENERATOR STATOR SUB-ASSEMBLY WITH RECTIFIER
Align the key of the drive end frame with the keyway of the generator stator.
Install the stator with the 4 bolts.
- Torque:
- 4.3 N*m (44 kgf*cm, 38 in.*lbf)
6.INSTALL VOLTAGE REGULATOR SUB-ASSEMBLY WITH BRUSH
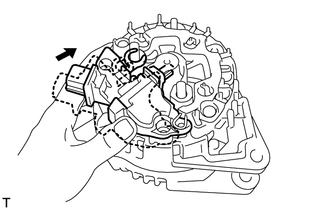
Attach the brushes and terminals to the rectifier end frame of the regulator.
Install the regulator with the 3 screws.
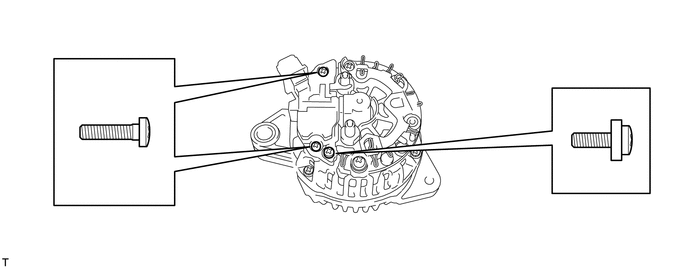
| *1 | Screw A | *2 | Screw B |
- Torque:
- for screw A : 2.2 N*m (22 kgf*cm, 19 in.*lbf)
- for screw B : 1.2 N*m (12 kgf*cm, 11 in.*lbf)
- HINT:
-
Install screw B to the position shown in the illustration.
7.INSTALL GENERATOR REAR END COVER
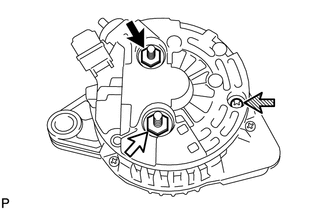
|
|
Nut A |

|
Nut B |

|
Screw |
Install the rear end cover with the 2 nuts and screw.
- Torque:
- for nut A : 19 N*m (194 kgf*cm, 14 ft.*lbf)
- for nut B : 12 N*m (122 kgf*cm, 9 ft.*lbf)
- for screw : 2.4 N*m (24 kgf*cm, 21 in.*lbf)
- NOTICE:
-
The protective tower must be attached on the end cover.
Install the 2 terminal covers by turning them clockwise.