HEATING / AIR CONDITIONING AIR CONDITIONING PANEL(for Manual Air Conditioning System) INSPECTION
PROCEDURE

 1.INSPECT AIR CONDITIONING CONTROL ASSEMBLY
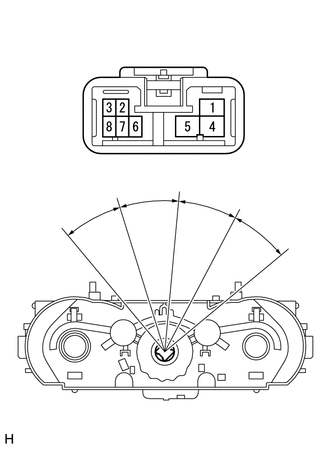
| *a | Component without harness connected
(Air Conditioning Control Assembly) |
Measure the resistance according to the value(s) in the table below.
- Standard Resistance:
Tester Connection Switch Condition Specified Condition 1 - 2 - 4 - 5 - 6 OFF 10 kΩ or higher 5 - 6 LO Below 1 Ω 2 - 5 - 6 LO - M1 Below 1 Ω 2 - 5 - 6 M1 Below 1 Ω 1 - 2 - 5 - 6 M1 - M2 Below 1 Ω 1 - 5 - 6 M2 Below 1 Ω 1 - 4 - 5 - 6 M2 - HI Below 1 Ω 4 - 5 - 6 HI Below 1 Ω
If the result is not as specified, replace the air conditioning control assembly.
Inspect illuminations.
Connect the positive (+) lead of the battery to terminal 8 and negative (-) lead to terminal 3. Check that the bulbs illuminate.
If a bulb does not illuminate, replace it.
2.INSPECT COOLER SWITCH
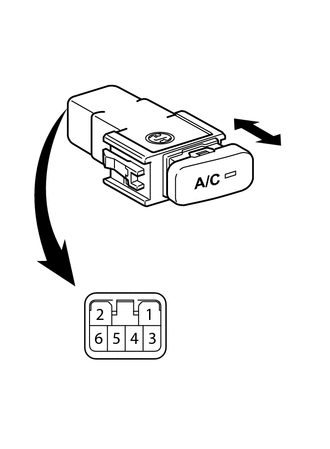
| *1 | Indicator Light |
| *2 | Illumination Light |
| *a | Component without harness connected
(Cooler Switch) |
| *b | ON |
| *c | OFF |
Check the cooler switch resistance.
Using an ohmmeter, measure the resistance and check the results in accordance with the values in the table below.
- Standard Resistance:
Tester Connection Condition Specified Condition 5 - 6 Cooler Switch OFF 10 kΩ or higher 5 - 6 Cooler Switch ON Below 1 Ω
If the result is not as specified, replace the cooler switch.
Check the A/C indicator operation.
Connect the positive (+) lead from the battery to terminal 6 and the negative (-) lead to terminal 4.
Push the cooler switch in and check that the indicator lights up.
- Standard:
Indicator lights up
If the result is not as specified, replace the cooler switch.
Check the illumination operation.
Connect the positive (+) lead from the battery to terminal 3 and the negative (-) lead to terminal 1 and check that the bulb illuminates.
- Standard:
Bulb illuminates
If the result is not as specified, replace the cooler switch.