INTERIOR PANELS / TRIM UPPER INSTRUMENT PANEL REASSEMBLY
PROCEDURE

 1.INSTALL COOLER (SOLAR SENSOR) THERMISTOR (for Automatic Air Conditioning System)
2.INSTALL LIGHT CONTROL SWITCH HOLE COVER (w/ Automatic Light Control System)
Attach the guide and 2 claws to install the light control switch hole cover.
3.INSTALL AUTOMATIC LIGHT CONTROL SENSOR (w/ Automatic Light Control System)
4.INSTALL NO. 2 INSTRUMENT PANEL CUSHION
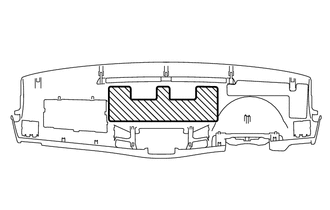
Clean the instrument panel surface.
Align a new No. 2 instrument panel cushion with the markings on the upper instrument panel and install the No. 2 instrument panel cushion to the position shown in the illustration using double-sided tape.
5.REMOVE NO. 3 INSTRUMENT PANEL CUSHION
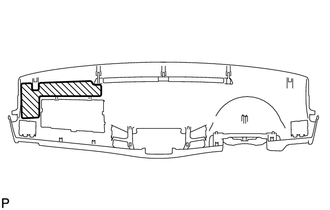
Clean the instrument panel surface.
Align a new No. 3 instrument panel cushion with the markings on the upper instrument panel and install the No. 3 instrument panel cushion to the position shown in the illustration using double-sided tape.
6.INSTALL NO. 4 INSTRUMENT PANEL CUSHION
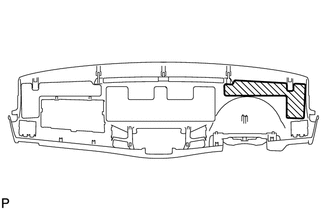
Clean the instrument panel surface.
Align a new No. 4 instrument panel cushion with the markings on the upper instrument panel and install the No. 4 instrument panel cushion to the position shown in the illustration using double-sided tape.
7.INSTALL INSTRUMENT PANEL CUP HOLDER SUB-ASSEMBLY
- HINT:
-
Use the same procedure for both instrument panel cup holders.
Install the instrument panel cup holder with the 3 screws <B>.
8.INSTALL NO. 2 INSTRUMENT PANEL REGISTER ASSEMBLY
Attach the 4 claws to install the No. 2 instrument panel register.
9.INSTALL NO. 1 INSTRUMENT PANEL REGISTER ASSEMBLY
- HINT:
-
Use the same procedure described for the No. 2 instrument panel register.
10.INSTALL METER MOUNTING BRACKET
Install the meter mounting bracket with the screw <B>.
11.INSTALL NO. 1 DEFROSTER NOZZLE OPENING PLATE (w/o Defroster)
Attach the 6 claws to install the No. 1 defroster nozzle opening plate.
12.INSTALL NO. 2 DEFROSTER NOZZLE OPENING PLATE (w/o Defroster)
- HINT:
-
Use the same procedure described for the No. 1 defroster nozzle opening plate.
13.INSTALL INSTRUMENT PANEL DOOR (w/o Front Passenger Airbag)
Attach the 2 guides and 8 claws to install the instrument panel door.
Install the 2 screws <B>.