NETWORKING CAN COMMUNICATION SYSTEM(w/ VSC) HOW TO PROCEED WITH TROUBLESHOOTING
CAUTION / NOTICE / HINT
IMPORTANT POINT CONCERNING TROUBLESHOOTING
- CAUTION:
-
Wait at least 90 seconds after disconnecting the cable from the negative (-) battery terminal to disable the SRS system.
- NOTICE:
- ·
Refer to the troubleshooting procedures of each system if DTCs regarding the CAN communication system are not output.
·Before measuring the resistance, leave the vehicle for at least 1 minute and do not operate the ignition switch, any switches or any doors. If doors need to be opened in order to check connectors, open the doors and leave them open.
·After turning the ignition switch off, waiting time may be required before disconnecting the cable from the battery terminal. Therefore, make sure to read the disconnecting the cable from the battery terminal notice before proceeding with work.
Click hereGeneral>INTRODUCTION>REPAIR INSTRUCTION>PRECAUTION
·When disconnecting the cable, some systems need to be initialized after the cable is reconnected.
Click hereGeneral>INTRODUCTION>REPAIR INSTRUCTION>INITIALIZATION
- HINT:
- ·
Operating the ignition switch, any switches or any doors triggers related ECU and sensor communication with the CAN, which causes resistance variation.
·*: Use the intelligent tester.
DTCs indicating a CAN communication malfunction are also stored due to internal or power source-related problems in ECUs or sensors of systems using CAN communication. Therefore, check whether codes indicating internal or power source-related problems in those systems are output together with the CAN communication DTCs.
It is possible to inspect the circuit of the DLC3 branch line or V bus main line for malfunctions by inspecting the terminals of the DLC3 using SST.
- NOTICE:
-
It is only possible to inspect branch lines to ECUs (sensors) or the V1 bus from the DLC3.
It is possible to check which ECUs (sensors) are not able to communicate via CAN communication by checking the "Bus Check" function of the intelligent tester (when the DLC3 CAN branch wire and V1 bus CAN main wire are normal).
- HINT:
- ·
When checking "Bus Check", ECUs (sensors) whose branch line is open or that cannot communicate via CAN communication do not respond to the intelligent tester (they are not displayed on the screen).
·When checking "Bus Check", if a DTC indicating a CAN communication malfunction is output even though all ECUs (sensors) respond (they are displayed on the screen), use the DTC combination table to determine the suspected trouble area and perform symptom simulation.
For past malfunctions of the V bus, the ECUs (sensors) which cannot communicate via CAN communication can be determined from the combination of CAN communication DTCs that are output.
When an open circuit malfunction is confirmed, before disconnecting the connectors for inspection, check whether the connectors are loose by pushing in the connector case.
When a connector is disconnected, check if the connector terminals or case is damaged, deformed, deteriorated, etc.
PROCEDURE
- Result:
Proceed to NEXT
NEXT
- Standard voltage:
11 to 14 V
If the voltage is below 11 V, recharge or replace the battery before proceeding.
- Result:
Proceed to NEXT
NEXT
Using the intelligent tester, check for all DTCs.
- NOTICE:
- ·
If codes indicating internal or power source-related malfunctions of ECUs or sensors are output together with codes indicating that those ECUs or sensors cannot communicate via CAN communication, it is likely that the problem is not in the CAN communication line. Therefore, perform troubleshooting for the DTCs related to the malfunctioning parts first.
·If a connector of a system which includes a CAN communication line is disconnected when the ignition switch is ON or ACC, CAN communication DTCs will be stored by that system and any related systems.
- Result:
Proceed to NEXT
NEXT
Based on the vehicle equipment and specifications, confirm the systems that use CAN communication.
Click herePower Source / Network>NETWORKING>CAN COMMUNICATION SYSTEM(w/ VSC)>DIAGNOSIS SYSTEM
- Result:
Proceed to NEXT
NEXT
Disconnect the cable from the negative (-) battery terminal before measuring the resistances of the CAN main wire and CAN branch wire.
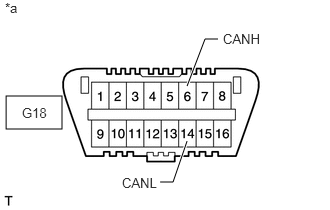
| *a | Front view of DLC3 |
Measure the resistance of the DLC3.
- Standard Resistance:
Tester Connection Switch Condition Specified Condition Proceed to G18-6 (CANH) - G18-14 (CANL) Ignition switch off OK (54 to 69 Ω) A G18-6 (CANH) - G18-14 (CANL) Ignition switch off NG (Higher than 69 Ω) B G18-6 (CANH) - G18-14 (CANL) Ignition switch off NG (Below 54 Ω) C
A
B
Click herePower Source / Network>NETWORKING>CAN COMMUNICATION SYSTEM(w/ VSC)>Open in CAN Main Bus Line
C
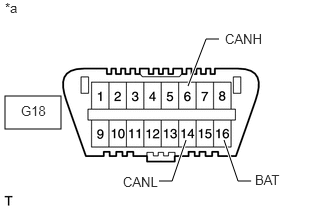
| *a | Front view of DLC3 |
Measure the resistance of the DLC3.
- Standard Resistance:
Tester Connection Switch Condition Specified Condition G18-6 (CANH) - G18-16 (BAT) Ignition switch off 6 kΩ or higher G18-14 (CANL) - G18-16 (BAT) Ignition switch off 6 kΩ or higher
- Result:
Proceed to OK NG
OK
NG
Click herePower Source / Network>NETWORKING>CAN COMMUNICATION SYSTEM(w/ VSC)>Short to B+ in CAN Bus Line
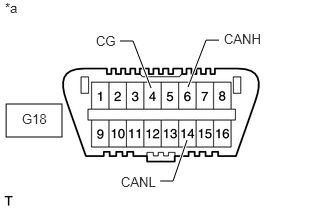
| *a | Front view of DLC3 |
Measure the resistance of the DLC3.
- Standard Resistance:
Tester Connection Switch Condition Specified Condition G18-6 (CANH) - G18-4 (CG) Ignition switch off 200 Ω or higher G18-14 (CANL) - G18-4 (CG) Ignition switch off 200 Ω or higher
- Result:
Proceed to OK NG
OK
NG
Click herePower Source / Network>NETWORKING>CAN COMMUNICATION SYSTEM(w/ VSC)>Short to GND in CAN Bus Line
Connect the cable to the negative (-) battery terminal.
- NOTICE:
-
When disconnecting the cable, some systems need to be initialized after the cable is reconnected.
-
Click hereGeneral>INTRODUCTION>REPAIR INSTRUCTION>INITIALIZATION
Select "Bus Check" from "System Select".
Click herePower Source / Network>NETWORKING>CAN COMMUNICATION SYSTEM(w/ VSC)>DIAGNOSIS SYSTEM
Check the display of the connected ECUs and sensors for a minute.
- Result:
Result Proceed to All ECUs and sensors connected to CAN communication system are displayed on screen (CAN bus circuit currently normal) A Single ECU or sensor that should be connected to CAN communication is not displayed (ECU or sensor CAN branch wire open or communication stop) B ECU or sensor that should be connected to CAN communication is not displayed or display is intermittent during check (ECU or sensor CAN branch wire open on one side) C
- NOTICE:
-
ECUs and sensors that are not present will not be displayed. Be careful not to mistake them for communication stop malfunctions.
- HINT:
-
If the display of an ECU is intermittent during the check, one side of an ECU or sensor CAN branch wire is open (the signal of the ECU is treated as noise, which affects the response and display of the intelligent tester).
A
B
C
Select "Bus Check" from "System Select".
Click herePower Source / Network>NETWORKING>CAN COMMUNICATION SYSTEM(w/ VSC)>DIAGNOSIS SYSTEM
Write down all of the DTCs stored in each ECU.
- HINT:
- ·
If there are communication malfunction DTCs output but the intelligent tester "Bus Check - Communication Bus Check" screen displays all of the ECUs and sensors connected to the CAN system, the communication malfunction DTCs may be past malfunctions that are no longer present.
·For V bus CAN main wire malfunctions, DTCs for related ECUs are also output. Therefore, determine the malfunctioning area based on all of the DTCs that are output.
- Result:
Proceed to NEXT
NEXT
Based on the combination of output CAN communication system DTCs, determine which ECUs and sensors have a communication stop malfunction.
Click herePower Source / Network>NETWORKING>CAN COMMUNICATION SYSTEM(w/ VSC)>DIAGNOSIS SYSTEM
- Result:
Proceed to NEXT
NEXT
Using the intelligent tester, clear all DTCs.
Perform a malfunction simulation test on all harnesses and connectors related to the V bus CAN main wire.
Check the DTCs that were output as a result of the malfunction simulation test. Then determine the malfunctioning area.
- Result:
Proceed to NEXT
NEXT
- Result:
Proceed to NEXT
NEXT
Using the intelligent tester, clear all DTCs.
- Result:
Proceed to NEXT
NEXT
- Result:
Proceed to NEXT
NEXT