FUEL SYSTEM > DETAILS


SYSTEM CONTROL


  1. Common-rail System


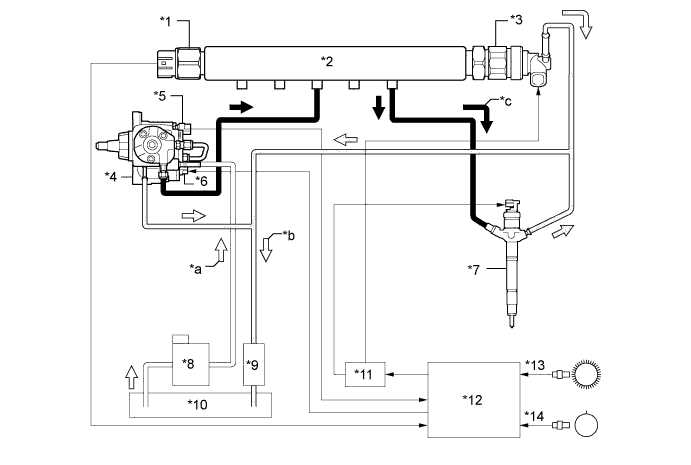
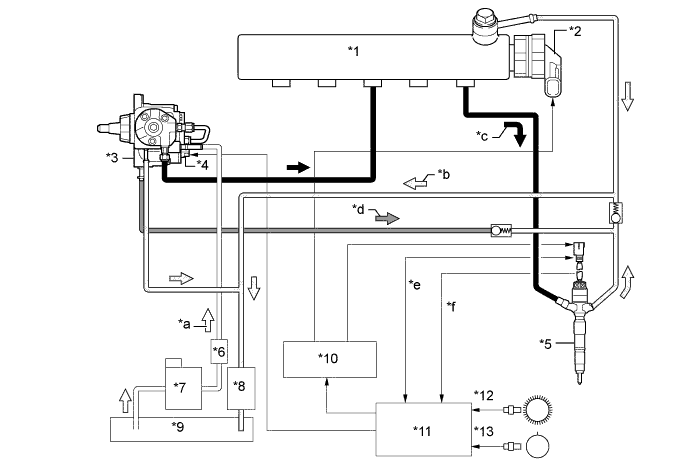
    1. In this system, the highly pressurized fuel supplied by the supply pump is stored in the common-rail, and the ECM sends signals to the injectors via the injector driver in order to control the injection timing and injection volume.

      W102286E01


      Text in Illustration (Except Model Compliant with Tier 1.5 Emission Regulations:) 
      *1
      Fuel Pressure Sensor
      *2
      Common-rail Assembly
      *3
      Pressure Discharge Valve
      *4
      Supply Pump Assembly
      *5
      Fuel Temperature Sensor
      *6
      Suction Control Valve (SCV)
      *7
      Injector Assembly
      *8
      Fuel Filter Assembly
      *9
      Fuel Cooler
      *10
      Fuel Tank
      *11
      Injector Driver
      *12
      ECM
      *13
      Crank Position Sensor (NE Signal)
      *14
      Camshaft Position Sensor (G Signal)
      *a
      Fuel (Suction)
      *b
      Fuel (Return)
      *c
      Fuel (High Pressure)
      -
      -
      W107460E01


      Text in Illustration (Model Compliant with Tier 1.5 Emission Regulations:) 
      *1
      Common-rail Assembly
      *2
      Pressure Discharge Valve
      *3
      Supply Pump Assembly
      *4
      Suction Control Valve (SCV)
      *5
      Injector Assembly
      *6
      2nd Fuel Filter
      *7
      Fuel Filter Assembly
      *8
      Fuel Cooler
      *9
      Fuel Tank
      *10
      Injector Driver
      *11
      ECM
      *12
      Crank Position Sensor (NE Signal)
      *13
      Camshaft Position Sensor (G Signal)
      -
      -
      *a
      Fuel (Suction)
      *b
      Fuel (Return)
      *c
      Fuel (High Pressure)
      *d
      Fuel (Back Pressure)
      *e
      INJ Communication (Fuel Temperature Signal and Memory IC Communication)
      *f
      Fuel Pressure Signal

CONSTRUCTION


  1. Supply Pump Assembly


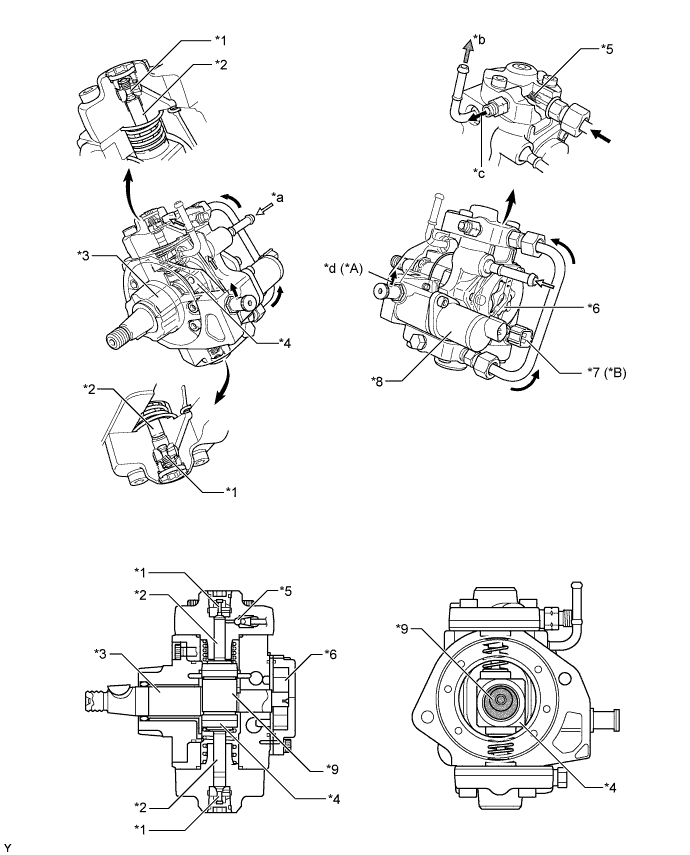
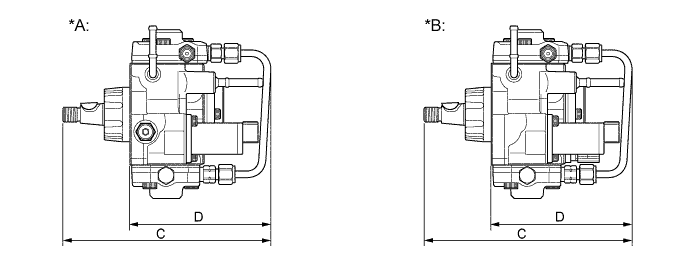
    1. An HP3 type supply pump is used.


      W107482E01


      Text in Illustration 
      *A
      Model Compliant with Tier 1.5 Emission Regulations
      *B
      Except Model Compliant with Tier 1.5 Emission Regulations

      Supply Pump Specifications 
      Type
      HP3
      Length
      C
      190.2 mm (7.49 in.)
      D
      129.0 mm (5.08 in.)
      SCV
      1
      Plunger
      φ 8.5 mm x 2
      Weight
      3800 g (8.38 lb)

      HINT:
      1. The ECM learns and memorizes the pump discharge volume variances associated with the individual differences in the supply pumps. Therefore, make sure to perform the operation described below after replacing the supply pump. For details, refer to the corresponding Repair Manual for this model.
      2. Connect an intelligent tester II to the DLC3 connector and use the tester to reset the learned value. Alternatively, connect the SST (09843-18040) between the TC and CG terminals of the DLC3 connector, and leave the ignition switch ON for approximately 3 minutes to reset the learned value.
      3. After resetting, start the engine, allow it to idle* for approximately 1 minute, and turn the ignition switch off to enable the engine to memorize the learned value.
      1. *: The engine coolant temperature should be 60°C (140°F) or more, and the fuel temperature should be 20°C (68°F) or more.

    2. The supply pump consists of an eccentric camshaft, a ring cam, 2 plungers, 4 check valves, a Suction Control Valve (SCV), a fuel temperature sensor*, and a feed pump.

      1. *: Except models compliant with Tier 1.5 emission regulation


    3. The 2 plungers are placed opposite each other outside of the ring cam.


      W104208E04


      Text in Illustration 
      *A
      Models Compliant with Tier 1.5 Emission Regulations
      *B
      Except Models Compliant with Tier 1.5 Emission Regulations
      *1
      Check Valve (for Suction)
      *2
      Plunger
      *3
      Eccentric Camshaft
      *4
      Ring Cam
      *5
      Check Valve (for Discharge)
      *6
      Feed Pump
      *7
      Fuel Temperature Sensor
      *8
      SCV
      *9
      Eccentric Cam Portion
      -
      -
      *a
      From Fuel Tank (for Suction)
      *b
      To Fuel Tank (for Return)
      *c
      To Common-rail
      *d
      To Injector Assembly (for Back Pressure)


  2. Common-rail Assembly

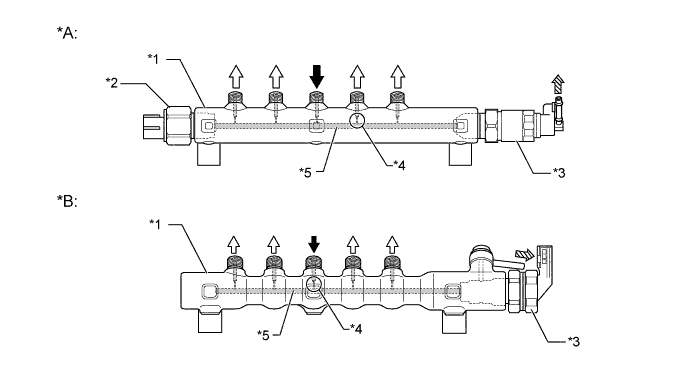
    1. The function of the common-rail is to store the fuel that has been pressurized by the supply pump.

    2. Except on the models compliant with Tier 1.5 emission regulations, the common-rail is provided with a fuel pressure sensor and pressure discharge valve.

    3. On the models compliant with Tier 1.5 emission regulations, the common-rail is provided with a pressure discharge valve.

    4. The fuel pressure sensor detects the fuel pressure in the common-rail.

    5. The pressure discharge valve regulates the fuel pressure. In the pressure discharge valve, the plunger opens and closes in accordance with the actuation signals from the injector driver. Thus, it regulates pressure by releasing excess pressure from the common-rail. In addition, it has a pressure reduction function in case of emergency.


    6. Internally, the common-rail contains a main hole and 5 branch holes that intersect the main hole. Each branch hole functions as an orifice that dampens the fluctuation of the fuel pressure.


      W107483E01


      Text in Illustration 
      *A
      Except Models Compliant with Tier 1.5 Emission Regulations
      *B
      Models Compliant with Tier 1.5 Emission Regulations
      *1
      Common-rail Assembly
      *2
      Fuel Pressure Sensor
      *3
      Pressure Discharge Valve
      *4
      Branch Hole
      *5
      Main Hole
      -
      -
      V100135
      From Supply Pump
      V100136
      To Injector Assembly
      V100137
      To Fuel Tank (Excess Pressure)
      -
      -

      HINT:
      1. The fuel pressure sensor has its sealing portion plastic-deformed in order to keep sealing performance, so do not reuse it after disassembling.
      2. If parts that affect the alignment have been changed, make sure to replace the pipe with a new one as well. The parts that require the replacement of a pipe are listed below:
        1. Injection pipe: injector, common-rail, and cylinder head
        2. Fuel inlet pipe: supply pump, common-rail, cylinder block, cylinder head, cylinder head gasket and timing gear case
      3. For details, refer to the corresponding Repair Manual for this model.


  3. Injector Assembly

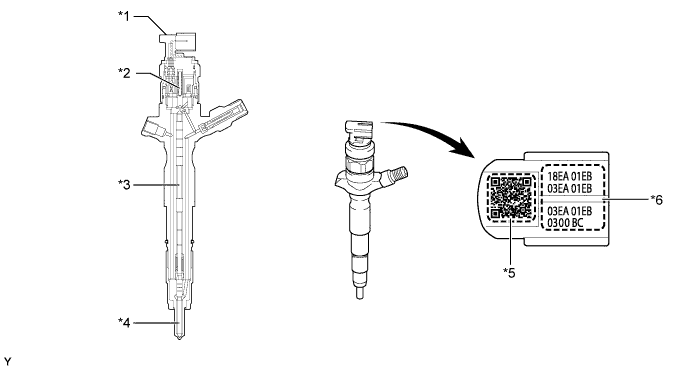
    1. Except on the models compliant with Tier 1.5 emission regulations, each injector assembly consists of a nozzle needle, a piston, and a solenoid valve.

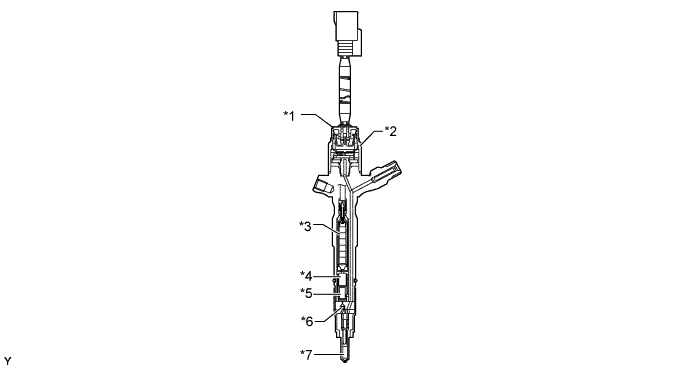
    2. On the models compliant with Tier 1.5 emission regulations, each injector assembly consists of a nozzle needle, 2 pistons, a three-way valve, a piezo actuator, a fuel pressure sensor, a fuel temperature sensor and memory IC. The fuel temperature sensor and memory IC communicate with the ECM.

    3. Except on the models compliant with Tier 1.5 emission regulations, An injector compensation value and a Quick Response (QR) code containing encoded characteristics of the injector are printed on each injector.

    4. On models compliant with Tier 1.5 emission regulations, an injector compensation value and a QR code are not printed on the injector assembly because injection volume is automatically corrected.


    5. On the models compliant with Tier 1.5 emission regulations, the injector assembly is provided with an auto-learning function. Learned values are stored by the injector assembly in its own built-in memory IC.


      W107455E01


      Text in Illustration (Models Compliant with Tier 1.5 Emission Regulations:) 
      *1
      Injector Assembly
      *2
      Fuel Temperature Sensor, Fuel Pressure Sensor and Memory IC Portion
      *3
      Piezo Actuator
      *4
      No. 1 Piston
      *5
      No. 2 Piston
      *6
      Three-way Valve
      *7
      Nozzle Needle
      -
      -

      W102289E01


      Text in Illustration (Except Model Compliant with Tier 1.5 Emission Regulations:) 
      *1
      Injector Assembly
      *2
      Solenoid Valve
      *3
      Piston
      *4
      Nozzle Needle
      *5
      QR Code
      *6
      Injector Compensation Value

      HINT:
      1. Except on the models compliant with Tier 1.5 emission regulations, if the ECM is replaced, use the intelligent tester II and input the injector compensation values of all 4 injectors. If the injector is replaced, input the injector compensation value of the replaced injector. Then, the proper compensation will be made so that the injection volume precision prior to the replacement will remain unchanged. For details, refer to the corresponding Repair Manual for this model.
      2. The QR code, which requires a special scan tool, is not used at TOYOTA dealers.
      3. What is Quick Response (QR) Code?
        1. QR code, a matrix symbology consisting of an array of nominally square cells, allows omni-directional, high-speed reading of large amounts of data.
        2. QR code encodes many types of date such as numeric, alphanumeric, kanji, kana and binary code. A maximum of 7089 characters (numeric) can be encoded.
        3. QR code (2D code) contains information in the vertical and horizontal directions, whereas a bar code contains data in one direction only. QR code (2D code) holds a considerably greater volume of information than a bar code.


  4. Fuel Filter Assembly

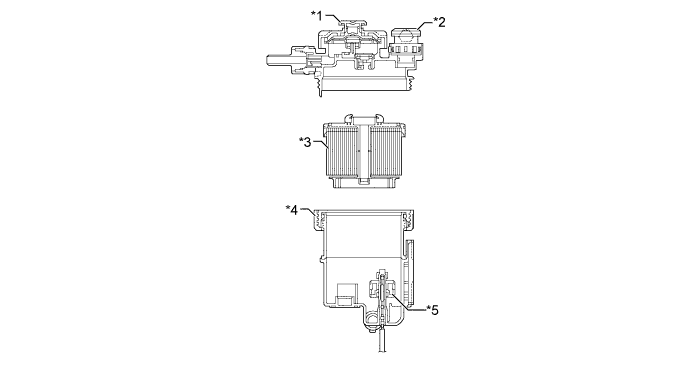
    1. A fuel filter assembly consists of a separate filter element and a filter housing.

    2. A paper filter element that offers high filtering efficiency and captures the minutest particles is used.


    3. A fuel filter warning switch is provided in the fuel filter assembly.


      W102869E01


      Text in Illustration 
      *1
      Priming Pump
      *2
      Fuel Filter Warning Switch (Vacuum Switch)
      *3
      Filter Element
      *4
      Filter Housing
      *5
      Fuel Sedimenter Level Warning Switch
      -
      -


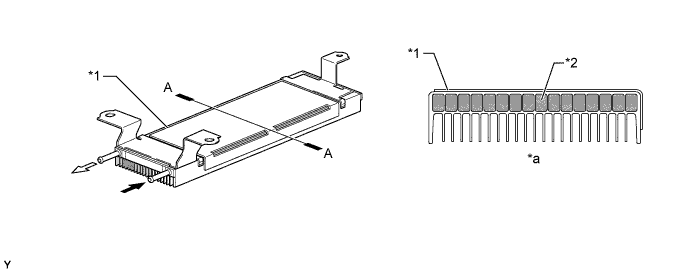
  5. Fuel Cooler

    1. An air-cooled fuel cooler is used.


    2. The fuel cooler, which is provided in the fuel return path, cools the return fuel that has reached a high temperature as a result of the pumping of the supply pump. This prevents the reduction in fuel viscosity that is caused by the rise in fuel temperature, and improves the reliability of the fuel system.


      W104113E01


      Text in Illustration 
      *1
      Fuel Cooler
      *2
      Fuel
      *a
      A - A Cross Section
      -
      -
      V100136
      To Fuel Tank
      V100135
      From Engine


OPERATION


  1. Supply Pump Assembly


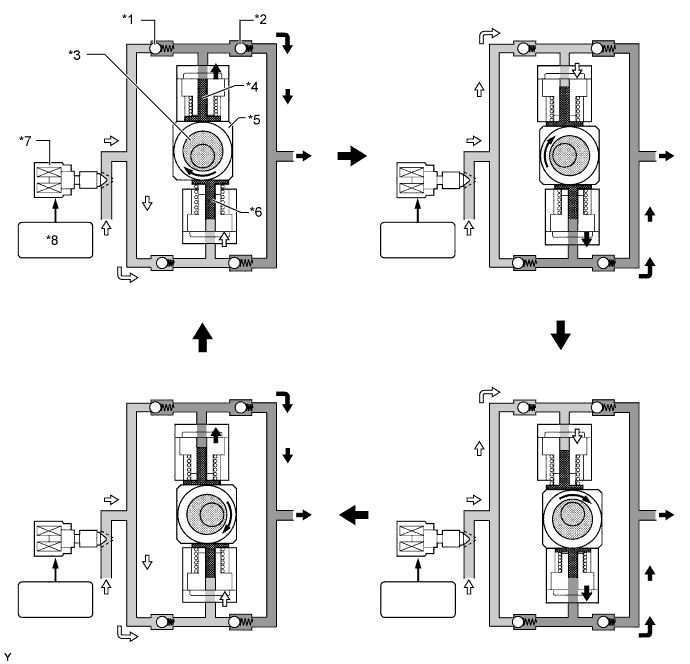
    1. Due to the rotation of the eccentric cam, the ring cam pushes plunger "A" upward as illustrated below. The force of the spring pulls plunger "B" (which is located opposite plunger "A") upward. As a result, plunger "B" draws fuel in, and plunger "A" pumps fuel at the same time.


      W102348E01


      Text in Illustration 
      *1
      Check Valve (for Suction)
      *2
      Check Valve (for Discharge)
      *3
      Eccentric Cam
      *4
      Plunger "A"
      *5
      Ring Cam
      *6
      Plunger "B"
      *7
      Suction Control Valve (SCV)
      *8
      ECM

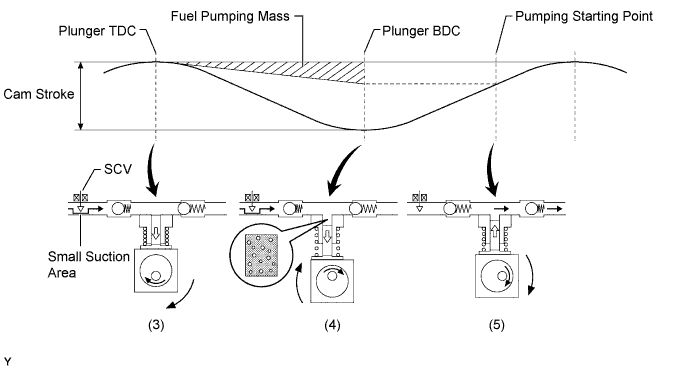
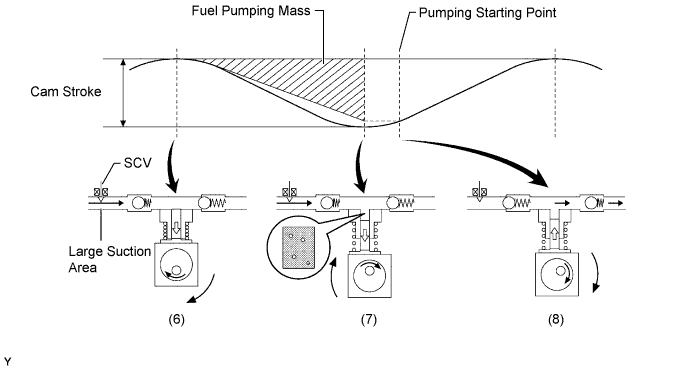
    2. The ECM controls the opening of the SCV in order to regulate the volume of fuel that is pumped by the supply pump to the common-rail. Consequently, the fuel pressure in the common-rail is controlled to the target injection pressure.

    3. When the opening of the SCV is small, the fuel suction area is kept small, which decreases the transferable fuel quantity.

    4. When the plunger strokes fully, however, the suction volume becomes small due to the small suction area.


    5. Pumping will start when the fuel pressure has become higher than the common-rail pressure.


      W102349E01

    6. When the opening of the SCV is large, the fuel suction area is kept large, which increases the transferable fuel quantity.

    7. If the plunger strokes fully, the suction volume will increase because the suction area is large.


    8. Pumping will start at the time when the fuel pressure has become higher than the common-rail pressure.


      W102350E01


  2. Injector Assembly (Models Compliant with Tier 1.5 Emission Regulations)

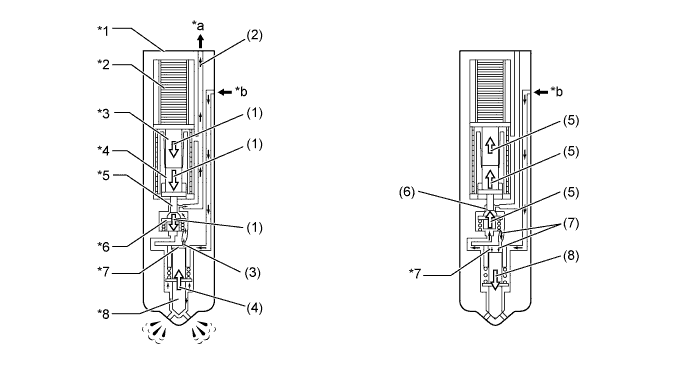
    1. When current is applied to the piezo actuator, the No. 1 piston, No. 2 piston and three-way valve are pushed down.

    2. The orifice on the upper part of the three-way valve opens and the fuel in the control chamber flows out.

    3. The fuel pressure in the control chamber drops.

    4. As a result, the nozzle needle is pushed up due to fuel pressure, causing fuel injection.

    5. Current to the piezo actuator is shut off and the No. 1 and No. 2 pistons and the three-way valve are pushed up due to spring tension.

    6. The orifice on the upper part of the three-way valve closes to stop fuel flow.

    7. The fuel pressure in the control chamber rises.


    8. As a result, the nozzle needle goes down to stop fuel injection.


      W102699E01


      Text in Illustration 
      *1
      Injector Assembly
      *2
      Piezo Actuator
      *3
      No. 1 Piston
      *4
      No. 2 Piston
      *5
      Orifice
      *6
      Three-way Valve
      *7
      Control Chamber
      *8
      Nozzle Needle
      *a
      Return Fuel
      *b
      Fuel from Common-rail


  3. Injector Assembly (Except Models Compliant with Tier 1.5 Emission Regulations)

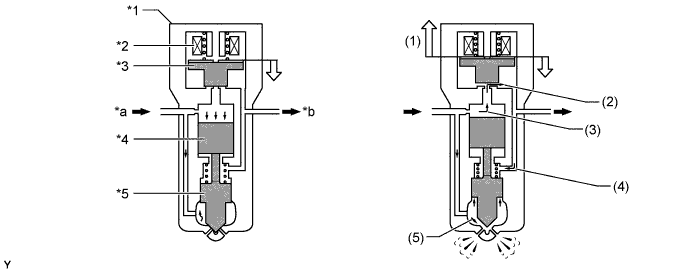
    1. When electrical current is applied to the solenoid coil, it pulls the solenoid valve up.

    2. The orifice of the control chamber opens, allowing the fuel to flow out.

    3. The fuel pressure in the control chamber drops.

    4. Simultaneously, fuel flows from the orifice to the bottom of the piston and raises the piston up (to enhance response).


    5. As a result, the piston raises the nozzle needle to inject fuel.


      W102351E01


      Text in Illustration 
      *1
      Injector Assembly
      *2
      Solenoid Coil
      *3
      Solenoid Valve
      *4
      Piston
      *5
      Nozzle Needle
      -
      -
      *a
      Fuel from Common-rail
      *b
      Return Fuel


  4. Fuel Filter Assembly

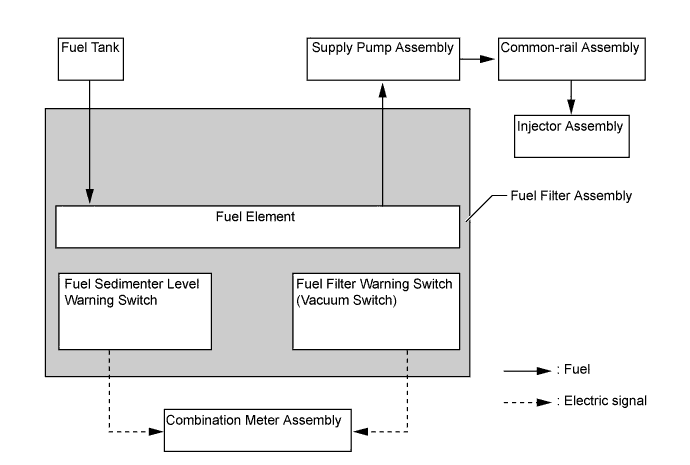
    1. When the water in the sedimenter section reaches a certain amount, the fuel sedimenter level warning switch comes on, the warning light in the combination meter assembly illuminates, and the multi buzzer sounds.


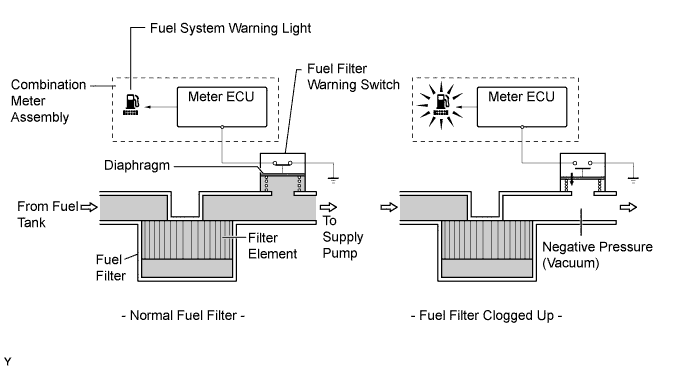
    2. A fuel filter warning switch, which turns on or off when the internal vacuum of the filter increases, is provided in the fuel filter. This switch, which turns off when the internal vacuum of the fuel filter increases to a predetermined level, is connected by wire to the meter ECU.


      W104524E01


    3. When the meter ECU detects that the internal vacuum of the fuel filter has increased (by way of the fuel filter warning switch off signal), it determines that the fuel filter has become clogged. Then, it illuminates the fuel system warning light on the combination meter assembly to urge the driver to replace the fuel filter.


      W102352E02