DTC P0300 Random / Multiple Cylinder Misfire Detected |
DTC P0301 Cylinder 1 Misfire Detected |
DTC P0302 Cylinder 2 Misfire Detected |
DTC P0303 Cylinder 3 Misfire Detected |
DTC P0304 Cylinder 4 Misfire Detected |
DTC P0305 Cylinder 5 Misfire Detected |
DTC P0306 Cylinder 6 Misfire Detected |
| DTC No. | DTC Detection Condition | Trouble Area |
| P0300 | Simultaneous misfiring of several cylinders detected (2 trip detection logic) |
|
| P0301 P0302 P0303 P0304 P0305 P0306 | Misfiring of specific cylinder detected (2 trip detection logic) |
|
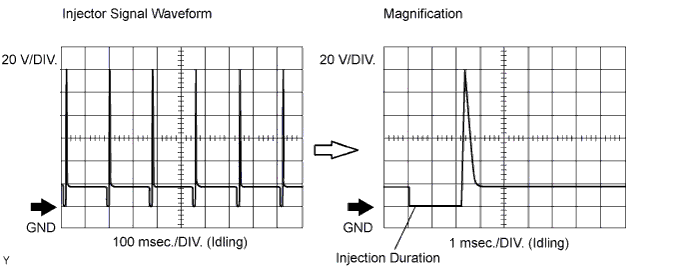
| Item | Content |
| Tester Connection | CH 1: #10 to #60 - E01 CH 2: INJF - E01 |
| Tool Setting | 20 V/DIV., 100 or 1 msec./DIV. |
| Condition | Idling |
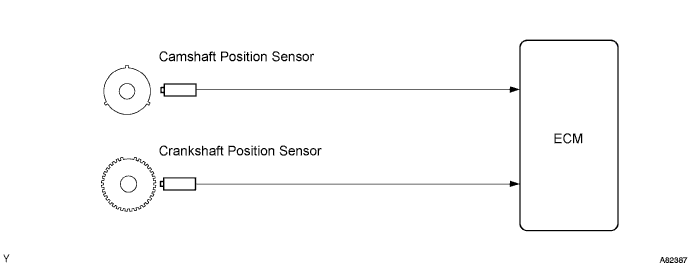
| Engine Speed | Duration |
| Idling | 8.0 minutes or more |
| 1000 | 4.5 minutes or more |
| 2000 | 2.5 minutes or more |
| 3000 | 1.5 minutes or more |
| 1.CHECK FOR ANY OTHER DTCS OUTPUT (IN ADDITION TO MISFIRE DTCS) |
Connect the intelligent tester to the DLC3.
Turn the ignition switch ON and turn the tester ON.
Turn the tester ON.
Enter the following menus: Powertrain / Engine and ECT / DTC.
Read DTCs.
| Display (DTC output) | Proceed to |
| P0300, P0301, P0302, P0303, P0304, P0305 and/or P0306 is output | A |
| P0300, P0301, P0302, P0303, P0304, P0305 and/or P0306 and other DTCs are output | B |
|
| ||||
| A | |
 |
| 2.CHECK PCV HOSE CONNECTIONS |
Check the PCV hose connections.
|
| ||||
| OK | |
|
| 3.READ VALUE USING INTELLIGENT TESTER (MISFIRE RPM AND MISFIRE LOAD) |
Connect the intelligent tester to the DLC3.
Turn the ignition switch ON and turn the tester ON.
Enter the following menu items: Powertrain / Engine and ECT / Data List / Misfire RPM and Misfire Load.
Read and note the Misfire RPM and Misfire Load values.
| NEXT | |
|
| 4.READ VALUE USING INTELLIGENT TESTER |
Connect the intelligent tester to the DLC3.
Turn the ignition switch to ON.
Turn the tester on.
Enter the following menus: Powertrain / Engine and ECT / Data List / Catalyst OT MF F/C.
Read the value displayed on the intelligent tester.
| Data List | Tester Display | Proceed to |
| Catalyst OT MF F/C | AVAIL (Avail) | A |
| NOT AVL (Not Avl) | B |
|
| ||||
| A | |
|
| 5.PERFORM ACTIVE TEST USING INTELLIGENT TESTER |
Connect the intelligent tester to the DLC3.
Turn the ignition switch to ON.
Turn the tester on.
Enter the following menus: Powertrain / Engine and ECT / Active Test / Prohibit the Catalyst OT Misfire prevent F/C.
Perform the Active Test.
| NEXT | |
|
| 6.READ VALUE USING INTELLIGENT TESTER (MISFIRE COUNT) |
Connect the intelligent tester to the DLC3.
Turn the ignition switch ON and turn the tester ON.
Clear DTCs (Click here).
Enter the following menus: Powertrain / Engine and ECT / Data List / Cylinder #1 (to #6) Misfire Count.
Allow the engine to idle.
Read each value of Cylinder #1 (to #6) Misfire Count displayed on the tester. If no misfire counts occur in any cylinders, perform the following procedures:
Move the shift lever to the drive position.
Check the Cylinder #1 (to #6) Misfire Count.
If misfire counts are still not displayed, perform procedure "A" and "B", and then check the misfire counts again.
| High Misfire Rate Cylinder | Proceed to |
| Most misfires occur in only 1 or 2 cylinders | A |
| 3 cylinders or more have equal misfire counts | B |
|
| ||||
| A | |
|
| 7.INSPECT SPARK PLUG |
Inspect the spark plug of the misfiring cylinder.
|
| ||||
| OK | |
|
| 8.CHECK FOR SPARKS AND IGNITION |
Perform a spark test.
|
| ||||
| OK | |
|
| 9.CHECK CYLINDER COMPRESSION PRESSURE |
Measure the cylinder compression pressure of the misfiring cylinder.
|
| ||||
| OK | |
|
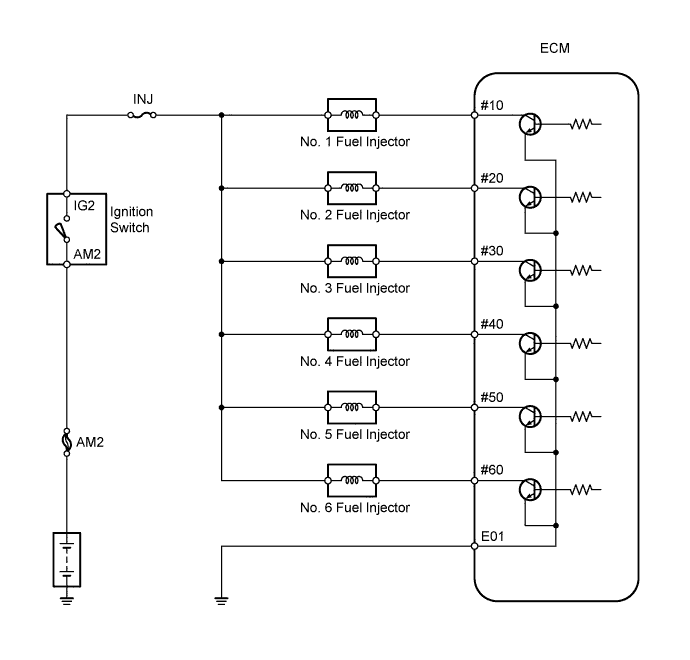
| 10.CHECK FUEL INJECTOR ASSEMBLY (POWER SOURCE) |
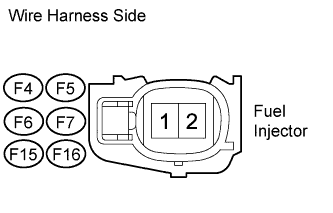 |
Disconnect the injector connector (of the misfiring cylinder).
Turn the ignition switch ON.
Measure the voltage of the wire harness side connectors.
| Cylinder | Tester Connection | Specified Condition |
| No. 1 | F4-2 - Body ground | 11 to 14 V |
| No. 2 | F5-2 - Body ground | 11 to 14 V |
| No. 3 | F6-2 -Body ground | 11 to 14 V |
| No. 4 | F7-2 - Body ground | 11 to 14 V |
| No. 5 | F15-2 - Body ground | 11 to 14 V |
| No. 6 | F16-2 - Body ground | 11 to 14 V |
|
| ||||
| OK | |
|
| 11.CHECK HARNESS AND CONNECTOR (FUEL INJECTOR - ECM) |
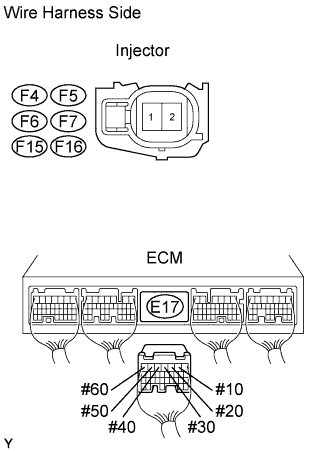 |
Disconnect the injector connector (of the misfiring cylinder).
Disconnect the E17 ECM connector.
Turn the ignition switch ON.
Measure the resistance of the wire harness side connectors.
| Cylinder | Tester Connection | Specified Condition |
| No. 1 | F4-1 or E17-2 (#10) - Body ground | 10 kΩ or higher |
| No. 1 | F4-1 - E17-2 (#10) | Below 1 Ω |
| No. 2 | F5-1 or E17-3 (#20) - Body ground | 10 kΩ or higher |
| No. 2 | F5-1 - E17-3 (#20) | Below 1 Ω |
| No. 3 | F6-1 or E17-4 (#30) - Body ground | 10 kΩ or higher |
| No. 3 | F6-1 - E17-4 (#30) | Below 1 Ω |
| No. 4 | F7-1 or E17-5 (#40) - Body ground | 10 kΩ or higher |
| No. 4 | F7-1 - E17-5 (#40) | Below 1 Ω |
| No. 5 | F15-1 or E17-6 (#50) - Body ground | 10 kΩ or higher |
| No. 5 | F15-1 - E17-6 (#50) | Below 1 Ω |
| No. 6 | F16-1 or E17-7 (#60) - Body ground | 10 kΩ or higher |
| No. 6 | F16-1 - E17-7 (#60) | Below 1 Ω |
|
| ||||
| OK | |
|
| 12.CHECK FUEL INJECTOR OF MISFIRING CYLINDER |
Check the injector injection [whether fuel volume is high or low, and whether injection pattern is poor].
|
| ||||
| OK | |
|
| 13.CHECK AIR INDUCTION SYSTEM |
Check the air induction system for vacuum leakage.
|
| ||||
| OK | |
|
| 14.CHECK FUEL PRESSURE |
Check the fuel pressure .
|
| ||||
| OK | |
|
| 15.READ VALUE USING INTELLIGENT TESTER (COOLANT TEMP) |
Connect the intelligent tester to the DLC3.
Turn the ignition switch ON and turn the tester ON.
Enter the following menus: Powertrain / Engine and ECT / Data List / Coolant Temp.
Read Coolant Temp twice, when the engine is both cold and warmed up.
|
| ||||
| OK | |
|
| 16.READ VALUE USING INTELLIGENT TESTER (MAF) |
Connect the intelligent tester to the DLC3.
Turn the ignition switch ON and turn the tester ON.
Enter the following menus: Powertrain / Engine and ECT / Data List / Coolant Temp and MAF.
Allow the engine to idle until Coolant Temp reaches 75°C (167°F) or higher.
Read MAF with the engine speed at 3000 rpm.
|
| ||||
| OK | |
|
| 17.CHECK VALVE TIMING |
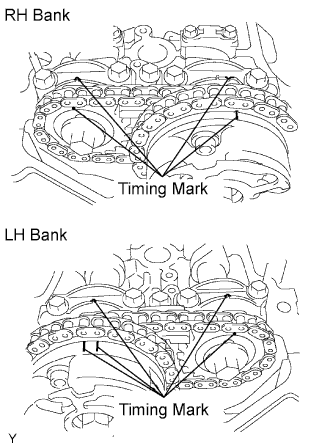 |
Remove the cylinder head cover.
Turn the crankshaft pulley, and align its groove with the timing mark "0" of the timing chain cover.
Check that the timing marks of the camshaft timing gears are aligned with the timing marks of the bearing cap as shown in the illustration.
If not, turn the crankshaft 1 revolution (360°) and align the marks as described above.
|
| ||||
|
| ||||
| 18.CHECK AIR INDUCTION SYSTEM |
Check the air induction system for vacuum leakage.
|
| ||||
| OK | |
|
| 19.CHECK FUEL PRESSURE |
Check the fuel pressure .
|
| ||||
| OK | |
|
| 20.READ VALUE USING INTELLIGENT TESTER (COOLANT TEMP) |
Connect the intelligent tester to the DLC3.
Turn the ignition switch ON and turn the tester ON.
Enter the following menus: Powertrain / Engine and ECT / Data List / Coolant Temp.
Read Coolant Temp twice, when the engine is both cold and warmed up.
|
| ||||
| OK | |
|
| 21.READ VALUE USING INTELLIGENT TESTER (MAF) |
Connect the intelligent tester to the DLC3.
Turn the ignition switch ON and turn the tester ON.
Enter the following menus: Powertrain / Engine and ECT / Data List / Coolant Temp and MAF.
Allow the engine to idle until Coolant Temp reaches 75°C (167°F) or higher.
Read MAF with the engine speed at 3000 rpm.
|
| ||||
| OK | |
|
| 22.CHECK VALVE TIMING |
|
Remove the cylinder head cover.
Turn the crankshaft pulley, and align its groove with the timing mark "0" of the timing chain cover.
Check that the timing marks of the camshaft timing gears are aligned with the timing marks of the bearing cap as shown in the illustration.
If not, turn the crankshaft 1 revolution (360°) and align the marks as described above.
|
| ||||
| OK | |
|
| 23.INSPECT SPARK PLUG |
Inspect the spark plug of the misfiring cylinder.
|
| ||||
| OK | |
|
| 24.CHECK SPARKS AND IGNITION |
Perform a spark test.
|
| ||||
| OK | |
|
| 25.CHECK CYLINDER COMPRESSION PRESSURE |
Measure the cylinder compression pressure of the misfiring cylinder.
|
| ||||
| OK | |
|
| 26.CHECK FUEL INJECTOR ASSEMBLY (POWER SOURCE) |
|
Disconnect the injector connector (of the misfiring cylinder).
Turn the ignition switch ON.
Measure the voltage of the wire harness side connectors.
| Cylinder | Tester Connection | Specified Condition |
| No. 1 | F4-2 - Body ground | 11 to 14 V |
| No. 2 | F5-2 - Body ground | 11 to 14 V |
| No. 3 | F6-2 -Body ground | 11 to 14 V |
| No. 4 | F7-2 - Body ground | 11 to 14 V |
| No. 5 | F15-2 - Body ground | 11 to 14 V |
| No. 6 | F16-2 - Body ground | 11 to 14 V |
|
| ||||
| OK | |
|
| 27.CHECK HARNESS AND CONNECTOR (FUEL INJECTOR - ECM) |
|
Disconnect the injector connector (of the misfiring cylinder).
Disconnect the E17 ECM connector.
Turn the ignition switch ON.
Measure the resistance of the wire harness side connectors.
| Cylinder | Tester Connection | Specified Condition |
| No. 1 | F4-1 or E17-2 (#10) - Body ground | 10 kΩ or higher |
| No. 1 | F4-1 - E17-2 (#10) | Below 1 Ω |
| No. 2 | F5-1 or E17-3 (#20) - Body ground | 10 kΩ or higher |
| No. 2 | F5-1 - E17-3 (#20) | Below 1 Ω |
| No. 3 | F6-1 or E17-4 (#30) - Body ground | 10 kΩ or higher |
| No. 3 | F6-1 - E17-4 (#30) | Below 1 Ω |
| No. 4 | F7-1 or E17-5 (#40) - Body ground | 10 kΩ or higher |
| No. 4 | F7-1 - E17-5 (#40) | Below 1 Ω |
| No. 5 | F15-1 or E17-6 (#50) - Body ground | 10 kΩ or higher |
| No. 5 | F15-1 - E17-6 (#50) | Below 1 Ω |
| No. 6 | F16-1 or E17-7 (#60) - Body ground | 10 kΩ or higher |
| No. 6 | F16-1 - E17-7 (#60) | Below 1 Ω |
|
| ||||
| OK | |
|
| 28.CHECK FUEL INJECTOR ASSEMBLY |
Check the injector injection [whether fuel volume is high or low, and whether injection pattern is poor].
|
| ||||
| OK | |
|
| 29.CHECK HARNESS AND CONNECTOR |
Check the connection and terminal contact pressure of connectors and wire harnesses between the mass air flow meter and ECM.
| NEXT | |
|
| 30.CHECK WHETHER DTC OUTPUT RECURS |
Drive the vehicle in accordance with the driving pattern described in Confirmation Driving Pattern.
Enter the following menus: Powertrain / Engine and ECT / Utility / All Readiness.
Input the DTC: P0300, P0301, P0302, P0303, P0304, P0305 or P0306.
Check the DTC judgment result.
| Display (DTC Output) | Proceed to |
| ABNORMAL (P0300, P0301, P0302, P0303, P0304, P0305 or P0306 output) | A |
| NORMAL (No DTC output) | B |
|
| ||||
| A | |
|
| 31.CHECK HARNESS AND CONNECTOR (MASS AIR FLOW METER - ECM) |
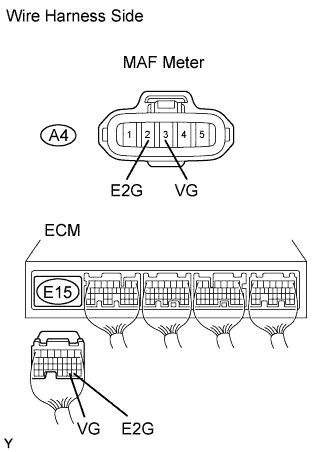 |
Disconnect the A4 MAF meter connector.
Disconnect the E15 ECM connector.
Measure the resistance of the wire harness side connectors.
| Tester Connection | Specified Condition |
| A4-3 (VG) - E15-30 (VG) | Below 1 Ω |
| A4-2 (E2G) - E15-29 (E2G) | Below 1 Ω |
| A4-3 (VG) or E15-30 (VG) - Body ground | 10 kΩ or higher |
|
| ||||
| OK | |
|
| 32.REPLACE MASS AIR FLOW METER |
Replace the mass air flow meter.
| NEXT | |
|
| 33.CONFIRM WHETHER MALFUNCTION HAS BEEN SUCCESSFULLY REPAIRED |
Drive the vehicle in accordance with the driving pattern described in Confirmation Driving Pattern.
Enter the following menus: Powertrain / Engine and ECT / Utility / All Readiness.
Input the DTC: P0300, P0301, P0302, P0303, P0304, P0305 or P0306.
Check the DTC judgment result.
| Display (DTC Output) | Proceed to |
| NORMAL (No DTC output) | A |
| ABNORMAL (P0300, P0301, P0302, P0303, P0304, P0305 or P0306 output) | B |
|
| ||||
| A | ||
 | ||
| ||
| 34.CHANGE TO NORMAL SPARK PLUG AND CHECK SPARK OF MISFIRING CYLINDER |
Change the installed spark plug to a spark plug that functions normally.
Perform a spark test.
Install the spark plug to the ignition coil and connect the ignition coil connector.
Disconnect the injector connector.
Ground the spark plug.
Check if sparks occur while the engine is being cranked.
|
| ||||
| OK | ||
| ||
| ||
| 35.CHANGE TO NORMAL IGNITION COIL ASSEMBLY AND CHECK SPARK OF MISFIRING CYLINDER |
Change the ignition coil assembly to an ignition coil assembly that functions normally.
Perform a spark test.
Install the spark plug to the ignition coil and connect the ignition coil connector.
Disconnect the injector connector.
Ground the spark plug.
Check if sparks occur while the engine is being cranked.
|
| ||||
| OK | ||
| ||
| ||
| 36.CHECK FUEL LINE |
Check the fuel lines for leaks or blockage.
|
| ||||
| OK | ||
| ||
| ||

