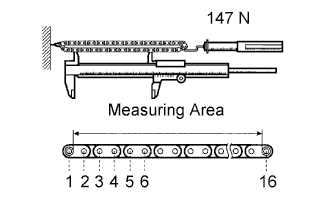
 |
Pull the chain with a force of 147 N (15 kgf, 33 lbf) as shown in the illustration.
ENGINE UNIT > INSPECTION |
| 1. INSPECT OIL NOZZLE |
Check the oil nozzles for damage or clogging.
If necessary, replace the oil nozzle.
| 2. INSPECT CHAIN |
|
Pull the chain with a force of 147 N (15 kgf, 33 lbf) as shown in the illustration.
Using a vernier caliper, measure the length of 16 links.
| 3. INSPECT NO. 2 CHAIN |
|
Pull the chain with a force of 147 N (15 kgf, 33 lbf) as shown in the illustration.
Using a vernier caliper, measure the length of 16 links.
| 4. INSPECT CAMSHAFT TIMING GEAR |
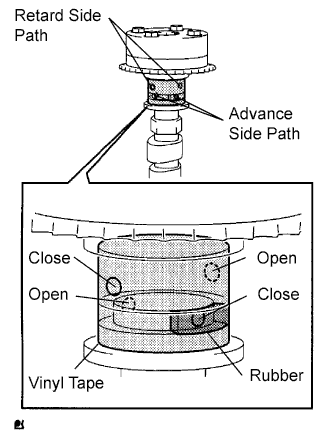 |
Check the lock of the camshaft timing gear.
Clamp the camshaft in a vise, and confirm that the camshaft timing gear is locked.
Release the lock pin.
Cover the 4 oil paths of the cam journal with vinyl tape as shown in the illustration.
Break through the tape of the advance side path and the retard side path on the opposite side of the groove.
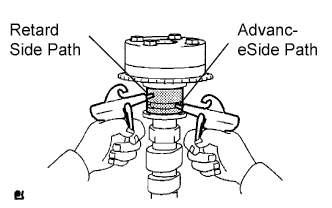 |
Apply approximately 200 kPa (2.0 kgf/cm2, 28 psi) of air pressure to the paths whose tape was broken in the procedure above.
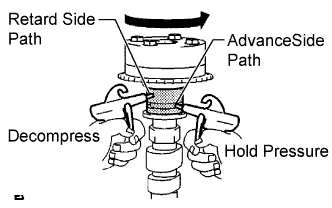 |
Check that the camshaft timing gear revolves in the advance direction when weakening the air pressure of the retard side path.
When the camshaft timing gear reaches the extreme advance position, remove the air gun from the retard side path and advance side path, in that order.
Check for smooth rotation.
Rotate the camshaft timing gear within its movable range several times, but do not turn it to the extreme retard position. Check that the gear rotates smoothly.
Check the lock in the extreme retard position.
Confirm that the camshaft timing gear is locked at the extreme retard position.
| 5. INSPECT NO. 1 CAMSHAFT |
Check the camshaft for runout.
Place the camshaft on V-blocks.
Using a dial indicator, measure the circle runout at the center journal.
Using a micrometer, measure the cam lobe height.
Using a micrometer, measure the journal diameter.
| Item | Specified Condition |
| No. 1 journal | 35.949 to 35.965 mm (1.415 to 1.416 in.) |
| Other journal | 26.959 to 26.975 mm (1.061 to 1.062 in.) |
| 6. INSPECT NO. 2 CAMSHAFT |
Check the camshaft for runout.
Place the camshaft on V-blocks.
Using a dial indicator, measure the circle runout at the center journal.
Using a micrometer, measure the cam lobe height.
Using a micrometer, measure the journal diameter.
| Item | Specified Condition |
| No. 1 journal | 35.949 to 35.965 mm (1.415 to 1.416 in.) |
| Other journal | 26.959 to 26.975 mm (1.061 to 1.062 in.) |
| 7. INSPECT NO. 1 CHAIN TENSIONER |
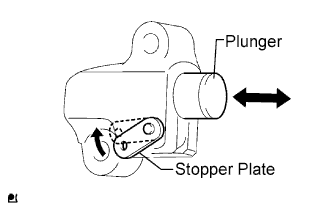 |
Move the stopper plate upward to release the lock. Push the plunger and check that it moves smoothly.
| 8. INSPECT NO. 2 CHAIN TENSIONER |
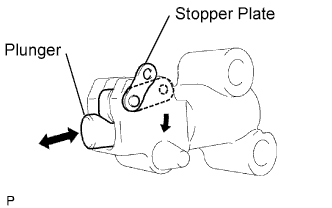 |
Move the stopper plate downward to release the lock.
Push the plunger and check that it moves smoothly.
| 9. INSPECT CAMSHAFT TIMING SPROCKET |
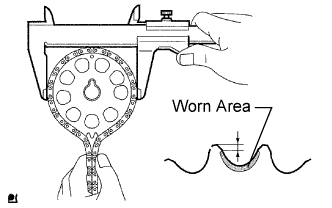 |
Measure the distance between the most worn out sprocket tip and the beginning of the worn area below the tip.
Wrap the chain around the sprocket.
Using a vernier caliper, measure the sprocket diameter with the chain.
| 10. INSPECT CAMSHAFT TIMING GEAR |
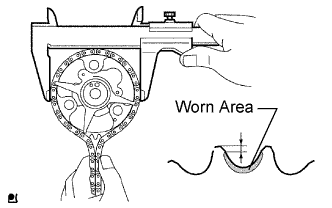 |
Measure the distance between the most worn out timing gear tip and the beginning of the worn area below the tip.
Wrap the chain around the timing gear.
Using a vernier caliper, measure the sprocket diameter with the chain.
| 11. INSPECT CRANKSHAFT TIMING SPROCKET |
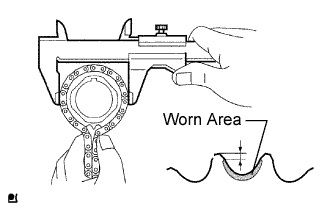 |
Measure the distance between the most worn out sprocket tip and the beginning of the worn area below the tip.
Wrap the chain around the drive sprocket.
Using a vernier caliper, measure the sprocket diameter with the chain.
| 12. INSPECT CHAIN TENSIONER SLIPPER |
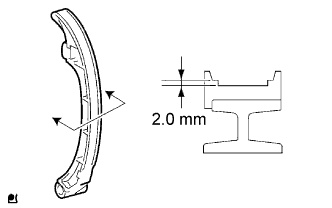 |
Using a vernier caliper, measure the tensioner slipper wear.
| 13. INSPECT CHAIN VIBRATION DAMPER |
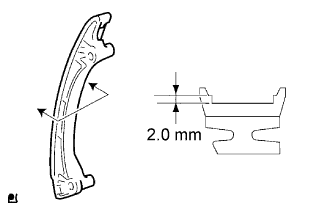 |
Using a vernier caliper, measure the vibration damper wear.
| 14. INSPECT TIMING CHAIN GUIDE |
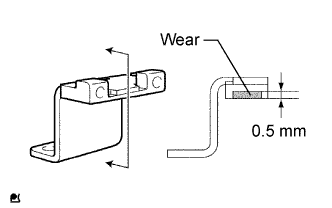 |
Using a vernier caliper, measure the chain guide wear.
| 15. INSPECT NO. 2 CRANKSHAFT TIMING SPROCKET |
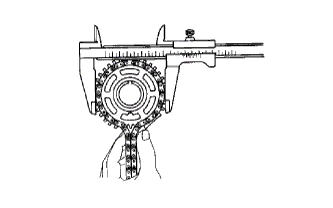 |
Wrap the chain around the sprocket.
Using a vernier caliper, measure the sprocket diameter with the chain.
| 16. INSPECT BALANCE SHAFT DRIVE GEAR |
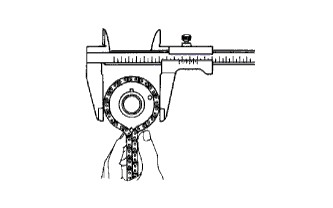 |
Wrap the chain around the sprocket.
Using a vernier caliper, measure the sprocket diameter with the chain.
| 17. INSPECT NO. 2 CHAIN VIBRATION DAMPER |
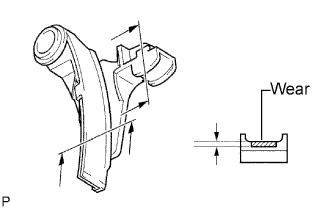 |
Using a vernier caliper, measure the No. 2 vibration damper wear.
| 18. INSPECT NO. 3 CHAIN VIBRATION DAMPER |
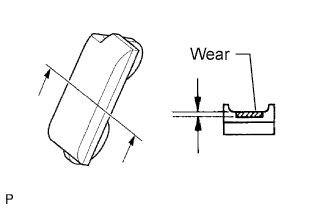 |
Using a vernier caliper, measure the No. 3 vibration damper wear.
| 19. INSPECT NO. 4 CHAIN VIBRATION DAMPER |
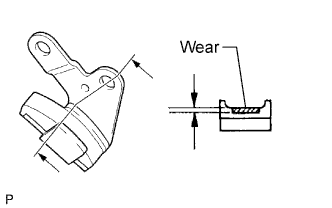 |
Using a vernier caliper, measure the No. 4 vibration damper wear.
| 20. INSPECT CYLINDER HEAD SET BOLT |
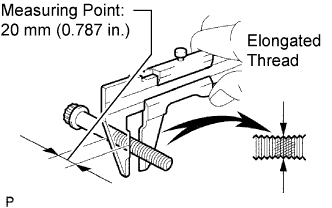 |
Using a vernier caliper, measure the minimum diameter of the elongated thread at the measuring point.
| 21. INSPECT VALVE LASH ADJUSTER |
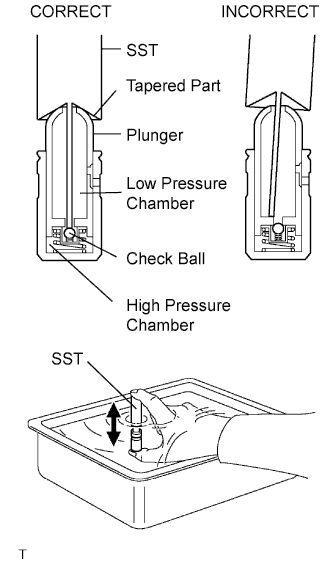 |
Place the lash adjuster into a container full of engine oil.
Insert SST's tip into the lash adjuster's plunger and use the tip to press down on the checkball inside the plunger.
Squeeze the SST and lash adjuster together to move the plunger up and down 5 to 6 times.
Check the movement of the plunger and bleed air.
After bleeding air, remove SST. Then, try to quickly and firmly press the plunger with a finger.
| 22. INSPECT CYLINDER HEAD FOR FLATNESS |
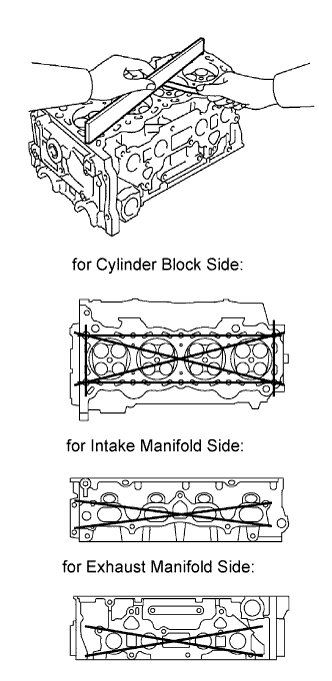 |
Using a precision straightedge and feeler gauge, measure the surface contacting the cylinder block and manifold for warpage.
| 23. INSPECT CYLINDER HEAD FOR CRACKS |
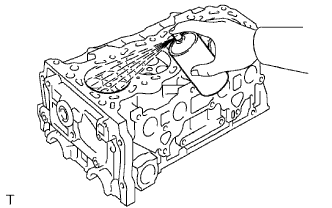 |
Using a dye penetrant, check the intake ports, exhaust ports and cylinder surface for cracks.
If cracked, replace the cylinder head.
| 24. INSPECT INTAKE VALVE SEAT |
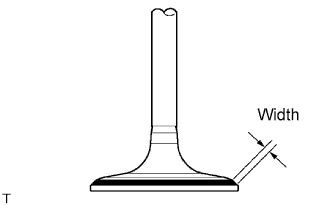 |
Apply a light coat of Prussian blue (or white lead) to the valve face.
Lightly press the valve face against the valve seat.
Check the valve face and valve seat according to the following procedures.
If blue appears 360° around the valve face, the valve face is concentric. If not, replace the valve.
If blue appears 360° around the valve seat, the guide and valve face are concentric. If not, resurface the valve seat.
Check that the valve seat contact is in the middle of the valve face with the width between 1.0 to 1.4 mm (0.0394 to 0.0551 in.).
| 25. INSPECT EXHAUST VALVE SEAT |
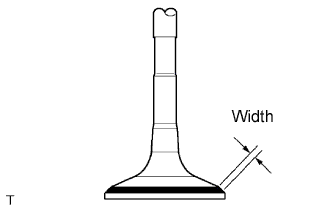 |
Apply a light coat of Prussian blue (or white lead) to the valve face.
Lightly press the valve face against the valve seat.
Check the valve face and valve seat according to the following procedures.
If blue appears 360° around the valve face, the valve face is concentric. If not, replace the valve.
If blue appears 360° around the valve seat, the guide and valve face are concentric. If not, resurface the valve seat.
Check that the valve seat contact is in the middle of the valve face with the width between 1.0 to 1.4 mm (0.0394 to 0.0551 in.).
| 26. INSPECT CAMSHAFT THRUST CLEARANCE |
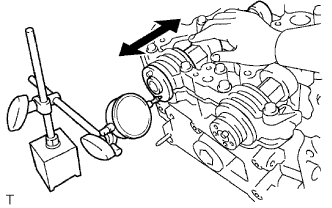 |
Using a dial indicator, measure the thrust clearance while moving the camshaft back and forth.
| 27. INSPECT CAMSHAFT OIL CLEARANCE |
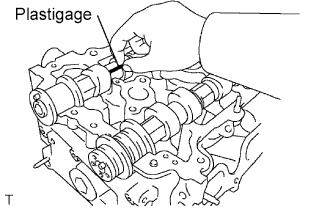 |
Clean the bearing caps and camshaft journals.
Place the camshafts on the cylinder head.
Lay a strip of Plastigage across each of the camshaft journals.
Install the bearing caps .
Remove the bearing caps.
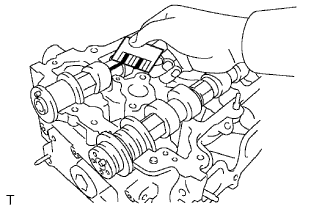 |
Measure the Plastigage at its widest point.
| Item | Specified Condition |
| No. 1 journal | 0.035 to 0.072 mm (0.00138 to 0.00283 in.) |
| Other journal | 0.025 to 0.062 mm (0.000984 to 0.00244 in.) |
Completely remove the Plastigage.
| 28. INSPECT COMPRESSION SPRING |
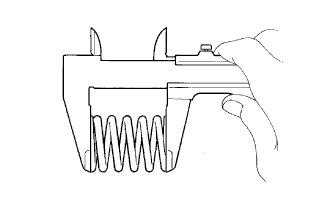 |
Using a vernier caliper, measure the free length of the inner compression spring.
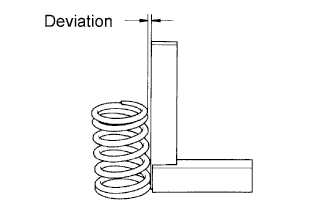 |
Using a steel square, measure the deviation of the inner compression spring.
| 29. INSPECT INTAKE VALVE |
Using a vernier caliper, measure the valve's overall length.
Using a micrometer, measure the diameter of the valve stem.
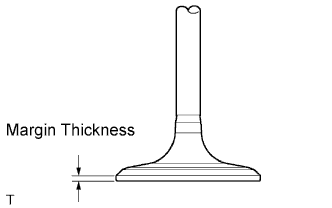 |
Using a vernier caliper, measure the valve head margin thickness.
| 30. INSPECT EXHAUST VALVE |
Using a vernier caliper, measure the valve's overall length.
Using a micrometer, measure the diameter of the valve stem.
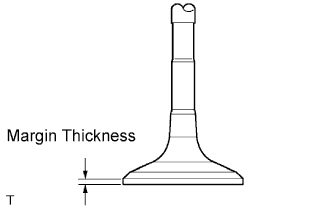 |
Using a vernier caliper, measure the valve head margin thickness.
| 31. INSPECT INTAKE VALVE GUIDE BUSH |
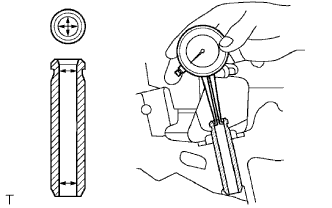 |
Using a caliper gauge, measure the inside diameter of the guide bush.
Subtract the valve stem diameter measurement from the guide bush inside diameter measurement.
| 32. INSPECT EXHAUST VALVE GUIDE BUSH |
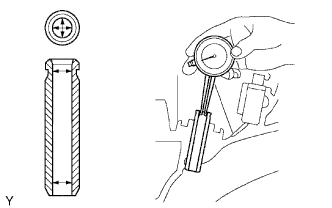 |
Using a caliper gauge, measure the inside diameter of the guide bush.
Subtract the valve stem diameter measurement from the guide bush inside diameter measurement.
| 33. INSPECT NO. 1 BALANCE SHAFT |
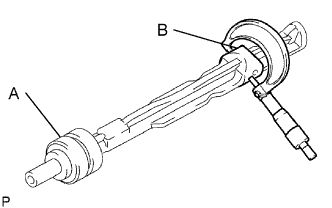 |
Inspect the diameter of the journal.
Using a micrometer, measure the diameter of the balance shaft main journals.
| Item | Specified Condition |
| A | 37.969 to 37.985 mm (1.49 to 1.50 in.) |
| B | 37.449 to 37.465 mm (1.474 to 1.475 in.) |
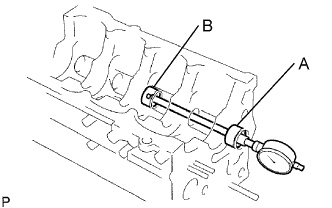 |
Inspect the diameter of bearing.
Using a cylinder gauge, measure the inside diameter of the balance shaft bearings.
| Item | Specified Condition |
| A | 38.025 to 38.045 mm (1.497 to 1.498 in.) |
| B | 37.525 to 37.545 mm (1.477 to 1.478 in.) |
Inspect the oil clearance.
Subtract the balance shaft main journal diameter measurement from the balance shaft bearing inside diameter measurement.
| Item | Specified Condition |
| A | 0.040 to 0.076 mm (0.00157 to 0.00299 in.) |
| B | 0.060 to 0.096 mm (0.00236 to 0.00378 in.) |
| 34. INSPECT NO. 2 BALANCE SHAFT |
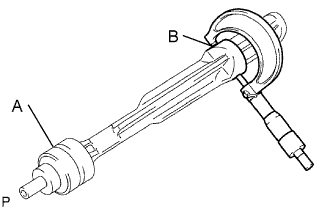 |
Inspect the diameter of the journal.
Using a micrometer, measure the diameter of the balance shaft main journals.
| Item | Specified Condition |
| A | 37.969 to 37.985 mm (1.49 to 1.50 in.) |
| B | 37.449 to 37.465 mm (1.474 to 1.475 in.) |
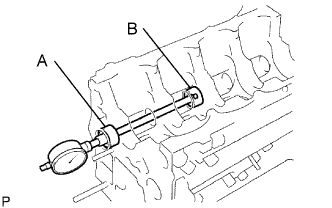 |
Inspect the diameter of the bearing.
Using a cylinder gauge, measure the inside diameter of the balance shaft bearings.
| Item | Specified Condition |
| A | 38.025 to 38.045 mm (1.497 to 1.498 in.) |
| B | 37.525 to 37.545 mm (1.477 to 1.478 in.) |
Inspect the oil clearance.
Subtract the balance shaft main journal diameter measurement from the balance shaft bearing inside diameter measurement.
| Item | Specified Condition |
| A | 0.040 to 0.076 mm (0.00157 to 0.00299 in.) |
| B | 0.060 to 0.096 mm (0.00236 to 0.00378 in.) |
| 35. INSPECT CYLINDER BLOCK |
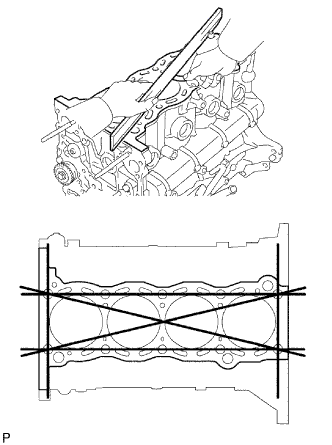 |
Inspect for flatness.
Using a precision straightedge and feeler gauge, measure the surface contacting the cylinder head gasket for warpage.
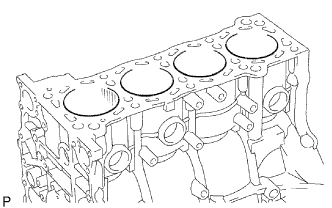 |
Visually check the cylinder for vertical scratches.
If deep scratches are present, rebore all the 4 cylinders. If necessary, replace the cylinder block.
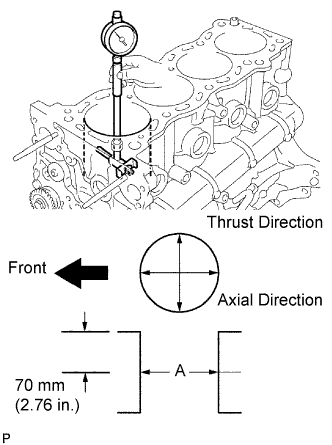 |
Inspect the cylinder bore diameter.
Using a cylinder gauge, measure the cylinder bore diameter at position A in the thrust and axial directions.
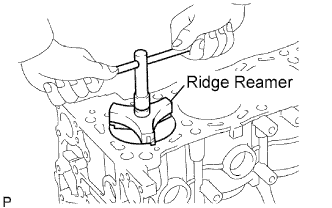 |
Inspect the cylinder ridge.
If the wear is less than 0.2 mm (0.00787 in.), using a ridge reamer, grind the top of the cylinder.
| 36. INSPECT PISTON WITH PIN |
 |
Inspect the piston oil clearance.
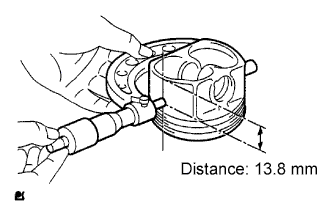
Using a micrometer, measure the piston diameter at right angles to the piston center line, the indicated distance from the piston end.
| Item | Specified Condition |
| Standard side | 94.940 to 94.966 mm (3.7378 to 3.7384 in.) |
| O/S 0.50 | 95.440 to 95.466 mm (3.7575 to 3.7585 in.) |
Measure the cylinder bore diameter in the thrust directions.
Subtract the piston diameter measurement from the cylinder bore diameter measurement.
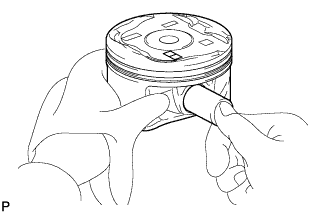 |
Inspect the piston pin fit.
At 60°C (140°F), check that the piston pin can be pushed into the piston pin hole with your thumb.
| 37. INSPECT PISTON RING SET |
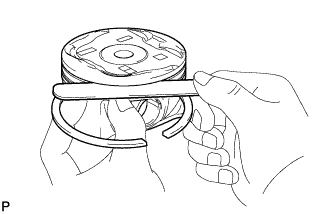 |
Using a feeler gauge, measure the clearance between a new piston ring and the wall of the ring groove.
| Item | Specified Condition |
| No. 1 ring | 0.020 to 0.070 mm (0.000787 to 0.00276 in.) |
| No. 2 ring | 0.020 to 0.060 mm (0.000787 to 0.00236 in.) |
| Oil ring | 0.020 to 0.060 mm (0.000787 to 0.00236 in.) |
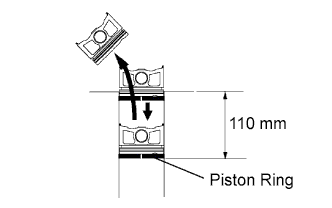 |
Inspect the piston ring end gap.
Insert the piston ring into the cylinder bore.
Using a piston, push the piston ring a little beyond the bottom of the ring travel, 110 mm (4.33 in.) from the top of the cylinder block.
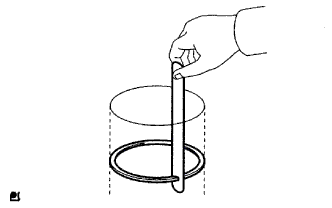 |
Using a feeler gauge, measure the end gap.
| Item | Specified Condition |
| No. 1 ring | 0.26 to 0.31 mm (0.0102 to 0.0122 in.) |
| No. 2 ring | 0.59 to 0.71 mm (0.0232 to 0.0280 in.) |
| Oil ring | 0.10 to 0.30 mm (0.00394 to 0.0118 in.) |
| Item | Specified Condition |
| No. 1 ring | 0.90 mm (0.0354 in.) |
| No. 2 ring | 1.36 mm (0.0535 in.) |
| Oil ring | 0.75 mm (0.0295 in.) |
| 38. INSPECT CONNECTING ROD |
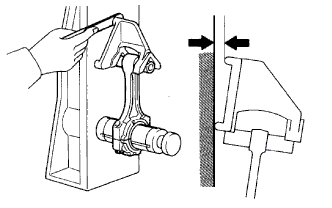 |
Using a rod aligner and feeler gauge, check the connecting rod alignment.
Check for bend.
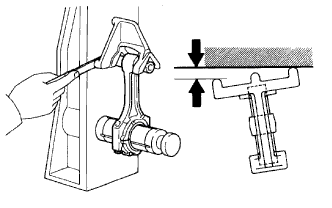 |
Check for twist.
| 39. INSPECT PISTON PIN OIL CLEARANCE |
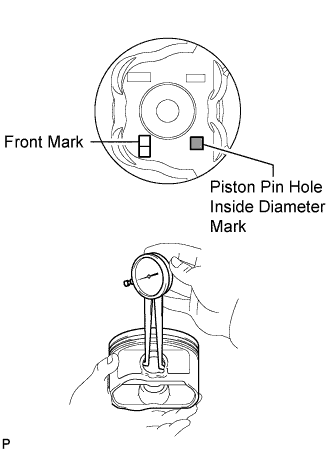 |
Using a caliper gauge, measure the inside diameter of the piston pin hole.
| Item | Specified Condition |
| A | 22.001 to 22.004 mm (0.86618 to 0.86630 in.) |
| B | 22.005 to 22.007 mm (0.86634 to 0.86642 in.) |
| C | 22.008 to 22.010 mm (0.86645 to 0.86653 in.) |
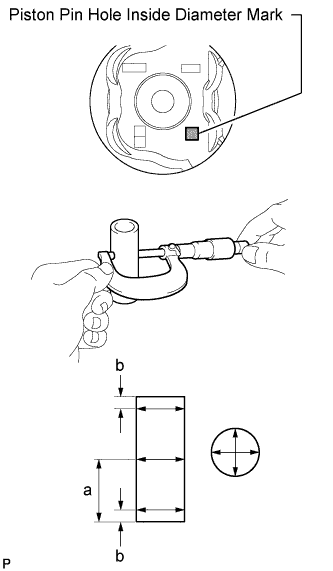 |
Using a micrometer, measure the piston pin diameter.
| Measurement Position | Piston Pin Position |
| a | 28 mm (1.10 in.) |
| b | 5 mm (0.197 in.) |
| Item | Specified Condition |
| A | 21.997 to 22.000 mm (0.86602 to 0.86614 in.) |
| B | 22.001 to 22.003 mm (0.86618 to 0.86626 in.) |
| C | 22.004 to 22.006 mm (0.86630 to 0.86638 in.) |
Subtract the piston pin diameter measurement from the piston pin hole diameter measurement.
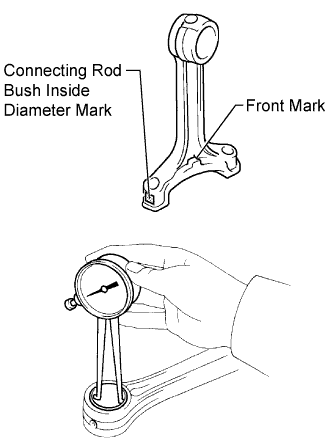 |
Using a caliper gauge, measure the inside diameter of the connecting rod bush.
| Item | Specified Condition |
| A | 22.005 to 22.008 mm (0.86634 to 0.86645 in.) |
| B | 22.009 to 22.011 mm (0.86649 to 0.86657 in.) |
| C | 22.012 to 22.014 mm (0.86661 to 0.86669 in.) |
Subtract the piston pin diameter measurement from the bush inside diameter measurement.
| 40. INSPECT CONNECTING ROD BOLT |
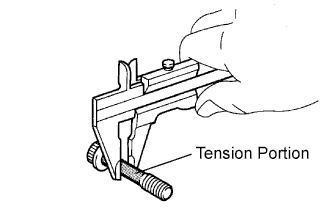 |
Using a vernier caliper, measure the tension portion diameter of the bolt.
| 41. INSPECT CRANKSHAFT |
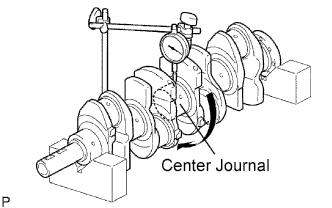 |
Inspect for circle runout.
Place the crankshaft on V-blocks.
Using a dial indicator, measure the circle runout at the center journal.
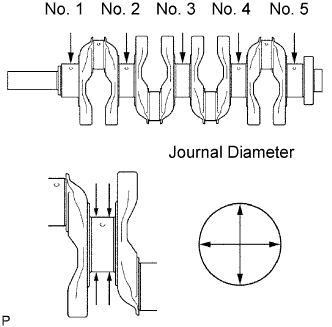 |
Inspect the main journals.
Using a micrometer, measure the diameter of each main journal.
| Item | Specified Condition |
| No. 3 journal | 59.981 to 59.994 mm (2.361 to 2.362 in.) |
| Except No. 3 journal | 59.987 to 60.000 mm (2.3617 to 2.3622 in.) |
Check each main journal for taper and out-of-round as shown in the illustration.
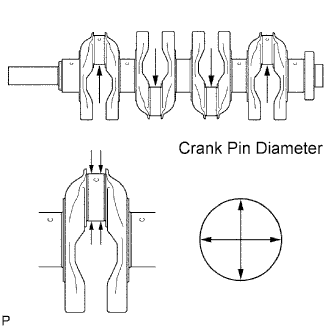 |
Inspect the crank pin.
Using a micrometer, measure the diameter of each crank pin.
Check each crank pin for taper and out-of-round as shown in the illustration.
| 42. INSPECT CRANKSHAFT BEARING CAP SET BOLT |
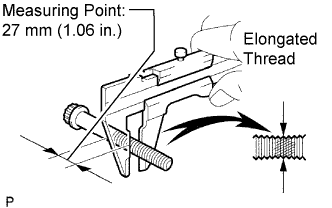 |
Using a vernier caliper, measure the minimum diameter of the elongated thread at the measuring point.