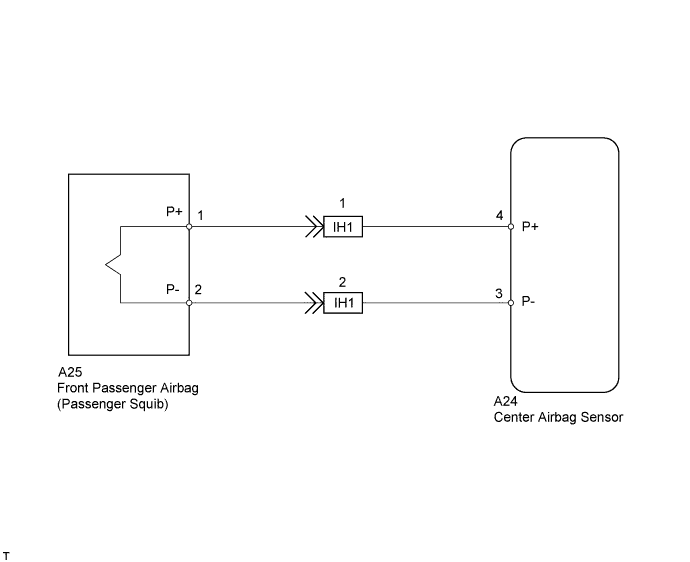
DTC B1805/52 Short in Front Passenger Side Squib Circuit |
DTC B1806/52 Open in Front Passenger Side Squib Circuit |
DTC B1807/52 Short to GND in Front Passenger Side Squib Circuit |
DTC B1808/52 Short to B+ in Front Passenger Side Squib Circuit |
| DTC No. | DTC Detection Condition | Trouble Area |
| B1805/52 | Center airbag sensor assembly receives line short circuit signal 5 times in passenger squib circuit during primary check |
|
| B1806/52 | Center airbag sensor assembly receives open circuit signal in passenger squib circuit for 2 seconds |
|
| B1807/52 | Center airbag sensor assembly receives short circuit to ground signal in passenger squib circuit for 0.5 seconds |
|
| B1808/52 | Center airbag sensor assembly receives B+ short circuit signal in passenger squib circuit for 0.5 seconds |
|
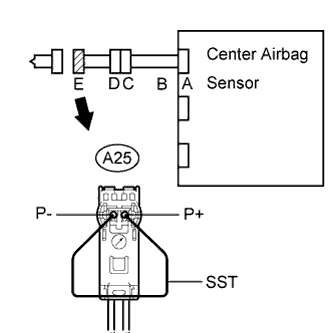
| 1.CHECK FRONT PASSENGER AIRBAG ASSEMBLY (PASSENGER SQUIB) |
 |
Turn the ignition switch off.
Disconnect the cable from the negative (-) battery terminal, and wait for at least 90 seconds.
Disconnect the connector to the front passenger airbag.
Connect the white wire side of SST (resistance 2.1 Ω) to the instrument panel wire connector E.
Connect the cable to the negative (-) battery terminal, and wait for at least 2 seconds.
Turn the ignition switch ON, and wait for at least 60 seconds.
Clear the DTCs (Click here).
Turn the ignition switch off.
Turn the ignition switch ON, and wait for at least 60 seconds.
Check for DTCs (Click here).
|
| ||||
| OK | ||
 | ||
| ||
| 2.CHECK CONNECTOR |
Turn the ignition switch off.
Disconnect the cable from the negative (-) battery terminal, and wait for at least 90 seconds.
Disconnect SST (resistance 2.1 Ω) from the instrument panel wire.
Check that the No. 2 instrument panel wire connectors (on the front passenger airbag side) are not damaged.
|
| ||||
| OK | |
 |
| 3.CHECK INSTRUMENT PANEL WIRE (PASSENGER SQUIB CIRCUIT) |
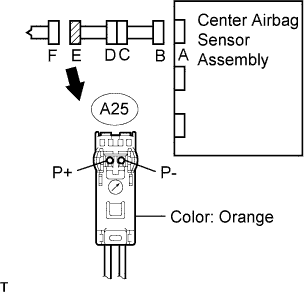 |
Disconnect the connector from the center airbag sensor.
Connect the cable to the negative (-) battery terminal, and wait for at least 2 seconds.
Turn the ignition switch ON.
Measure the voltage of the wire harness side connector.
| Tester Connection | Specified Condition |
| A25-1 (P+) - Body ground | Below 1 V |
| A25-2 (P-) - Body ground | Below 1 V |
Turn the ignition switch off.
Disconnect the cable from the negative (-) battery terminal, and wait for at least 90 seconds.
Measure the resistance of the wire harness side connector.
| Tester Connection | Specified Condition |
| A25-1 (P+) - A25-2 (P-) | Below 1 Ω |
| A25-1 (P+) - Body ground | 1 MΩ or higher |
| A25-2 (P-) - Body ground | 1 MΩ or higher |
Release the activation prevention mechanism built into connector B (Click here).
Measure the resistance of the wire harness side connector.
| Tester Connection | Specified Condition |
| A25-1 (P+) - A25-2 (P-) | 1 MΩ or higher |
|
| ||||
| NG | |
|
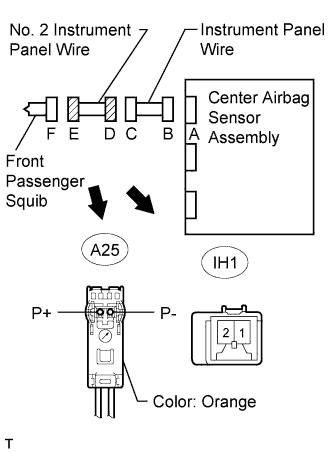
| 4.CHECK NO. 2 INSTRUMENT PANEL WIRE |
 |
Restore the released activation prevention mechanism of connector B to its original position.
Disconnect the No. 2 instrument panel wire connector from the instrument panel wire.
Connect the cable to the negative (-) battery terminal, and wait for at least 2 seconds.
Turn the ignition switch ON.
Measure the voltage of the wire harness side connector.
| Tester Connection | Specified Condition |
| A25-1 (P+) - Body ground | Below 1 V |
| A25-2 (P-) - Body ground | Below 1 V |
Turn the ignition switch off.
Disconnect the cable from the negative (-) battery terminal, and wait for at least 90 seconds.
Measure the resistance of the wire harness side connector.
| Tester Connection | Specified Condition |
| A25-1 (P+) - A25-2 (P-) | Below 1 Ω |
| A25-1 (P+) - Body ground | 1 MΩ or higher |
| A25-2 (P-) - Body ground | 1 MΩ or higher |
Release the activation prevention mechanism built into connector D (Click here).
Measure the resistance of the wire harness side connector.
| Tester Connection | Specified Condition |
| A25-1 (P+) - A25-2 (P-) | 1 MΩ or higher |
|
| ||||
| OK | ||
| ||
| ||

