AIR CONDITIONING UNIT > REASSEMBLY |
| 1. INSTALL NO. 1 COOLER THERMISTOR |
|
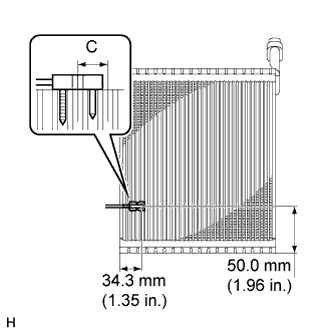
Insert the No. 1 cooler thermistor as shown in the illustration to install it.
| 2. INSTALL COOLER EXPANSION VALVE |
Sufficiently apply compressor oil to 2 new O-rings and the fitting surface of the hose joint.
Install the 2 O-rings to the cooler evaporator.
Using a 4 mm socket hexagon wrench, install the cooler expansion valve with the 2 hexagon bolts.
| 3. INSTALL NO. 1 COOLER EVAPORATOR SUB-ASSEMBLY |
Attach the clamp to install the No. 1 cooler evaporator sub-assembly.
Attach the 3 claws to install the lower heater case.
Install the 4 screws.
| 4. INSTALL HEATER RADIATOR UNIT SUB-ASSEMBLY |
Attach the evaporator case to the blower case.
Install the heater radiator unit sub-assembly with the screw.
| 5. INSTALL BLOWER ASSEMBLY |
Install the blower assembly with the 3 screws.
| 6. INSTALL QUICK HEATER ASSEMBLY (w/ PTC Heater) |
Install the quick heater assembly with the 2 screws.
Attach the 2 clamps.
| 7. INSTALL HEATER CONTROL CABLE SUB-ASSEMBLY (for Manual Air Conditioning System) |
Attach the 3 claws to install the heater control cable sub-assembly.
| 8. INSTALL AIR MIX DAMPER CONTROL CABLE SUB-ASSEMBLY (for Manual Air Conditioning System) |
Attach the 3 claws to install the air mix damper control cable sub-assembly.
| 9. INSTALL MODE DAMPER SERVO SUB-ASSEMBLY (for Automatic Air Conditioning System) |
Install the mode damper servo sub-assembly with the 3 screws.
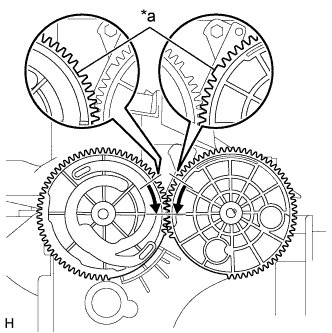 |
Set the mode damper servo sub-assembly so that the tooth of the gear engages with the cutout part as shown in the illustration to install the lever.
| *a | Cut Part |
Attach the claw.
| 10. INSTALL AIR MIX DAMPER SERVO SUB-ASSEMBLY (for Automatic Air Conditioning System) |
Install the air mix damper servo sub-assembly with the 3 screws.
| 11. INSTALL AIR CONDITIONING AMPLIFIER ASSEMBLY (for Manual Air Conditioning System) |
Install the air conditioning amplifier assembly with the screw.
Connect the connector.
Attach the clamp.