AUTOMATIC TRANSMISSION UNIT > REASSEMBLY |
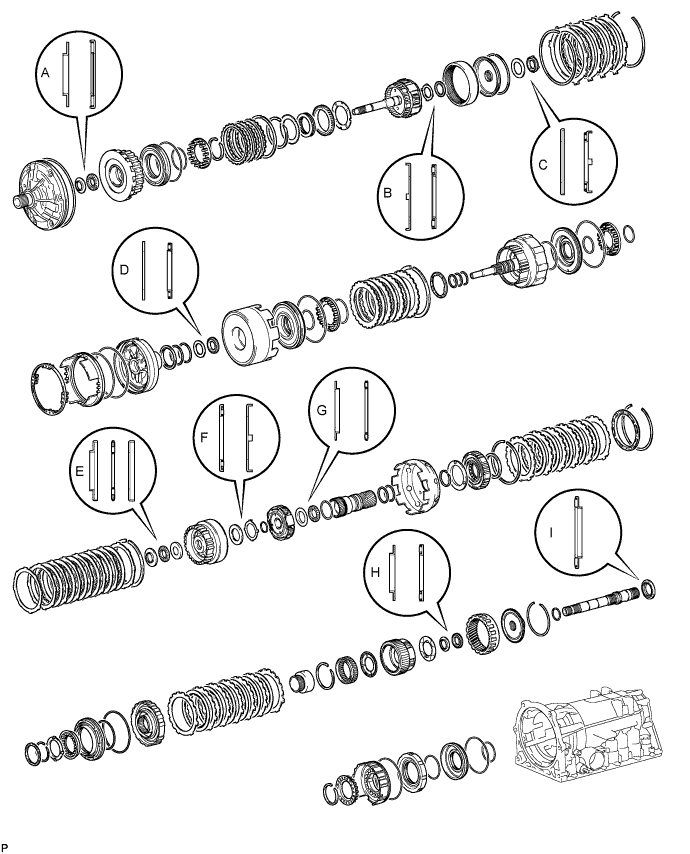
| 1. BEARING POSITION |
| Mark | Front Race Diameter Inside/Outside | Thrust Bearing Diameter Inside/Outside | Rear Race Diameter Inside/Outside |
| A | 28.45 mm (1.12 in.)/47.1 to 47.35 mm (1.855 to 1.864 in.) | 29.04 to 29.25 mm (1.144 to 1.151 in.)/50.04 to 50.34 mm (1.971 to 1.981 in.) | - |
| B | 33.0 to 33.25 mm (1.2993 to 1.3090 in.)/49.9 to 50.4 mm (1.97 to 1.98 in.) | 31.45 to 31.70 mm (1.239 to 1.248 in.)/49.1 to 49.4 mm (1.934 to 1.944 in.) | - |
| C | 37.1 to 37.3 mm (1.461 to 1.468 in.)/58.70 to 58.95 mm (2.312 to 2.320 in.) | 33.75 to 33.85 mm (1.329 to 1.332 in.)/49.8 to 50.3 mm (1.97 to 1.98 in.) | - |
| D | 36.5 to 37 mm (1.44 to 1.45 in.)/50.75 to 50.95 mm (1.999 to 2.005 in.) | 33.55 to 33.80 mm (1.321 to 1.330 in.)/47.62 to 47.87 mm (1.875 to 1.884 in.) | - |
| E | 25.98 mm (1.02 in.)/48.87 mm (1.92 in.) | 25.94 to 26.07 mm (1.022 to 1.026 in.)/46.62 to 46.87 mm (1.836 to 1.845 in.) | 26.5 to 27.0 mm (1.05 to 1.06 in.)/47.02 mm (1.85 in.) |
| F | - | 35.0 to 35.3 mm (1.378 to 1.389 in.)/53.50 to 53.75 mm (2.107to 2.116 in.) | 34.0 to 34.5 mm (1.34 to 1.35 in.)/48.5 to 49.0 mm (1.91 to 1.92 in.) |
| G | 33.55 to 33.80 mm (1.321 to 1.330 in.)/47.3 to 47.8 mm (1.87 to 1.88 in.) | 35.45 to 35.61 mm (1.396 to 1.401 in.)/47.62 to 47.87 mm (1.875 to 1.884 in.) | - |
| H | 28.5 mm (1.12 in.)/44.2 mm (1.74 in.) | 27.65 to 27.8 mm (1.089 to 1.094 in.)/44.2 mm (1.74 in.) | - |
| I | - | 39.38 mm (1.55 in.)/57.94 to 58.24 mm (2.282 to 2.292 in.) | - |
| 2. SECURE TRANSMISSION CASE |
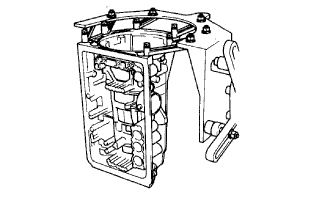 |
Secure the transmission case to an overhaul attachment.
| 3. INSTALL NO. 1 FIRST AND REVERSE BRAKE PISTON |
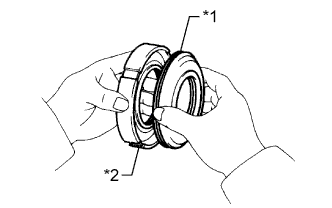 |
Coat 2 new O-rings with ATF and install them to the No. 1 brake piston.
| *1 | No. 1 First and Reverse Brake Piston |
| *2 | Reaction Sleeve |
Coat a new O-ring with ATF and install it to the reaction sleeve.
Install the No. 1 brake piston to the reaction sleeve.
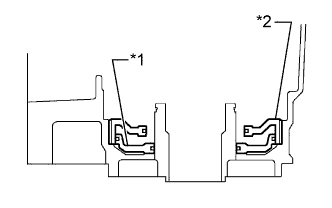 |
With the No. 1 brake piston on the bottom (the rear side), install the brake reaction sleeve and No. 1 brake piston to the transmission case.
| *1 | No. 1 First and Reverse Brake Piston |
| *2 | Reaction Sleeve |
| 4. INSTALL NO. 2 FIRST AND REVERSE BRAKE PISTON |
Coat a new O-ring with ATF and install it to the brake piston.
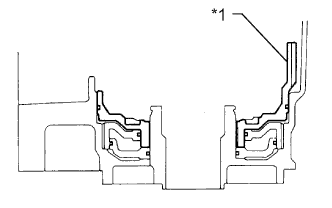 |
With the spring seat of the piston facing upward (the front side), install the piston to the transmission case.
| *1 | No. 2 First and Reverse Brake Piston |
| 5. INSTALL FIRST AND REVERSE BRAKE RETURN SPRING SUB-ASSEMBLY |
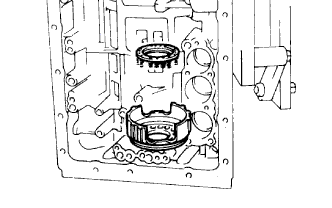 |
Install the brake return spring to the brake piston.
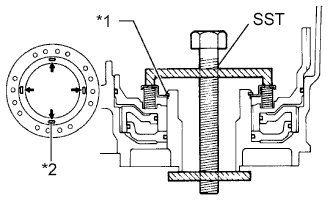 |
Place SST on the brake return spring and compress the brake return spring.
Using SST, install the snap ring. Make sure the end gap of the snap ring is not aligned with a brake return spring claw.
| *1 | Snap Ring |
| *2 | Brake Return Spring Claw |
| 6. INSPECT PISTON OPERATION OF FIRST AND REVERSE BRAKE |
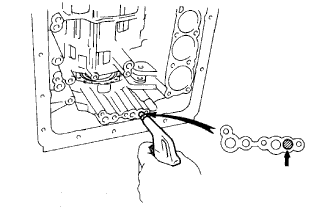 |
Make sure the first and reverse brake pistons move smoothly when compressed air is applied into the transmission case.
| 7. INSTALL LEAF SPRING |
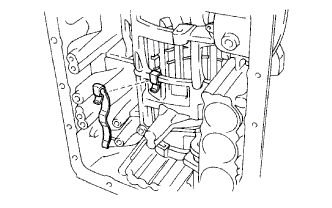 |
| 8. INSTALL NO. 2 1-WAY CLUTCH |
Coat the No. 2 planetary carrier thrust washer with petroleum jelly.
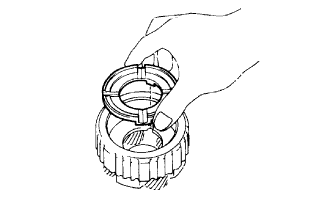 |
Install the thrust washer to the planetary gear.
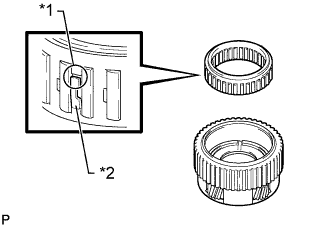 |
Install the 1-way clutch to the planetary gear.
| *1 | Open End |
| *2 | Guide |
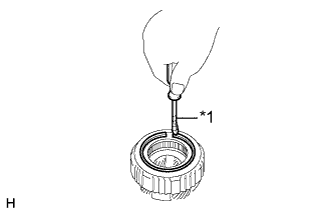 |
Using a screwdriver, install the snap ring.
| *1 | Protective Tape |
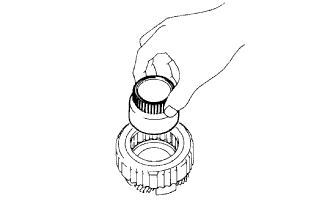 |
While turning the 1-way clutch inner race counterclockwise, install the 1-way clutch inner race to the planetary gear.
| 9. INSPECT NO. 2 1-WAY CLUTCH |
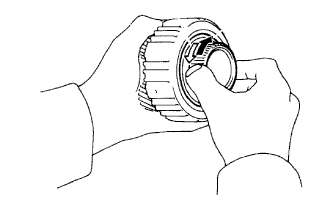 |
Hold the planetary gear and turn the 1-way clutch inner race. Check that the 1-way clutch inner race can be turned counterclockwise freely and locks when turned clockwise.
 | Lock |
 | Free |
| 10. INSTALL REAR PLANETARY GEAR ASSEMBLY |
Install the ring gear flange to the rear planetary ring gear.
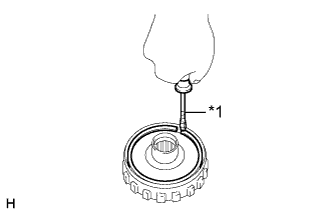 |
Using a screwdriver, install the snap ring.
| *1 | Protective Tape |
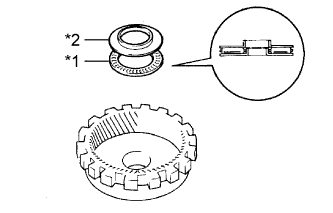 |
Coat the bearing and bearing race with petroleum jelly and install them to the rear planetary ring gear.
| Item | Inside | Outside |
| Bearing H | 27.65 to 27.8 mm (1.089 to 1.094 in.) | 44.2 mm (1.74 in.) |
| Bearing Race H | 28.5 mm (1.12 in.) | 44.2 mm (1.74 in.) |
| *1 | Bearing H |
| *2 | Bearing Race H |
Coat the No. 1 planetary carrier thrust washer with petroleum jelly.
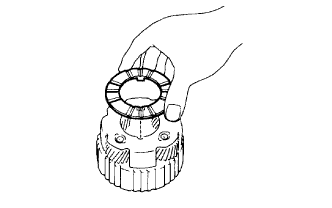 |
Install the thrust washer to the planetary gear.
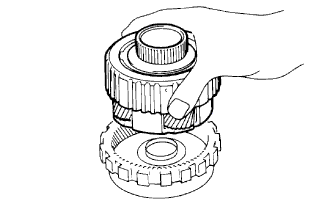 |
Install the rear planetary gear to the rear planetary ring gear.
| 11. INSTALL PLANETARY OUTPUT SHAFT OIL SEAL RING |
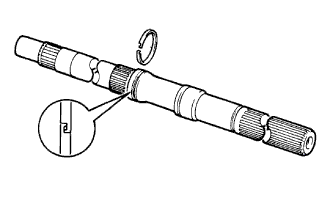 |
Coat a new oil seal ring with ATF and install it to the output shaft.
| 12. INSTALL OUTPUT SHAFT |
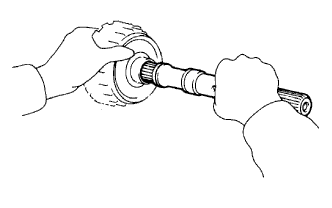 |
Install the output shaft to the rear planetary gear flange.
| 13. INSTALL SECOND BRAKE PISTON |
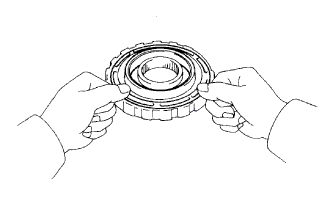 |
Coat 2 new O-rings with ATF and install them to the second brake piston.
While being careful not to damage the O-rings, press the second brake piston toward the second brake drum with both hands.
| 14. INSTALL SECOND BRAKE PISTON RETURN SPRING SUB-ASSEMBLY |
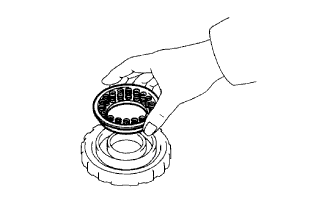 |
Install the piston return spring.
Install the second brake piston return spring seat.
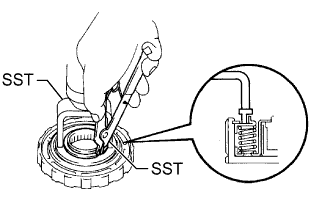 |
Place SST on the return spring, compress the return spring with a press, and then install the snap ring.
| 15. INSPECT SECOND BRAKE PISTON |
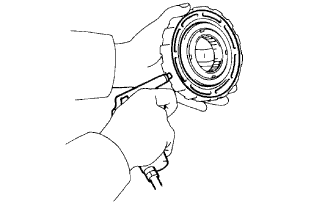 |
Check that the second brake piston moves smoothly when applying compressed air to and releasing low-pressure compressed air from the second brake drum.
| 16. INSTALL NO. 4 PLANETARY CARRIER THRUST WASHER |
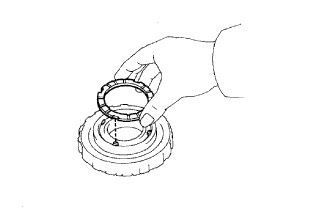 |
Coat the thrust washer with petroleum jelly and install it.
| 17. INSTALL FIRST AND REVERSE BRAKE DISC SET |
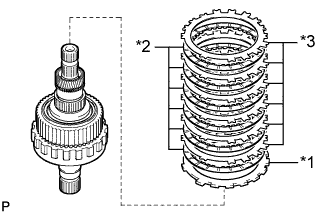 |
Install the flange with the rounded edge facing upward.
Install the 6 discs and 6 plates.
| *1 | Flange |
| *2 | Disc |
| *3 | Plate |
| 18. INSTALL OUTPUT SHAFT WITH REAR PLANETARY GEAR, NO. 2 1-WAY CLUTCH, FIRST AND REVERSE BRAKE DISC SET AND SECOND BRAKE DRUM |
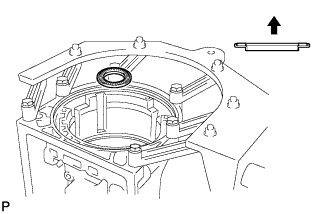 |
Coat the bearing with petroleum jelly and install it to the case.
| Item | Inside | Outside |
| Bearing I | 39.38 mm (1.55 in.) | 57.94 to 58.24 mm (2.282 to 2.292 in.) |
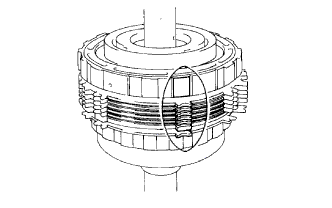 |
Align the teeth on the flange, discs and plates.
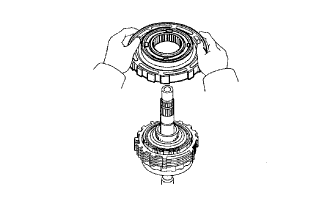 |
Install the second brake drum to the planetary gear with the snap ring facing upward.
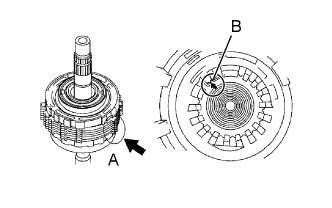 |
Align the teeth of the planetary gear assembly, indicated by A in the illustration, with the splines of the transmission case, indicated by B in the illustration.
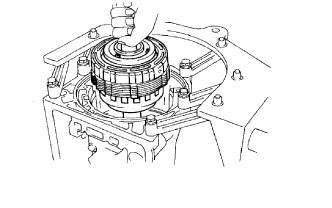 |
Install the assembled planetary gear.
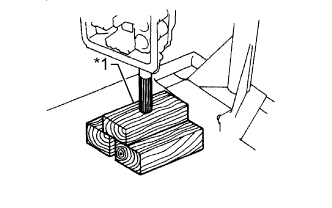 |
Place the output shaft on wooden blocks.
| *1 | Wooden Block |
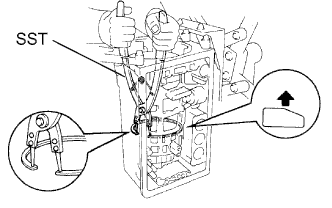 |
Using SST, install the snap ring.
| 19. SELECT FIRST AND REVERSE BRAKE FLANGE |
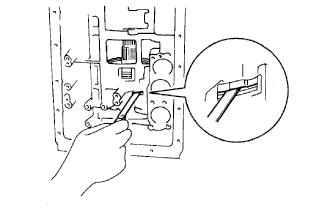 |
Using a feeler gauge, measure the clearance between the plate and second brake drum.
| Mark | Thickness |
| 55 | 3.94 to 4.06 mm (0.156 to 0.159 in.) |
| 54 | 4.14 to 4.26 mm (0.163 to 0.167 in.) |
| 53 | 4.34 to 4.46 mm (0.171 to 0.175 in.) |
| 52 | 4.54 to 4.66 mm (0.179 to 0.183 in.) |
| 51 | 4.74 to 4.86 mm (0.187 to 0.191 in.) |
| 50 | 4.92 to 5.08 mm (0.194 to 0.199 in.) |
| 66 | 5.10 to 5.30 mm (0.201 to 0.208 in.) |
| 67 | 5.30 to 5.50 mm (0.209 to 0.216 in.) |
| 20. INSTALL SECOND BRAKE PISTON SLEEVE |
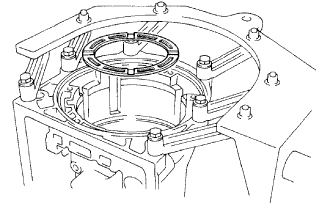 |
| 21. INSTALL BRAKE DRUM GASKET |
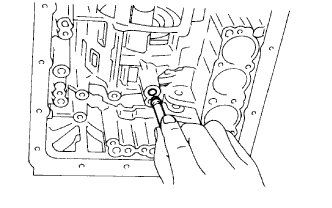 |
Coat a new gasket with ATF and install it.
| 22. INSTALL NO. 1 1-WAY CLUTCH ASSEMBLY |
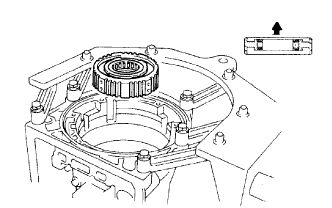 |
Install the 1-way clutch as shown in the illustration.
| 23. INSTALL SECOND BRAKE DISC SET |
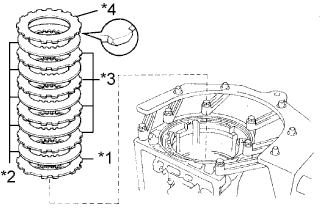 |
Install the plate (A) with the rounded edge of the plate facing the discs.
| Item | Specified Condition |
| Plate (A) | 1.8 mm (0.0709 in.) |
| Plate (B) | 2.5 mm (0.0984 in.) |
| *1 | Plate (A) |
| *2 | Disc |
| *3 | Plate (B) |
| *4 | Flange |
Install the 5 discs, 4 2.5 mm (0.0984 in.) thick plates and flange.
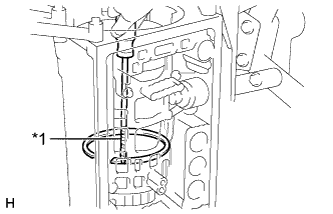 |
Using a screwdriver, install the snap ring.
| *1 | Protective Tape |
| 24. INSPECT SECOND BRAKE |
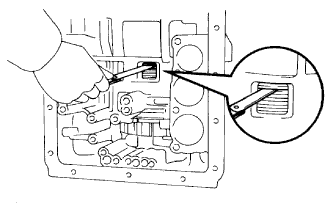 |
Using a feeler gauge, measure the clearance between the snap ring and flange.
| 25. INSTALL SUN GEAR INPUT DRUM SHAFT SNAP RING |
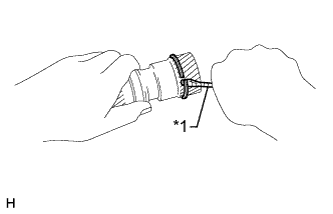 |
Using a screwdriver, install the snap ring to the planetary sun gear.
| *1 | Protective Tape |
| 26. INSTALL SUN GEAR INPUT DRUM |
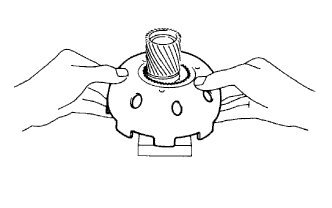 |
Place the planetary sun gear onto a wooden block or similar object.
Install the input drum to the planetary sun gear.
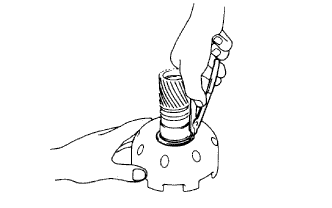 |
Using snap ring pliers, install the snap ring.
| 27. INSTALL SUN GEAR SHAFT OIL SEAL RING |
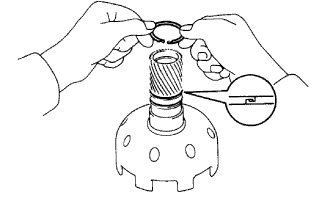 |
Coat 2 new oil seal rings with ATF and install the 2 oil seal rings to the planetary sun gear.
| 28. INSTALL NO. 1 1-WAY CLUTCH THRUST WASHER |
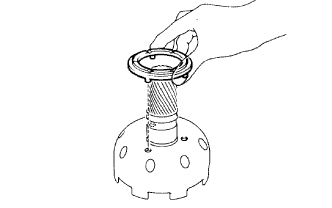 |
| 29. INSTALL PLANETARY SUN GEAR SUB-ASSEMBLY WITH SUN GEAR INPUT DRUM |
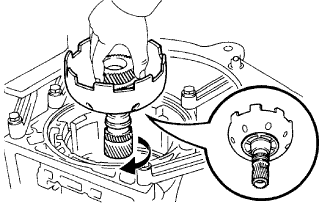 |
While turning the sun gear clockwise, install it to the 1-way clutch.
| 30. INSTALL FRONT PLANETARY GEAR ASSEMBLY |
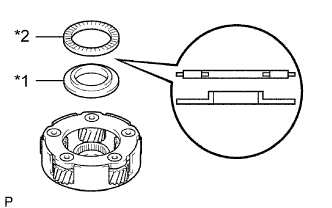 |
Coat the bearing and bearing race with petroleum jelly and install them to the planetary gear.
| Item | Inside | Outside |
| Bearing Race G | 33.55 to 33.80 mm (1.321 to 1.330 in.) | 47.3 to 47.8 mm (1.87 to 1.88 in.) |
| Bearing G | 35.45 to 35.61 mm (1.396 to 1.401 in.) | 47.62 to 47.87 mm (1.875 to 1.884 in.) |
| *1 | Bearing Race G |
| *2 | Bearing G |
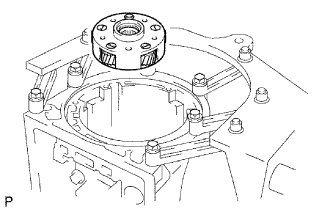 |
Install the planetary gear to the sun gear input drum.
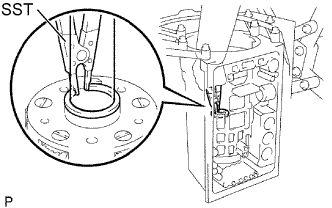 |
Using SST, install the snap ring.
Remove the wooden blocks from under the output shaft.
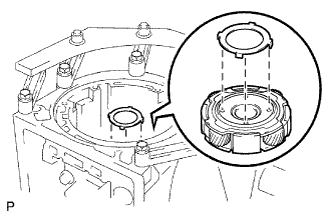 |
Coat the bearing race with petroleum jelly and install it to the planetary gear.
| Item | Inside | Outside |
| Bearing Race F | 34.0 to 34.5 mm (1.34 to 1.35 in.) | 48.5 to 49.0 mm (1.91 to 1.92 in.) |
| 31. INSTALL SECOND COAST BRAKE BAND ASSEMBLY |
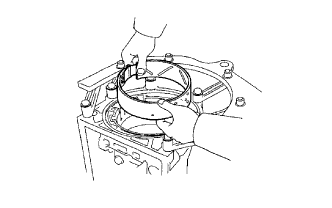 |
Install the brake band to the case.
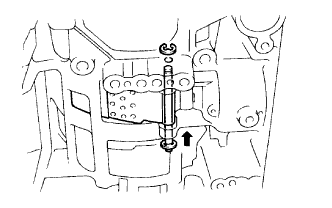 |
Install the pin to the brake band as shown in the illustration.
Install the E-ring to the pin.
| 32. INSTALL INPUT SHAFT OIL SEAL RING |
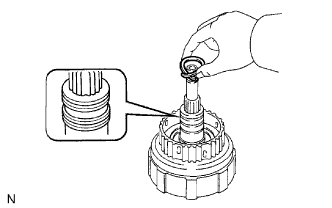 |
Coat the 3 new oil seal rings with ATF.
Squeeze the ends of the 3 new oil seal rings together, and then install them to the input shaft groove.
| 33. INSTALL FORWARD CLUTCH PISTON SUB-ASSEMBLY |
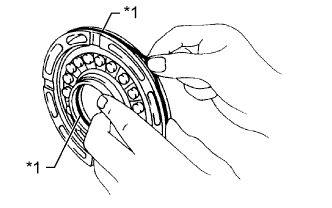 |
Coat 2 new O-rings with ATF and install them to the forward clutch piston.
| *1 | O-Ring |
Coat a new O-ring with ATF and install it to the input shaft.
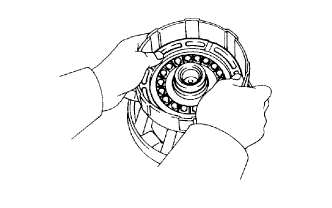 |
Press the clutch piston into the input shaft with both hands to install it.
| 34. INSTALL FORWARD CLUTCH RETURN SPRING SUB-ASSEMBLY |
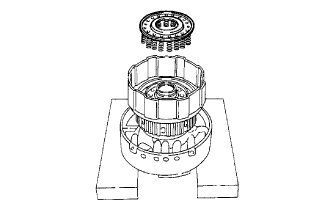 |
Install the piston return spring.
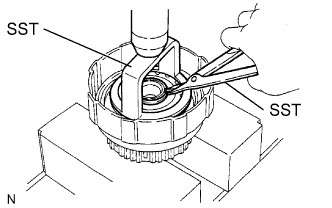 |
Place SST on the return spring, compress the return spring with a press, and then install the snap ring.
| 35. INSTALL FORWARD CLUTCH DISC SET |
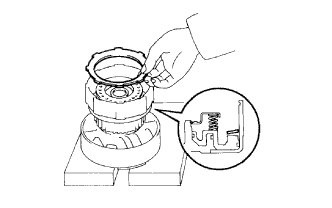 |
Install the cushion plate.
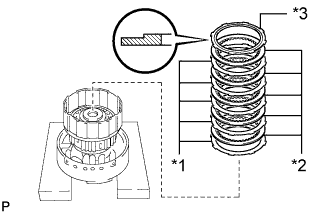 |
Install the 5 plates, 5 discs and flange.
| *1 | Plate |
| *2 | Disc |
| *3 | Flange |
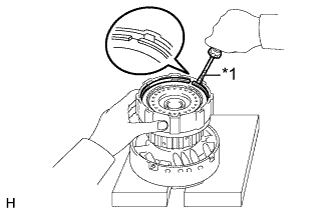 |
Using a screwdriver, install the snap ring.
| *1 | Protective Tape |
| 36. SELECT FORWARD CLUTCH FLANGE |
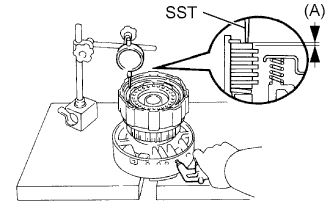 |
Using SST and a dial indicator, measure the piston stroke (A) of the clutch flange at both ends across the diameter while applying and releasing compressed air (392 kPa (4.0 kgf/cm2, 57 psi))
| Mark | Thickness |
| 90 | 2.95 to 3.05 mm (0.117 to 0.120 in.) |
| 91 | 3.15 to 3.25 mm (0.125 to 0.127 in.) |
| 92 | 3.35 to 3.45 mm (0.132 to 0.135 in.) |
| 93 | 3.55 to 3.65 mm (0.140 to 0.143 in.) |
| 94 | 3.75 to 3.85 mm (0.148 to 0.151 in.) |
| 95 | 3.95 to 4.05 mm (0.156 to 0.159 in.) |
| 96 | 4.15 to 4.25 mm (0.164 to 0.167 in.) |
| 97 | 4.35 to 4.45 mm (0.172 to 0.175 in.) |
| 37. INSTALL DIRECT CLUTCH PISTON SUB-ASSEMBLY |
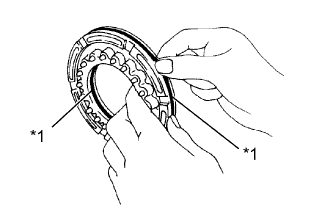 |
Coat 2 new O-rings with ATF and install them to the direct clutch piston.
| *1 | O-Ring |
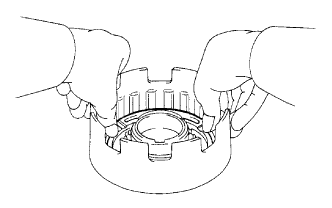 |
Press the clutch piston into the clutch drum with both hands to install it.
| 38. INSTALL DIRECT CLUTCH RETURN SPRING SUB-ASSEMBLY |
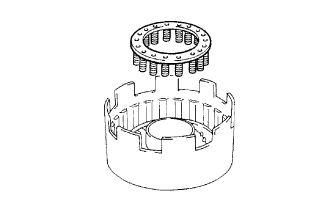 |
Install the piston return spring.
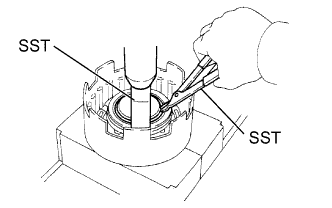 |
Place SST on the spring retainer, compress the return spring with a press, and then install the snap ring.
| 39. INSTALL DIRECT CLUTCH DISC SET |
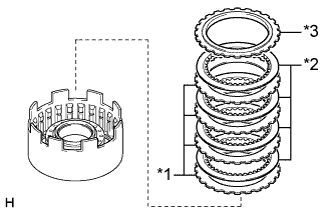 |
Install the 4 plates and 4 discs.
Install the flange with the flat end facing downward.
| *1 | Plate |
| *2 | Disc |
| *3 | Flange |
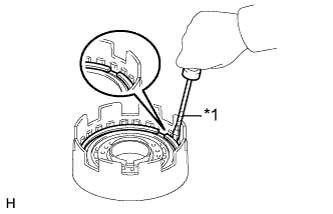 |
Using a screwdriver, install the snap ring.
| *1 | Protective Tape |
| 40. SELECT DIRECT CLUTCH FLANGE |
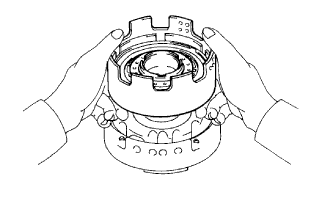 |
Place the direct clutch onto the overdrive support.
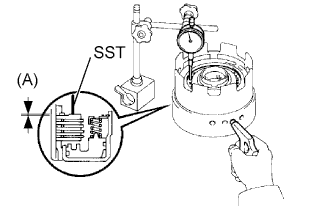 |
Using SST and a dial indicator, measure the piston stroke (A) of the clutch flange at both ends across the diameter while applying and releasing compressed air (186 to 206 kPa (1.9 to 2.1 kgf/cm2, 27 to 30 psi)).
| Mark | Thickness |
| 53 | 3.25 to 3.35 mm (0.128 to 0.131 in.) |
| 54 | 3.35 to 3.45 mm (0.132 to 0.135 in.) |
| 55 | 3.45 to 3.55 mm (0.136 to 0.139 in.) |
| 56 | 3.55 to 3.65 mm (0.140 to 0.143 in.) |
| 57 | 3.65 to 3.75 mm (0.144 to 0.147 in.) |
| 58 | 3.75 to 3.85 mm (0.148 to 0.151 in.) |
| 41. INSTALL DIRECT CLUTCH ASSEMBLY |
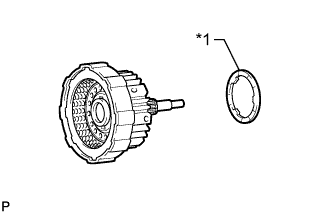 |
Install the thrust washer to the input shaft.
| *1 | Thrust Washer |
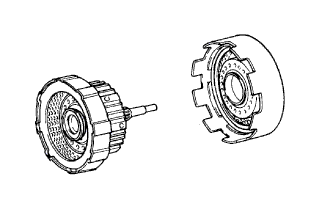 |
Install the direct clutch to the input shaft.
| 42. INSTALL FRONT PLANETARY RING GEAR SUB-ASSEMBLY |
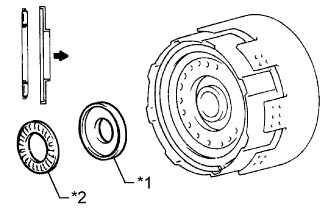 |
Coat the bearing race and bearing with petroleum jelly and install them to the input shaft.
| Item | Inside | Outside |
| Bearing Race E | 25.98 mm (1.02 in.) | 48.87 mm (1.92 in.) |
| Bearing E | 25.94 to 26.07 mm (1.022 to 1.026 in.) | 46.62 to 46.87 mm (1.836 to 1.845 in.) |
| *1 | Bearing Race E |
| *2 | Bearing E |
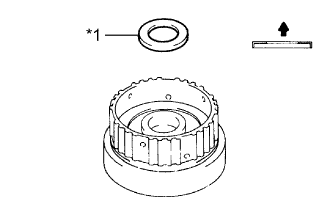 |
Coat the bearing race with petroleum jelly and install it to the front planetary ring gear.
| Item | Inside | Outside |
| Bearing Race E | 26.5 to 27.0 mm (1.05 to 1.06 in.) | 47.02 mm (1.85 in.) |
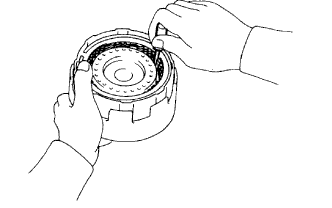 |
Align the teeth of the discs in the forward clutch.
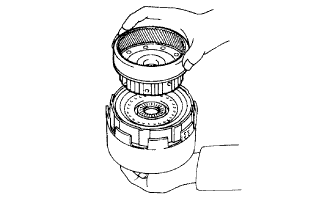 |
Align the splines of the planetary ring gear with the teeth of the discs and install the planetary ring gear to the forward clutch.
| 43. INSTALL DIRECT CLUTCH ASSEMBLY WITH FORWARD CLUTCH ASSEMBLY |
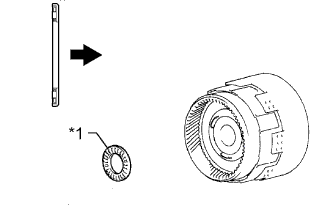 |
Coat the bearing with petroleum jelly and install it to the ring gear.
| Item | Inside | Outside |
| Bearing F | 35.0 to 35.3 mm (1.378 to 1.389 in.) | 53.50 to 53.75 mm (2.107 to 2.116 in.) |
| *1 | Bearing F |
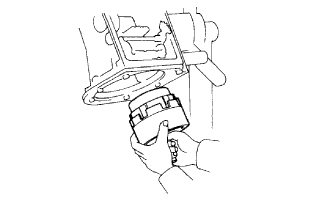 |
Install the assembled direct clutch, forward clutch and front planetary ring gear to the transmission case.
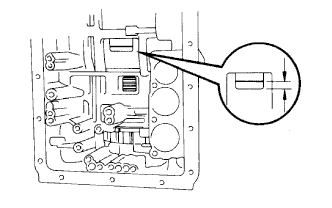 |
Using a vernier caliper, measure the distance between the sun gear input drum and direct clutch drum as shown in the illustration.
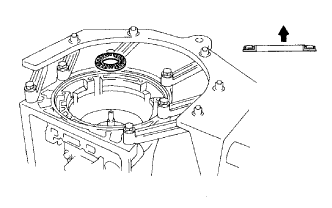 |
Coat the bearing with petroleum jelly and install it to the forward clutch.
| Item | Inside | Outside |
| Bearing D | 33.55 to 33.80 mm (1.321 to 1.330 in.) | 47.62 to 47.87 mm (1.875 to 1.884 in.) |
| 44. INSTALL SECOND COAST BRAKE PISTON ROD |
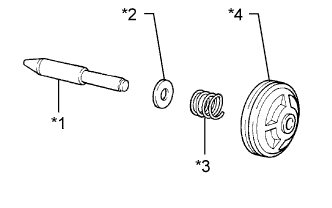 |
Install the washer plate, compression spring and piston to the piston rod.
| *1 | Piston Rod |
| *2 | Washer Plate |
| *3 | Compression Spring |
| *4 | Piston |
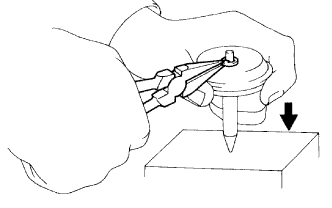 |
Firmly press the piston down to compress the compression spring.
Install the E-ring.
| 45. INSTALL SECOND COAST BRAKE PISTON OIL SEAL RING |
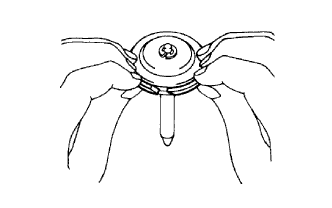 |
Coat a new oil seal ring with ATF.
Spread the ends of the ring to install the oil seal ring to the piston groove. Then squeeze its ends together.
| 46. INSTALL SECOND COAST BRAKE PISTON ASSEMBLY |
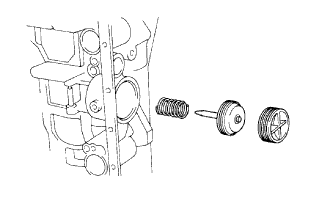 |
Coat 2 new O-rings with ATF and install them to the second coast brake cover.
Install a new spring, piston assembly and cover to the case.
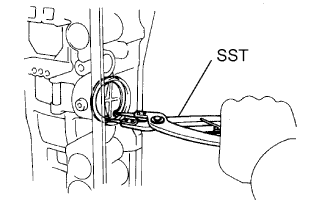 |
Using SST, install the snap ring.
| 47. INSPECT PISTON STROKE OF SECOND COAST BRAKE |
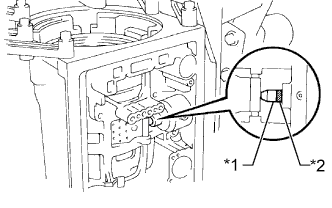 |
Using a waterproof pen, place a mark on the second coast brake piston rod as shown in the illustration.
| *1 | Piston Rod |
| *2 | Mark |
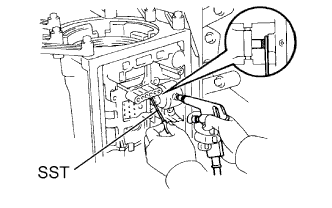 |
Using SST, measure the piston stroke while applying and releasing compressed air (392 kPa (4.0 kgf/cm2, 57 psi)).
| Groove Mark | Length |
| Without | 78.3 to 78.5 mm (3.083 to 3.090 in.) |
| With | 79.8 to 80.0 mm (3.142 to 3.149 in.) |
| 48. INSTALL OVERDRIVE BRAKE PISTON |
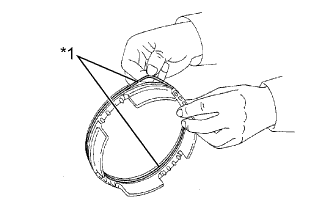 |
Coat 2 new O-rings with ATF and install them to the overdrive brake piston.
| *1 | O-Ring |
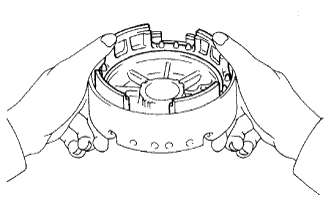 |
Press the brake piston into the overdrive support with both hands to install it.
| 49. INSTALL OVERDRIVE BRAKE RETURN SPRING SUB-ASSEMBLY |
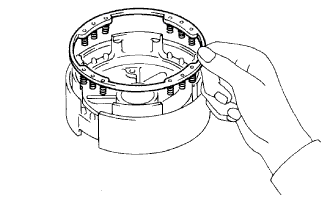 |
Install the return spring to the brake piston.
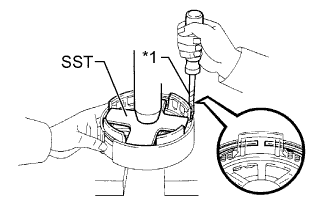 |
Place SST on the return spring and compress the return spring with a press.
Using a screwdriver, install the snap ring.
| *1 | Protective Tape |
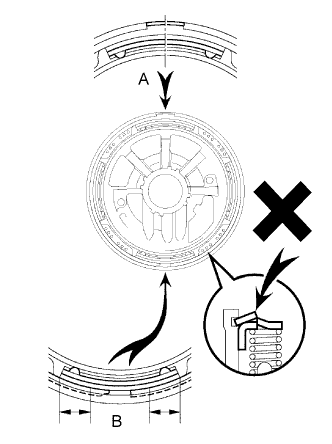 |
| 50. INSPECT PISTON OPERATION OF OVERDRIVE BRAKE |
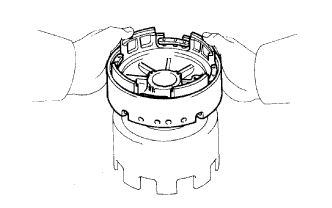 |
Place the overdrive support assembly onto the direct clutch assembly.
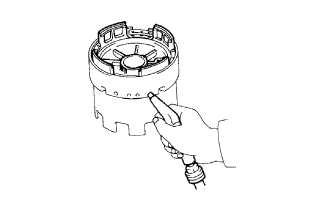 |
Apply compressed air (392 kPa (4 kgf/cm2, 57 psi)) into the oil passage and check that the overdrive brake piston moves smoothly.
| 51. INSTALL OVERDRIVE CLUTCH DRUM OIL SEAL RING |
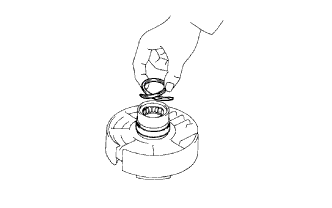 |
Coat 2 new oil seal rings with ATF.
Squeeze the ends of the 2 oil seal rings together, and then install them to the stator shaft groove.
| 52. INSTALL OVERDRIVE BRAKE ASSEMBLY |
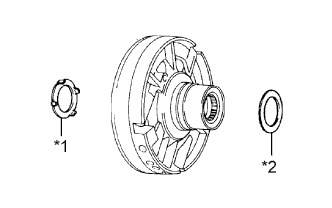 |
Coat the bearing and bearing race with petroleum jelly and install them to the overdrive brake assembly.
| Item | Inside | Outside |
| Bearing C | 33.75 to 33.85 mm (1.329 to 1.332 in.) | 49.8 to 50.3 mm (1.97 to 1.98 in.) |
| Bearing Race D | 36.5 to 37 mm (1.44 to 1.45 in.) | 50.75 to 50.95 mm (1.999 to 2.005 in.) |
| *1 | Bearing C |
| *2 | Bearing Race D |
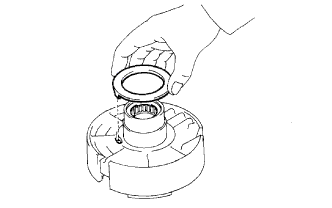 |
Coat the thrust washer with petroleum jelly and install it to the overdrive support.
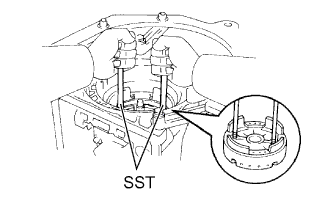 |
Using the 2 bolts of SST, aim the bolt and oil holes of the overdrive brake assembly toward the valve body side, and align them with the bolt holes of the transmission case. Then install the overdrive brake assembly.
Temporarily install the 2 bolts.
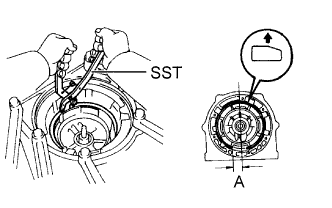 |
Using SST, install the snap ring.
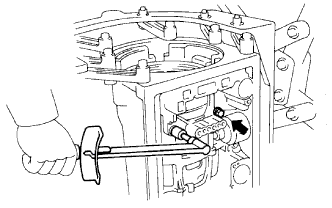 |
Tighten the 2 bolts.
| 53. INSPECT OUTPUT SHAFT END PLAY |
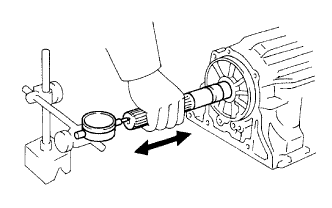 |
Using a dial indicator, measure the end play of the output shaft while moving it by hand.
Check that the output shaft rotates smoothly.
| 54. INSTALL OVERDRIVE BRAKE DISC SET |
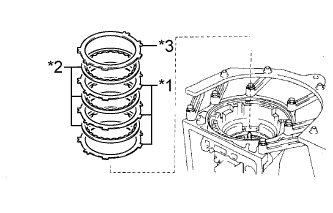 |
Install the 3 plates, 3 discs and flange.
| *1 | Plate |
| *2 | Disc |
| *3 | Flange |
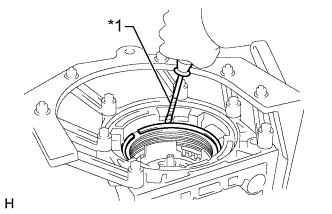 |
Using a screwdriver, install the snap ring.
| *1 | Protective Tape |
| 55. SELECT OVERDRIVE BRAKE FLANGE |
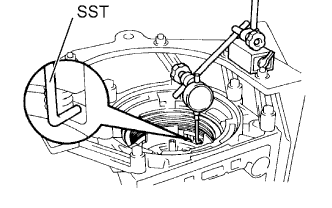 |
Place SST and a dial indicator on the overdrive brake piston.
Measure the stroke while applying and releasing compressed air (392 kPa (4.0 kgf/cm2, 57 psi))
| Mark | Thickness |
| 33 | 3.25 to 3.35 mm (0.128 to 0.131 in.) |
| 35 | 3.45 to 3.55 mm (0.136 to 0.139 in.) |
| 36 | 3.55 to 3.65 mm (0.140 to 0.143 in.) |
| 37 | 3.65 to 3.75 mm (0.144 to 0.147 in.) |
| 38 | 3.75 to 3.85 mm (0.148 to 0.151 in.) |
| 39 | 3.85 to 3.95 mm (0.152 to 0.155 in.) |
| 40 | 3.95 to 4.05 mm (0.156 to 0.159 in.) |
| 56. INSTALL OVERDRIVE PLANETARY RING GEAR FLANGE |
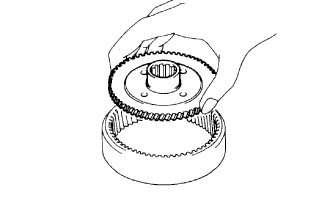 |
Install the ring gear flange to the overdrive planetary ring gear.
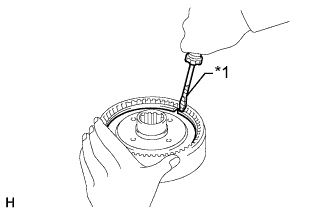 |
Using a screwdriver, install the snap ring.
| *1 | Protective Tape |
| 57. INSTALL OVERDRIVE PLANETARY RING GEAR |
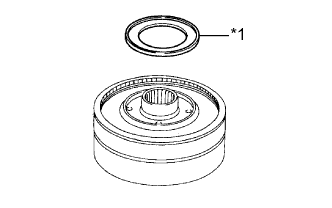 |
Coat the bearing race with petroleum jelly and install it to the overdrive planetary ring gear flange.
| Item | Inside | Outside |
| Bearing Race C | 37.1 to 37.3 mm (1.461 to 1.468 in.) | 58.70 to 58.95 mm (2.312 to 2.320 in.) |
| *1 | Bearing Race C |
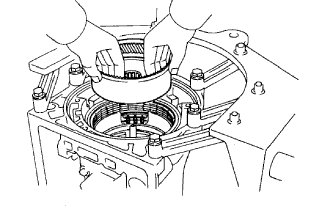 |
Install the ring gear.
| 58. INSTALL NO. 3 OVERDRIVE PLANETARY GEAR THRUST WASHER |
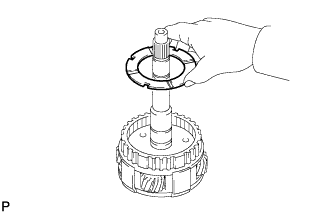 |
Install the thrust washer to the overdrive planetary gear with the grooves facing upward.
| 59. INSTALL OVERDRIVE 1-WAY CLUTCH |
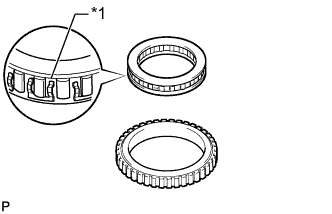 |
Install the 2 retainers to the 1-way clutch.
Install the 1-way clutch to the outer race with the flange of the 1-way clutch facing upward.
| *1 | Flange |
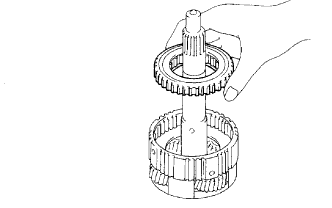 |
Install the overdrive 1-way clutch and outer race to the overdrive planetary gear.
| 60. INSTALL OVERDRIVE RETAINING PLATE |
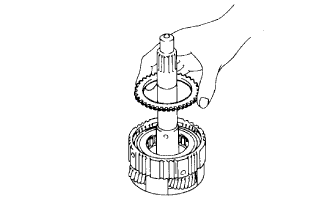 |
Install the retaining plate.
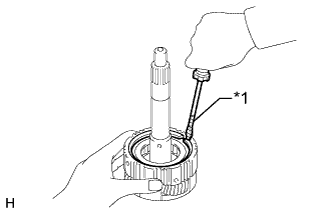 |
Using a screwdriver, install the snap ring.
| *1 | Protective Tape |
| 61. INSPECT OVERDRIVE 1-WAY CLUTCH |
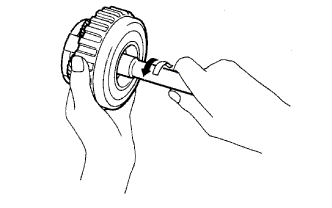 |
Hold the overdrive direct clutch drum and turn the input shaft. Check that the input shaft can be turned clockwise freely and locks when turned counterclockwise.
| Lock |
| Free |
| 62. INSTALL OVERDRIVE DIRECT CLUTCH PISTON SUB-ASSEMBLY |
Coat 2 new O-rings with ATF and install them to the overdrive direct clutch piston.
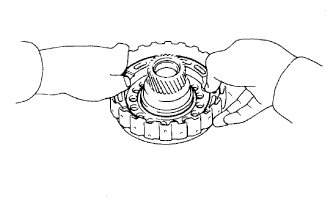 |
Press the clutch piston into the clutch drum with both hands to install it.
| 63. INSTALL OVERDRIVE DIRECT RETURN SPRING SUB-ASSEMBLY |
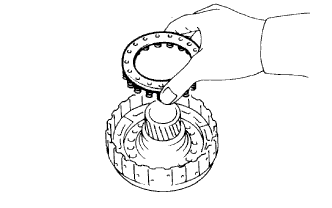 |
Install the overdrive brake return spring to the overdrive direct clutch piston.
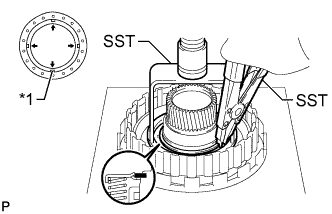 |
Place SST on the spring retainer, compress the return spring with a press, and then install the snap ring.
| *1 | Return Spring Claw |
| 64. INSTALL OVERDRIVE DIRECT CLUTCH DISC SET |
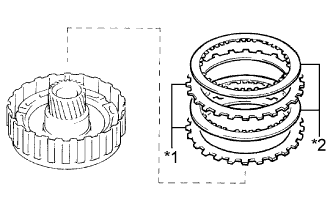 |
Install the 2 plates and 2 discs.
| *1 | Plate |
| *2 | Disc |
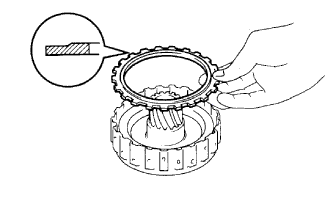 |
Install the flange with the flat end facing downward.
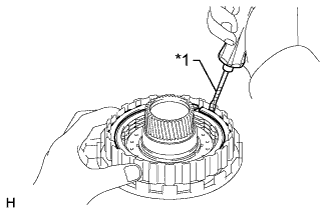 |
Using a screwdriver, install the snap ring.
| *1 | Protective Tape |
| 65. SELECT OVERDRIVE DIRECT CLUTCH FLANGE |
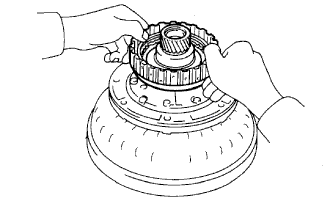 |
Place the oil pump onto the torque converter assembly, and then place the overdrive direct clutch drum assembly onto the oil pump.
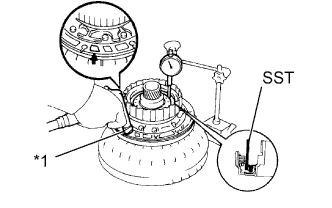 |
Using SST and a dial indicator, measure the overdrive direct clutch piston stroke while applying and releasing compressed air (392 kPa (4.0 kgf/cm2, 57 psi)).
| *1 | Vinyl Tape |
| Mark | Thickness |
| 21 | 3.05 to 3.15 mm (0.121 to 0.124 in.) |
| 20 | 3.15 to 3.25 mm (0.125 to 0.127 in.) |
| 19 | 3.25 to 3.35 mm (0.128 to 0.131 in.) |
| 18 | 3.35 to 3.45 mm (0.132 to 0.135 in.) |
| 17 | 3.45 to 3.55 mm (0.136 to 0.139 in.) |
| 16 | 3.55 to 3.65 mm (0.140 to 0.143 in.) |
| 66. INSTALL OVERDRIVE DIRECT CLUTCH DRUM |
Align the teeth of the discs in the direct clutch assembly.
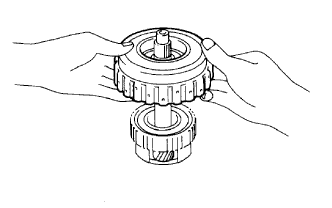 |
Install the direct clutch drum assembly to the overdrive planetary gear.
| 67. INSTALL OVERDRIVE PLANETARY GEAR ASSEMBLY WITH DIRECT CLUTCH ASSEMBLY AND OVERDRIVE 1-WAY CLUTCH ASSEMBLY |
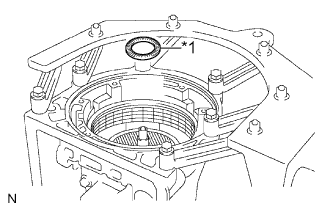 |
Coat the bearing with petroleum jelly and install it to the ring gear.
| Item | Inside | Outside |
| Bearing B | 31.45 to 31.70 mm (1.239 to 1.248 in.) | 49.1 to 49.4 mm (1.934 to 1.944 in.) |
| *1 | Bearing B |
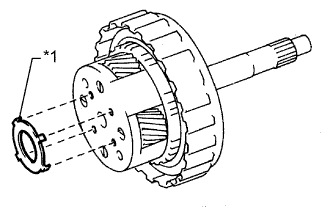 |
Coat the bearing race with petroleum jelly and install it to the planetary gear.
| Item | Inside | Outside |
| Bearing Race B | 33.0 to 33.25 mm (1.2993 to 1.3090 in.) | 49.9 to 50.4 mm (1.97 to 1.98 in.) |
| *1 | Bearing Race B |
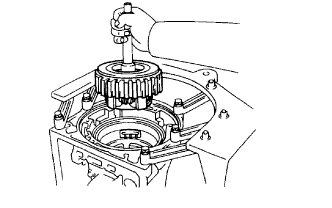 |
Install the overdrive planetary gear together with the overdrive direct clutch and 1-way clutch.
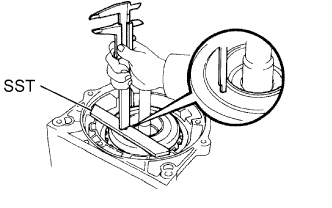 |
Place SST on the transmission case.
Using a vernier caliper, measure the distance between the top of SST and the clutch drum.
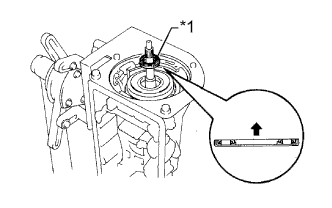 |
Coat the bearing with petroleum jelly and install it to the overdrive direct clutch.
| Item | Inside | Outside |
| Bearing A | 29.04 to 29.25 mm (1.144 to 1.151 in.) | 50.04 to 50.34 mm (1.971 to 1.981 in.) |
| *1 | Bearing A |
| 68. INSTALL OIL PUMP ASSEMBLY |
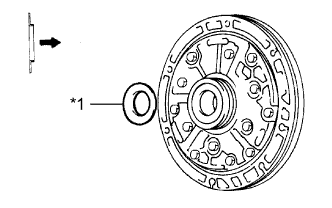 |
Coat the bearing race with petroleum jelly and install it to the oil pump.
| Item | Inside | Outside |
| Bearing Race A | 28.45 mm (1.12 in.) | 47.1 to 47.35 mm (1.855 to 1.864 in.) |
| *1 | Bearing Race A |
Coat a new O-ring with ATF and install it to the pump body.
Slide the oil pump onto the input shaft, align the bolt holes of the oil pump assembly with the bolt holes of the transmission case and install the oil pump.
Hold the input shaft and lightly press the oil pump body to slide the oil seal rings toward the overdrive direct clutch drum.
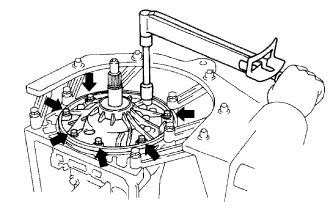 |
Install the 7 bolts.
| 69. INSPECT INPUT SHAFT ROTATION |
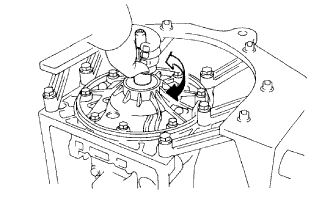 |
Make sure the input shaft rotates smoothly.
| 70. INSPECT INDIVIDUAL PISTON OPERATION |
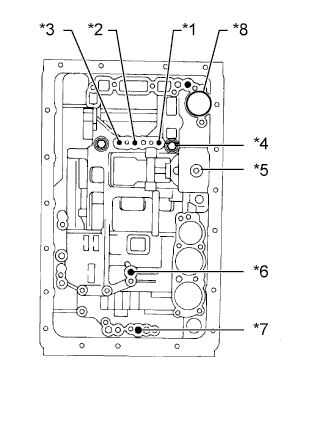 |
Check the operating sound while applying compressed air to the oil hole indicated in the illustration.
| *1 | Overdrive Direct Clutch (C1) |
| *2 | Direct Clutch (C2) |
| *3 | Forward Clutch (C3) |
| *4 | Overdrive Brake (B1) |
| *5 | Second Coast Brake (B2) |
| *6 | Second Brake (B3) |
| *7 | First and Reverse Brake (B4) |
| *8 | C-0 Accumulator Piston Hole |
| 71. INSTALL MANUAL VALVE LEVER SHAFT OIL SEAL |
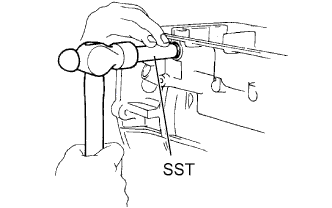 |
Using SST and a hammer, tap in 2 new oil seals.
Coat the lips of the oil seals with MP grease.
| 72. INSTALL MANUAL VALVE LEVER SHAFT |
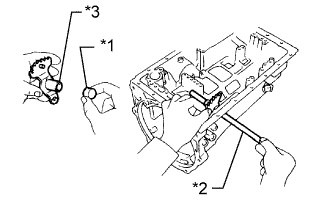 |
Install a new spacer to the manual valve lever.
| *1 | Spacer |
| *2 | Manual Valve Lever Shaft |
| *3 | Manual Valve Lever |
Pass the manual valve lever shaft through the transmission case and manual valve lever to install it.
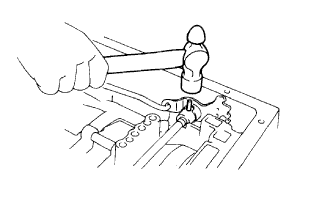 |
Using a hammer, tap in a new spring pin.
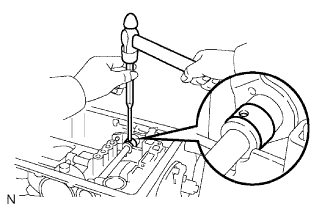 |
Align the manual valve lever indentation with the spacer hole and stake them with a punch.
Check that the shaft rotates smoothly.
| 73. INSTALL PARKING LOCK PAWL |
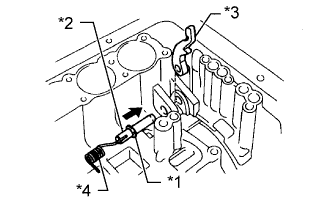 |
Install the E-ring to the parking lock pawl shaft.
| *1 | E-Ring |
| *2 | Parking Lock Pawl Shaft |
| *3 | Parking Lock Pawl |
| *4 | Spring |
Install the parking lock pawl, shaft and spring.
| 74. INSTALL PARKING LOCK ROD SUB-ASSEMBLY |
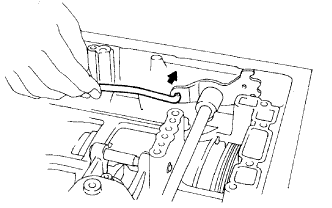 |
Connect the parking lock rod to the manual valve lever to install it.
| 75. INSTALL PARKING LOCK PAWL BRACKET |
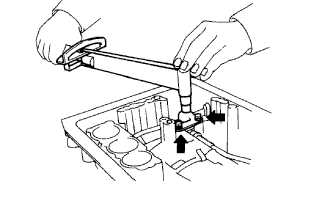 |
Install the parking lock pawl bracket to the transmission case with the 3 bolts.
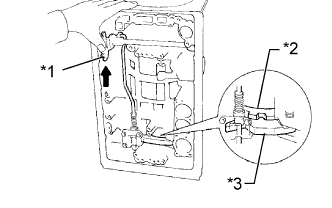 |
Shift the manual valve lever to the P position and confirm that the planetary ring gear is correctly locked by the parking lock pawl.
| *1 | Manual Valve Lever |
| *2 | Planetary Ring Gear |
| *3 | Parking Lock Pawl |
| 76. INSTALL C-0 ACCUMULATOR PISTON |
Coat a new O-ring with ATF and install it to the piston.
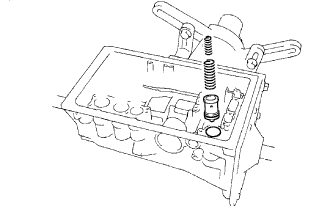 |
Install the 2 springs and accumulator piston to the hole.
| Item | Free Length Outer Diameter | Color |
| C-0 Inner Spring | 46.0 mm (1.81 in.) 14.02 mm (0.552 in.) | Yellow |
| C-0 Outer Spring | 74.6 mm (2.94 in.) 20.9 mm (0.823 in.) | Orange |
| 77. INSTALL B-0 ACCUMULATOR PISTON |
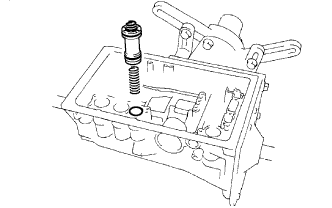 |
Coat 2 new O-rings with ATF and install them to the piston.
Install the spring and accumulator piston to the hole.
| Item | Free Length Outer Diameter | Color |
| B-0 Spring | 63.6 mm (2.50 in.) 16.0 mm (0.630 in.) | Red |
| 78. INSTALL C-2 ACCUMULATOR PISTON |
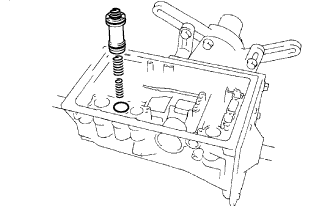 |
Coat 2 new O-rings with ATF and install them to the piston.
Install the 2 springs and accumulator piston to the hole.
| Item | Free Length Outer Diameter | Color |
| C-2 Inner Spring | 42.06 mm (1.66 in.) 14.7 mm (0.579 in.) | Pink |
| C-2 Outer Spring | 68.53 mm (2.70 in.) 20.2 mm (0.795 in.) | Blue |
| 79. INSTALL B-2 ACCUMULATOR PISTON |
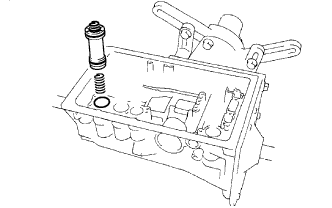 |
Coat 2 new O-rings with ATF and install them to the piston.
Install the spring and accumulator piston to the hole.
| Item | Free Length Outer Diameter | Color |
| B-2 Spring | 70.50 mm (2.78 in.) 19.9 mm (0.783 in.) | Red |
| 80. INSTALL CHECK BALL BODY |
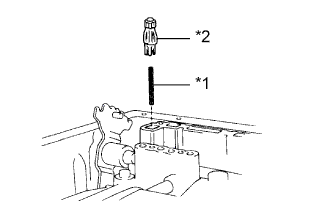 |
Install the spring and check ball body.
| *1 | Spring |
| *2 | Check Ball Body |
| 81. INSTALL TRANSMISSION VALVE BODY ASSEMBLY |
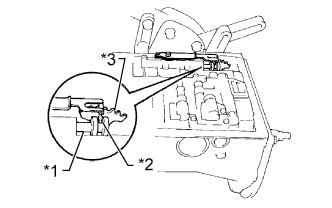 |
Install the valve body and align the groove of the manual valve with the pin of the manual valve lever.
| *1 | Manual Valve |
| *2 | Pin |
| *3 | Manual Valve Lever |
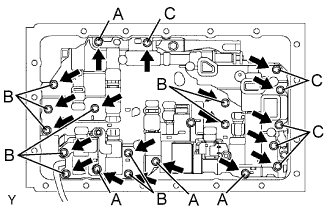 |
Install the 20 bolts.
| 82. INSTALL TRANSMISSION WIRE |
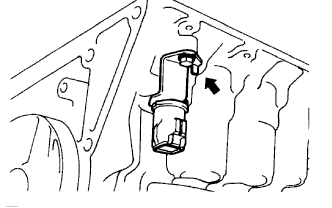 |
Coat a new O-ring with ATF and install it to the transmission wire.
Install the transmission wire to the case.
Install the stopper plate with the bolt.
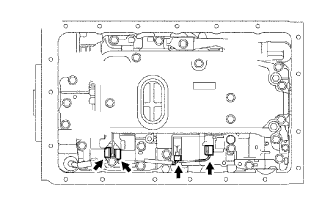 |
Connect the 4 connectors to the 4 shift solenoid valves.
| 83. INSTALL VALVE BODY OIL STRAINER ASSEMBLY |
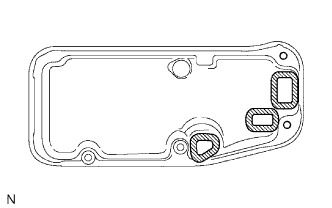 |
Install 3 new gaskets to the oil strainer.
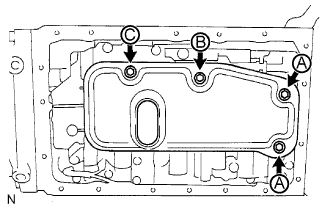 |
Install the oil strainer with the 4 bolts.
| 84. INSTALL OIL CLEANER MAGNET |
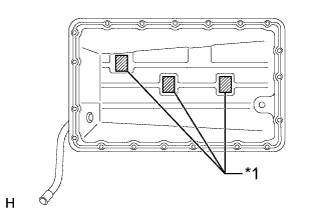 |
Install the 3 magnets.
| *1 | Magnet |
| 85. INSTALL AUTOMATIC TRANSMISSION OIL PAN SUB-ASSEMBLY |
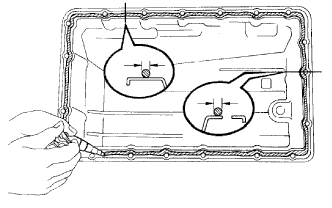 |
Remove all old seal packing from the contact surfaces of the transmission case and oil pan.
Apply seal packing to the oil pan.
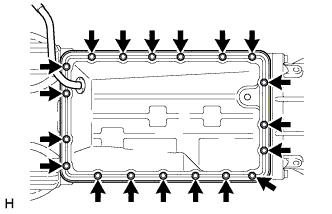 |
Install the oil pan with the 19 bolts.
| 86. INSTALL SENSOR ROTOR |
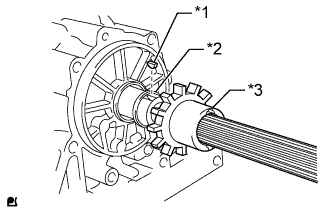 |
Using a snap ring expander, install the snap ring.
| *1 | Key |
| *2 | Snap Ring |
| *3 | Sensor Rotor |
Install the key and sensor rotor.
| 87. INSTALL SPEEDOMETER DRIVE GEAR |
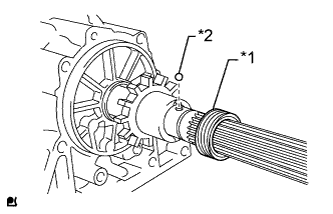 |
Install the ball and the speedometer drive gear.
| *1 | Speedometer Drive Gear |
| *2 | Ball |
Using a snap ring pliers, install the snap ring.
| 88. INSTALL AUTOMATIC TRANSMISSION EXTENSION HOUSING OIL SEAL |
Coat the lip of a new oil seal with MP grease.
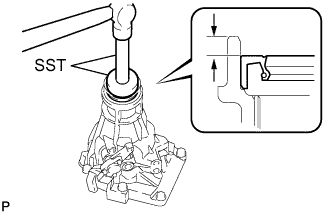 |
Using SST and a hammer, tap in the oil seal.
| 89. INSTALL EXTENSION HOUSING DUST DEFLECTOR |
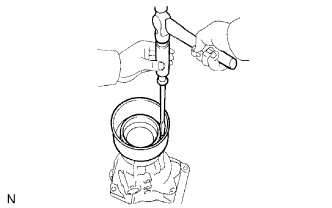 |
Using a screwdriver and hammer, tap on a new dust deflector.
| 90. INSTALL EXTENSION HOUSING BUSH APPLY TUBE GASKET |
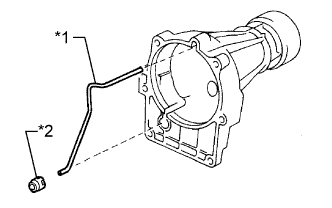 |
Install the gasket to the extension housing bush apply tube.
| *1 | Extension Housing Bush Apply Tube |
| *2 | Extension Housing Bush Apply Tube Gasket |
| 91. INSTALL EXTENSION HOUSING BUSH APPLY TUBE |
Install the extension housing bush apply tube together with the gasket to the extension housing.
| 92. INSTALL EXTENSION HOUSING SUB-ASSEMBLY |
Clean the threads of the bolts.
Apply adhesive to the 6 bolts.
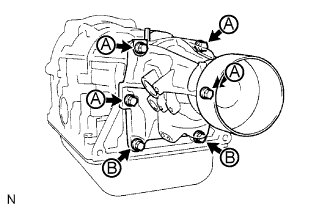 |
Install a new gasket and the extension housing to the transmission case with the 6 bolts.
| 93. INSTALL AUTOMATIC TRANSMISSION HOUSING |
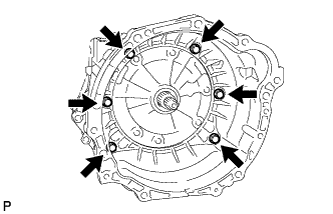 |
Clean the threads of the bolts and case with non-residue solvent.
Apply adhesive to the 6 bolts.
Install the transmission housing with the 6 bolts.
| 94. INSTALL SPEED SENSOR SP2 |
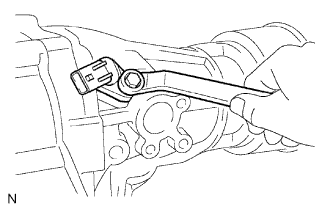 |
Coat a new O-ring with ATF and install it to the sensor.
Install the sensor with the bolt.
| 95. INSTALL SPEEDOMETER SENSOR |
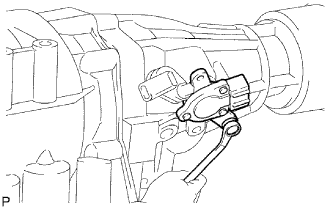 |
Coat a new O-ring with ATF and install it to the sensor.
Install the sensor with the bolt.
| 96. INSTALL SPEED SENSOR NC0 |
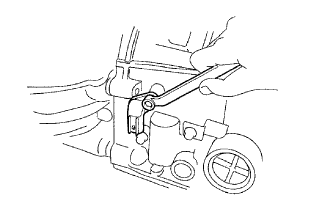 |
Coat a new O-ring with ATF and install it to the sensor.
Install the speed sensor with the bolt.
| 97. INSTALL OIL COOLER TUBE UNION |
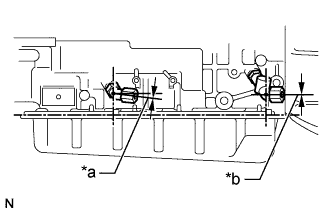 |
Coat 2 new O-rings with ATF and install one to each tube union.
| *a | -2 to 2° |
| *b | 5 to 9° |
| 98. INSTALL ATF TEMPERATURE SENSOR |
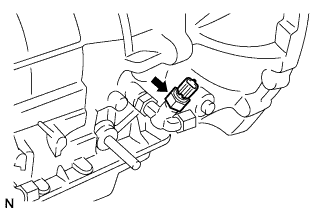 |
Coat the O-ring with ATF.
Install the sensor.
| 99. INSTALL PARK/NEUTRAL POSITION SWITCH ASSEMBLY |
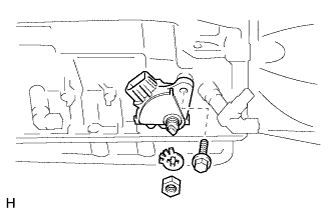 |
Install the park/neutral position switch to the manual valve lever shaft and temporarily install the adjusting bolt.
Install a new lock washer and the lock nut.
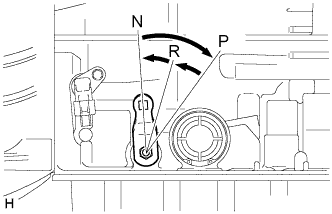 |
Turn the control shaft lever LH clockwise until it stops, and then turn it counterclockwise 2 notches to set it to the N position.
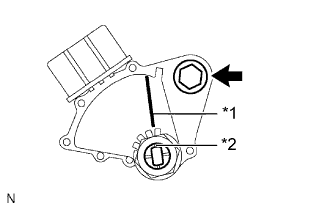 |
Align the neutral basic line with the switch groove as shown in the illustration and tighten the adjusting bolt.
| *1 | Neutral Basic Line |
| *2 | Groove |
Using a screwdriver, bend the tabs of the lock washer.
| 100. INSTALL TRANSMISSION CONTROL SHAFT LEVER LH |
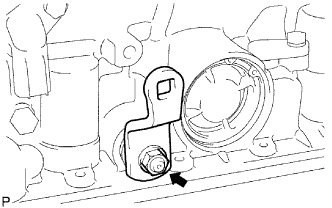 |
Install the control shaft lever with the washer and nut.
| 101. INSTALL BREATHER HOSE |
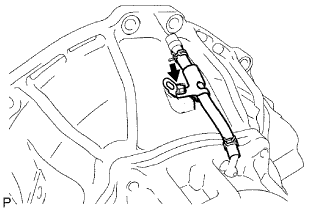 |
Install the breather hose with the bolt.
| 102. INSTALL DRAIN PLUG |
Install a new gasket and the drain plug.