Install 2 new spacers onto the glass as shown in the illustration.
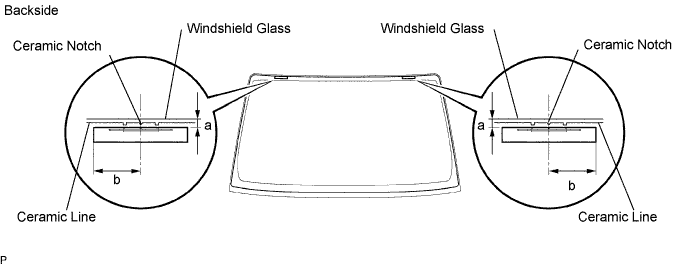
- Standard measurement:
Area Specified Condition a 7.7 mm (0.303 in.) b 40.0 mm (1.575 in.)
WINDSHIELD GLASS > INSTALLATION |
| 1. INSTALL WINDSHIELD GLASS SPACER |
Apply Primer G to the glass where the spacers will be installed.
Install 2 new spacers onto the glass as shown in the illustration.
| Area | Specified Condition |
| a | 7.7 mm (0.303 in.) |
| b | 40.0 mm (1.575 in.) |
| 2. INSTALL NO. 1 WINDSHIELD GLASS STOPPER |
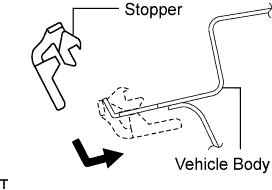 |
Install 2 new stoppers to the vehicle body as shown in the illustration.
| 3. INSTALL WINDOW GLASS ADHESIVE DAM |
Apply Primer G to the glass where the glass adhesive dams will be installed.
Remove the peeling paper from the adhesive part of the dam. Install the dam (adhesive side) to the glass (Primer G area), but exclude the spacer area A as shown in the illustration.
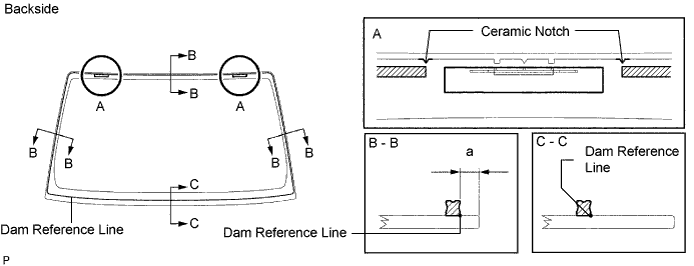
| Area | Specified Condition |
| a | 7.0 mm (0.276 in.) |
| 4. INSTALL WINDSHIELD GLASS |
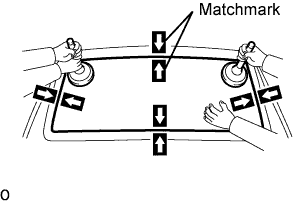 |
Position the glass.
Using suction cups, place the glass in the correct position.
Check that the entire contact surface of the glass rim is perfectly even.
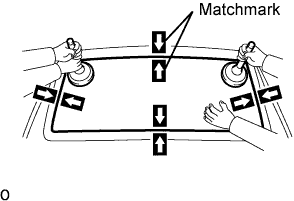
Place matchmarks on the glass and vehicle body on the locations indicated in the illustration.
Using suction cups, remove the glass.
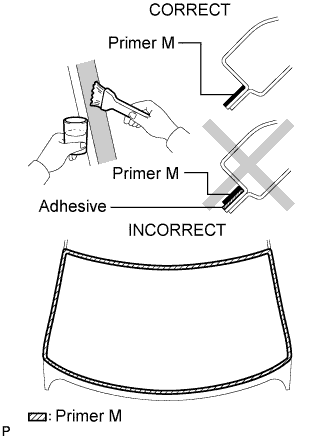 |
Using a brush, apply Primer M to the exposed part of the vehicle body.
Using a brush or sponge, apply Primer G to the contact surface of the glass.
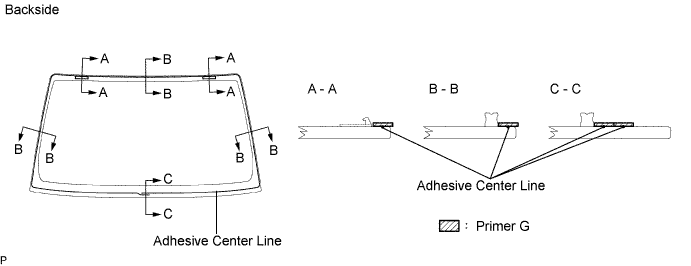
Apply adhesive to the glass.
Cut off the tip of the cartridge nozzle as shown in the illustration.
| Temperature | Usage Time Frame |
| 35°C (95°F) | 15 minutes |
| 20°C (68°F) | 1 hour 40 minutes |
| 5°C (41°F) | 8 hours |
Load the sealer gun with the cartridge.
Apply adhesive to the glass as shown in the illustration.
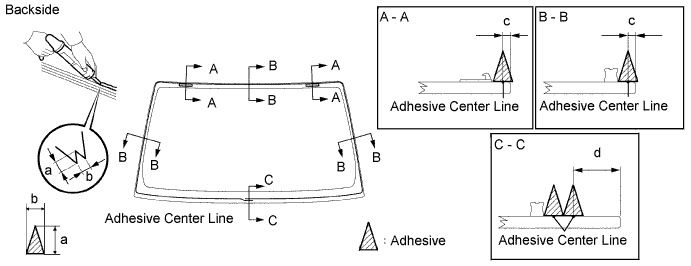
| Area | Specified Condition |
| a | 12.0 mm (0.472 in.) |
| b | 8.0 mm (0.315 in.) |
| c | 3.0 mm (0.118 in.) |
| d | 18.3 mm (0.720 in.) |
 |
Install the glass to the vehicle body.
Using suction cups, position the glass so that the matchmarks are aligned. Press it in gently along the rim.
Lightly press the outer surface of the glass to ensure that it is securely fit to the vehicle body.
Hold the glass in place securely with protective tape or equivalent until the adhesive hardens.
| 5. INSTALL WINDSHIELD MOULDING OUTER UPPER |
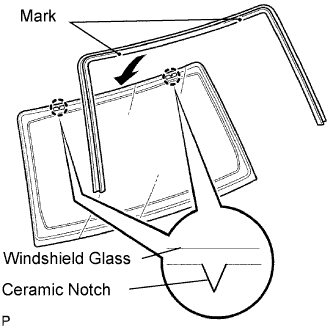 |
Using a brush or sponge, apply Primer G to the glass where a new moulding will be installed.
Align the moulding's marks with glass notches and install the moulding before the adhesive dries.
| Temperature | Minimum time prior to driving vehicle |
| 35°C (95°F) | 1 hour 30 minutes |
| 20°C (68°F) | 5 hours |
| 5°C (41°F) | 24 hours |
| 6. INSTALL COWL TOP VENTILATOR LOUVER LH |
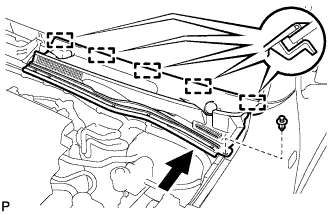 |
Attach the 5 guides to install the cowl top ventilator louver LH.
Install the clip.
| 7. INSTALL COWL TOP VENTILATOR LOUVER RH |
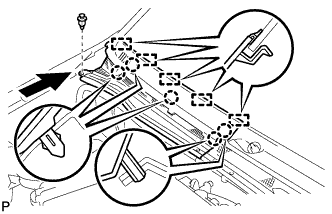 |
Attach the 5 claws and 5 guides to install the cowl top ventilator louver RH.
Install the clip.
| 8. INSTALL HOOD TO COWL TOP SEAL |
Attach the 9 clips to install the seal.
| 9. INSTALL FRONT WIPER ARM AND BLADE ASSEMBLY LH |
Operate the wiper and stop the front wiper motor and link at the automatic stop position.
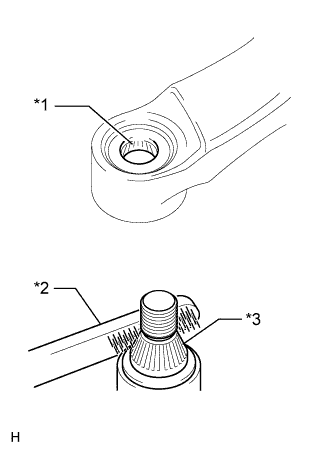 |
Clean the wiper arm serrations.
| *1 | Wiper Arm Serrations |
| *2 | Wire Brush |
| *3 | Wiper Pivot Serrations |
When reusing the front wiper motor and link assembly:
Clean the wiper pivot serrations with a wire brush.
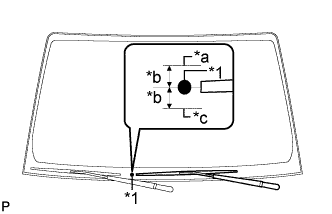 |
Position the blade tip within the range shown in the illustration.
| *1 | Mark for Blade Position |
| *a | Upper Limit |
| *b | 10 mm (0.393 in.) |
| *c | Lower Limit |
Install the front wiper arm and blade assembly LH with the nut.
Operate the front wipers while spraying washer fluid on the windshield glass. Make sure that the front wipers function properly and the wipers do not come into contact with the vehicle body.
| 10. INSTALL FRONT WIPER ARM AND BLADE ASSEMBLY RH |
Operate the wiper and stop the front wiper motor and link at the automatic stop position.
|
Clean the wiper arm serrations.
| *1 | Wiper Arm Serrations |
| *2 | Wire Brush |
| *3 | Wiper Pivot Serrations |
When reusing the front wiper motor and link assembly:
Clean the wiper pivot serrations with a wire brush.
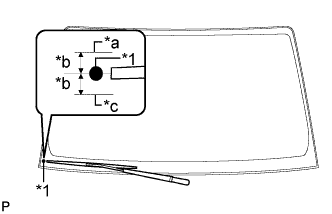 |
Position the blade tip within the range shown in the illustration.
| *1 | Mark for Blade Position |
| *a | Upper Limit |
| *b | 10 mm (0.393 in.) |
| *c | Lower Limit |
Install the front wiper arm and blade assembly RH with the nut.
| 11. INSTALL FRONT WIPER ARM HEAD CAP |
Install the front wiper arm head cap.
| 12. INSTALL ROOF HEADLINING ASSEMBLY |
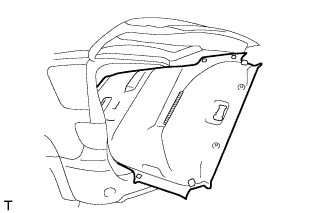 |
Place the roof headlining into the vehicle as shown in the illustration.
w/o Rear Cooler:
Install the roof headlining with the 9 clips.
w/ Rear Cooler:
Attach the 5 fasteners to install the roof headlining.
Install the 7 clips.
Connect the connectors and attach the 4 clamps.
Attach the 4 clamps to the front pillar.
| 13. INSTALL ASSIST GRIP |
Install the assist grip with the 2 screws.
Attach the 4 claws to close the 2 covers.
| 14. INSTALL VISOR HOLDER LH |
Attach the 2 claws to install the visor holder.
Install the screw.
| 15. INSTALL VISOR HOLDER RH |
| 16. INSTALL VISOR ASSEMBLY LH |
Install the visor with the 2 screws.
Attach the guide.
| 17. INSTALL VISOR ASSEMBLY RH |
| 18. INSTALL ROOM NO. 1 LIGHT ASSEMBLY |
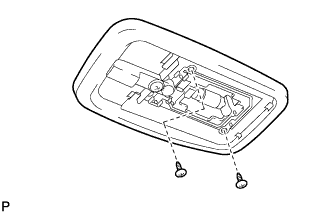 |
Connect the light connector.
Install the room light with the 2 screws.
Attach the 4 claws to install the lens.
| 19. INSTALL MAP LIGHT ASSEMBLY |
Connect the connector.
Attach the 2 guides and claw.
Install the 2 screws to install the map light assembly.
| 20. INSTALL FRONT PILLAR GARNISH LH |
w/ Curtain Shield Airbag:
Remove the protective cover.
Attach the 2 guides and 2 clips to install the front pillar garnish.
| 21. INSTALL FRONT PILLAR GARNISH RH |
| 22. INSTALL ASSIST GRIP SUB-ASSEMBLY FRONT |
Install the assist grip with the 2 screws.
| 23. INSTALL FRONT DOOR OPENING TRIM LH |
| 24. INSTALL FRONT DOOR OPENING TRIM RH |
| 25. INSTALL INNER REAR VIEW MIRROR ASSEMBLY |
Install the inner rear view mirror (Click here).
| 26. CHECK FOR LEAKS AND REPAIR |
Conduct a leak test after the adhesive has completely hardened.
Seal any leaks with auto glass sealer.
| 27. CONNECT CABLE TO NEGATIVE BATTERY TERMINAL |