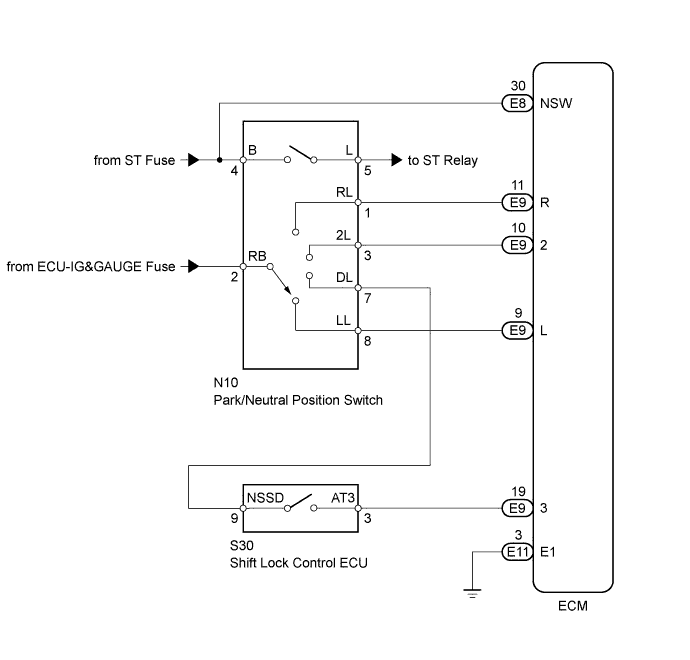
AUTOMATIC TRANSMISSION SYSTEM > Park / Neutral Position Switch Circuit |
| 1.CHECK PARK/NEUTRAL POSITION SWITCH ASSEMBLY (POWER SOURCE) |
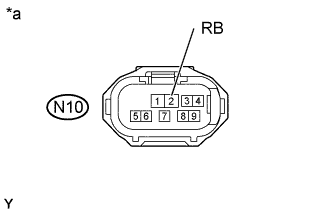 |
Disconnect the N10 park/neutral position switch connector.
Measure the voltage according to the value(s) in the table below.
| Tester Connection | Switch Condition | Specified Condition |
| N10-2 (RB) - Body ground | Ignition switch ON | 11 to 14 V |
| N10-2 (RB) - Body ground | Ignition switch off | Below 1 V |
| *a | Front view of wire harness connector (to Park/Neutral Position Switch) |
|
| ||||
| OK | |
 |
| 2.CHECK HARNESS AND CONNECTOR (NSW TERMINAL VOLTAGE) |
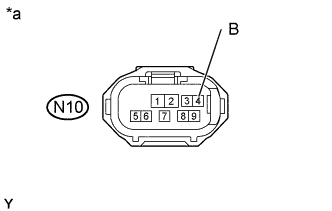 |
Disconnect the N10 park/neutral position switch connector.
Measure the voltage according to the value(s) in the table below.
| Tester Connection | Switch Condition | Specified Condition |
| N10-4 (B) - Body ground | Ignition switch ON | 11 to 14 V |
| N10-4 (B) - Body ground | Ignition switch off | Below 1 V |
| *a | Front view of wire harness connector (to Park/Neutral Position Switch) |
|
| ||||
| OK | |
|
| 3.INSPECT PARK/NEUTRAL POSITION SWITCH ASSEMBLY |
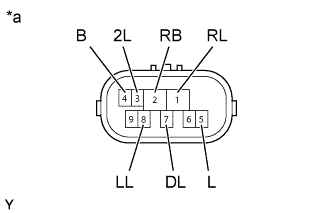 |
Disconnect the N10 park/neutral position switch connector.
Measure the resistance according to the value(s) in the table below.
| Tester Connection | Condition | Specified Condition |
| 4 (B) - 5 (L) | Shift lever in P | Below 1 Ω |
| 2 (RB) - 1 (RL) | Shift lever in R | Below 1 Ω |
| 4 (B) - 5 (L) | Shift lever in N | Below 1 Ω |
| 2 (RB) - 7 (DL) | Shift lever in D or 3 | Below 1 Ω |
| 2 (RB) - 3 (2L) | Shift lever in 2 | Below 1 Ω |
| 2 (RB) - 8 (LL) | Shift lever in L | Below 1 Ω |
| 4 (B) - 5 (L) | Shift lever not in P | 10 kΩ or higher |
| 2 (RB) - 1 (RL) | Shift lever not in R | 10 kΩ or higher |
| 4 (B) - 5 (L) | Shift lever not in N | 10 kΩ or higher |
| 2 (RB) - 7 (DL) | Shift lever not in D or 3 | 10 kΩ or higher |
| 2 (RB) - 3 (2L) | Shift lever not in 2 | 10 kΩ or higher |
| 2 (RB) - 8 (LL) | Shift lever not in L | 10 kΩ or higher |
| *a | Component without harness connected (Park/Neutral Position Switch) |
|
| ||||
| OK | |
|
| 4.INSPECT SHIFT LOCK CONTROL ECU |
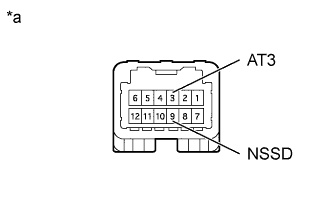 |
Disconnect the S30 shift lock control ECU connector.
Measure the resistance according to the value(s) in the table below.
| Tester Connection | Condition | Specified Condition |
| 3 (AT3) - 9 (NSSD) | Shift lever in 3 | Below 1 Ω |
| 3 (AT3) - 9 (NSSD) | Shift lever in D | 10 kΩ or higher |
| *a | Component without harness connected (Shift Lock Control ECU) |
|
| ||||
| OK | |
|
| 5.CHECK HARNESS AND CONNECTOR (PARK/NEUTRAL POSITION SWITCH - SHIFT LOCK CONTROL ECU) |
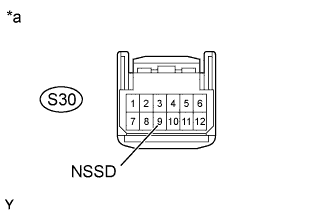 |
Disconnect the S30 shift lock control ECU connector.
Measure the voltage according to the value(s) in the table below.
| Tester Connection | Condition | Specified Condition |
| S30-9 (NSSD) - Body ground |
| 11 to 14 V |
| S30-9 (NSSD) - Body ground |
| Below 1 V |
| *a | Front view of wire harness connector (to Shift Lock Control ECU) |
|
| ||||
| OK | |
|
| 6.CHECK HARNESS AND CONNECTOR (PARK/NEUTRAL POSITION SWITCH - ECM) |
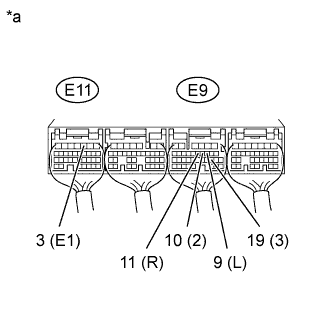 |
Measure the voltage according to the value(s) in the table below.
| Tester Connection | Condition | Specified Condition |
| E9-11 (R) - E11-3 (E1) |
| 11 to 14 V* |
| E9-19 (3) - E11-3 (E1) |
| 11 to 14 V |
| E9-10 (2) - E11-3 (E1) |
| 11 to 14 V |
| E9-9 (L) - E11-3 (E1) |
| 11 to 14 V |
| E9-11 (R) - E11-3 (E1) |
| Below 1 V |
| E9-19 (3) - E11-3 (E1) |
| Below 1 V |
| E9-10 (2) - E11-3 (E1) |
| Below 1 V |
| E9-9 (L) - E11-3 (E1) |
| Below 1 V |
| *a | Rear view of wire harness connector (to ECM) |
|
| ||||
| OK | ||
 | ||
| ||
| 7.CHECK HARNESS AND CONNECTOR (PARK/NEUTRAL POSITION SWITCH - ECM) |
Disconnect the N10 park/neutral position switch connector.
Disconnect the E8 ECM connector.
Measure the resistance according to the value(s) in the table below.
| Tester Connection | Condition | Specified Condition |
| N10-4 (B) - E8-30 (NSW) | Always | Below 1 Ω |
| N10-4 (B) - Body ground | Always | 10 kΩ or higher |
|
| ||||
| OK | ||
| ||
| ||

