 |
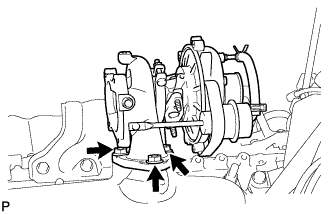
Temporarily install a new gasket and the turbocharger with 3 new nuts.
- HINT:
- When installing the turbo oil pipe, loosely install the 3 nuts so that the turbocharger and cylinder head can be aligned easily.
TURBOCHARGER > INSTALLATION |
| 1. CLEAN TURBOCHARGER SUB-ASSEMBLY |
| 2. INSTALL TURBOCHARGER SUB-ASSEMBLY |
|
Temporarily install a new gasket and the turbocharger with 3 new nuts.
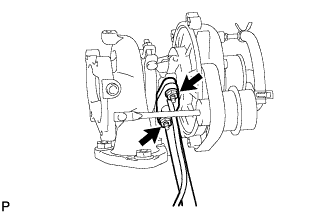 |
Temporarily install the turbo oil pipe and manifold stay.
Temporarily install a new gasket and the turbo oil pipe with the 2 nuts, but only loosely install the nuts.
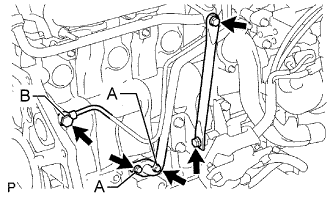 |
Temporarily install a new gasket and the turbo oil pipe with the 2 bolts (labeled: A), but only loosely install the bolts.
Temporarily install a new gasket and the turbo oil pipe with the union bolt (labeled: B), but only loosely install the union bolt.
Temporarily install the stay with the 2 bolts.
Tighten the bolts and nuts.
Tighten the 3 nuts of the turbocharger.
Tighten the 2 nuts of the turbo oil pipe.
Tighten the 2 bolts of the turbo oil pipe.
Tighten the union bolt.
Tighten the 2 bolts of the stay.
| 3. INSTALL TURBINE OUTLET ELBOW |
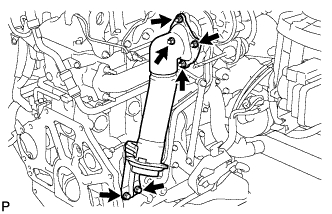 |
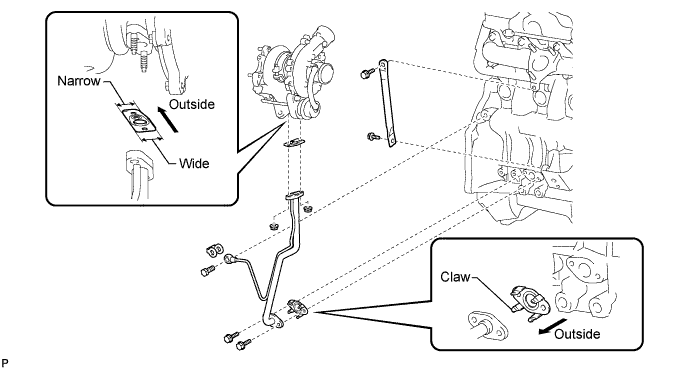
Temporarily install a new gasket and the outlet elbow (with turbocharger stay) to the turbocharger with the 4 new nuts.
Temporarily install the stay with the 2 bolts.
Tighten the 4 nuts of the turbocharger.
Tighten the 2 bolts of the stay.
| 4. INSTALL NO. 2 AIR CLEANER PIPE SUB-ASSEMBLY |
Install the engine cover bracket with the 2 bolts.
Attach the 4 claws to the pins of the engine cover bracket and install the No. 1 engine cover sub-assembly.
Connect the No. 2 air cleaner pipe with the 2 air hoses and install the bolt.
Tighten the 2 clamps.
Connect the vacuum hose to the gas filter.
Connect the manifold absolute pressure sensor connector.
| 5. INSTALL VENTILATION HOSE |
| 6. INSTALL VENTILATION HOSE HEAT INSULATOR |
Install the ventilation hose heat insulator with the 2 bolts.
| 7. INSTALL AIR CLEANER ASSEMBLY |
Connect the air cleaner hose.
Install the cleaner with the 2 bolts.
Tighten the hose clamp.
Connect the connector to the mass air flow meter connector.
| 8. INSTALL FRONT EXHAUST PIPE ASSEMBLY |
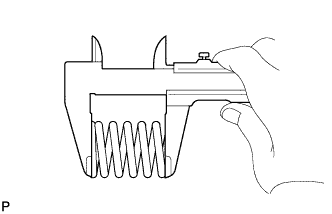 |
Using a vernier caliper, measure the free length of the compression spring.
Install the front exhaust pipe to the pipe support.
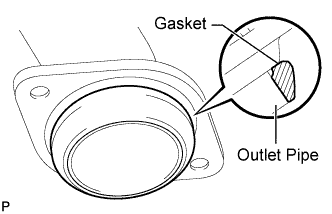 |
Install a new gasket to the outlet pipe.
Install the front exhaust pipe and 2 compression springs with the 2 bolts. Alternately tighten the bolts in several passes.
| 9. CONNECT CABLE TO NEGATIVE BATTERY TERMINAL |
| 10. INSPECT FOR OIL LEAK |
Start the engine. Make sure that there are no oil leaks from the areas that were worked on.
| 11. INSPECT FOR EXHAUST LEAK |
| 12. INSTALL FRONT FENDER UPPER APRON SEAL |
Install the front fender upper apron seal with the 5 clips.
| 13. INSTALL FRONT FENDER SEAL |
Install the front fender seal with the 5 clips.
| 14. INSTALL NO. 2 ENGINE UNDER COVER |
| 15. INSTALL NO. 1 ENGINE UNDER COVER |