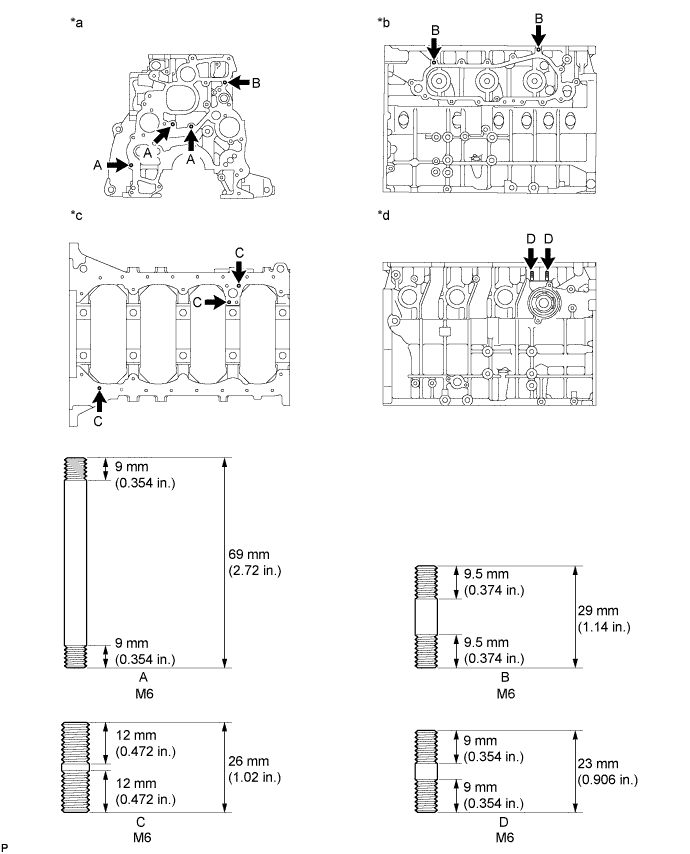
Install the stud bolts.
| *a | Front Side | *b | Left Side |
| *c | Oil Pan Side | *d | Right Side |
CYLINDER BLOCK > REASSEMBLY |
| 1. INSTALL STUD BOLT |
Install the stud bolts.
| *a | Front Side | *b | Left Side |
| *c | Oil Pan Side | *d | Right Side |
| 2. INSTALL NO. 1 OIL NOZZLE SUB-ASSEMBLY |
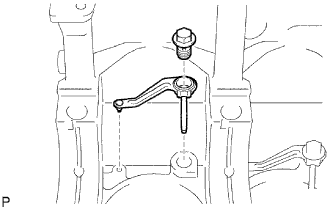 |
Align the pin of the No. 1 oil nozzle with the pin hole of the cylinder block.
Install the 4 No. 1 oil nozzles with the 4 check valves.
| 3. INSTALL PISTON WITH PIN SUB-ASSEMBLY |
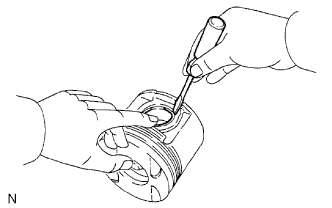 |
Using a small screwdriver, install a new snap ring on one side of the piston pin hole.
Gradually heat the piston to approximately 80°C (176°F).
Coat the piston pin with engine oil.
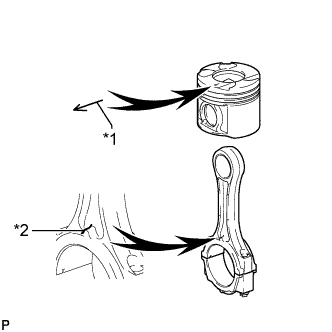 |
Align the front marks of the piston and connecting rod, connect the connecting rod to the piston, and then push in the piston pin with your thumb.
| *1 | Front Mark (Arrow) |
| *2 | Front Mark (Protrusion) |
Check the fit between the piston and piston pin. Try to move the piston back and forth on the piston pin.
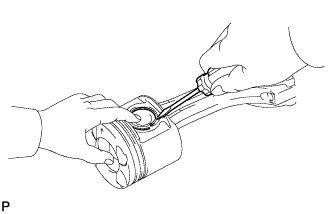 |
Using a small screwdriver, install a new snap ring on the other side of the piston pin hole.
| 4. INSTALL PISTON RING SET |
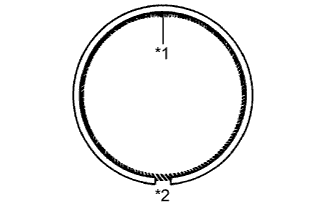 |
Install the coil and oil ring by hand.
| *1 | Coil Joint |
| *2 | Oil Ring End Gap |
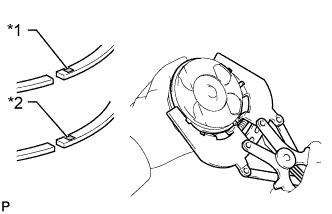 |
Using a piston ring expander, install the No. 1 and No. 2 piston rings with the code marks facing upward.
| Item | Specified Condition |
| No. 1 Piston Ring | N1 or 1N |
| No. 2 Piston Ring | N2 |
| *1 | No. 1 Piston Ring |
| *2 | No. 2 Piston Ring |
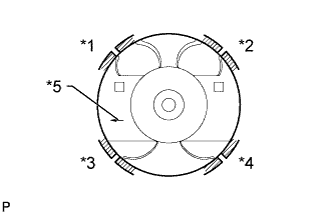 |
Position the piston rings so that the ring ends are as shown in the illustration.
| *1 | No. 1 Piston Ring |
| *2 | Oil Ring |
| *3 | Coil |
| *4 | No. 2 Piston Ring |
| *5 | Front Mark (Arrow) |
| 5. INSTALL CRANKSHAFT BEARING |
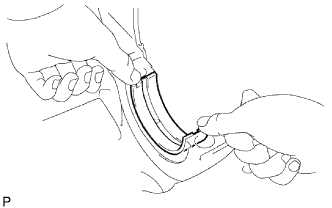 |
Align the bearing claw with the claw groove of the cylinder block and push in the 5 upper bearings.
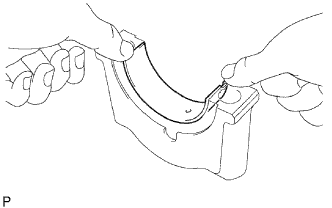 |
Align the bearing claw with the claw groove of the crankshaft bearing cap and push in the 5 lower bearings.
| 6. INSTALL CRANKSHAFT |
Place the crankshaft on the cylinder block.
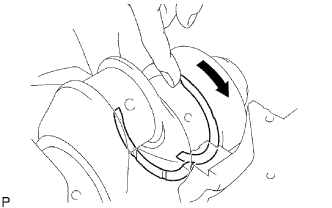 |
Push the crankshaft in one direction and install one thrust washer to the No. 5 journal position with the oil groove facing outward.
Push the crankshaft in the opposite direction and install the other thrust washer to the No. 5 journal position with the oil groove facing outward.
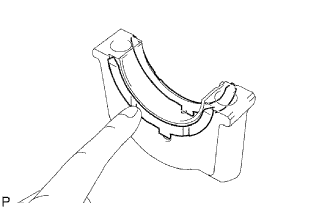 |
Install the 2 thrust washers to the No. 5 bearing cap with the grooves facing outward.
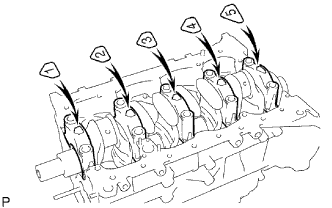 |
Install the 5 crankshaft bearing caps to their proper locations.
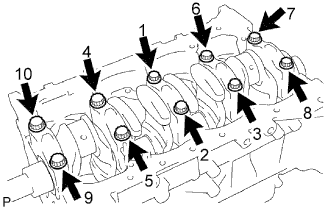 |
Install the crankshaft bearing cap bolts.
Apply a light coat of engine oil to the threads and under the bolt heads of the crankshaft bearing cap bolts.
Install and uniformly tighten the 10 bolts of the crankshaft bearing caps in several passes in the sequence shown in the illustration.
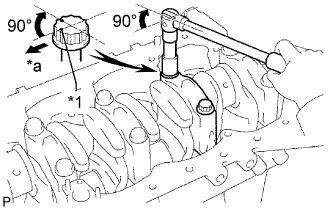 |
Mark the front of each crankshaft bearing cap bolt with paint.
| *1 | Painted Mark |
| *a | Front |
Tighten the crankshaft bearing cap bolts by 90° in the numerical order shown in the previous illustration.
Check that the painted marks are now at a 90° angle to the front.
Check that the crankshaft turns smoothly.
Check the crankshaft thrust clearance.
| 7. INSTALL CONNECTING ROD BEARING |
Align the bearing claw with the groove of the connecting rod or connecting rod cap.
Install the bearings to the connecting rod and connecting rod cap.
| 8. INSPECT CRANKSHAFT THRUST CLEARANCE |
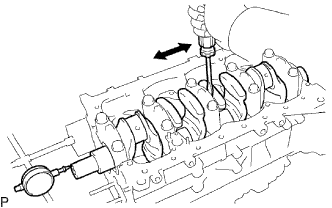 |
Using a dial indicator, measure the thrust clearance while prying the crankshaft back and forth with a screwdriver.
| Item | Specified Condition |
| STD | 2.430 to 2.480 mm (0.0957 to 0.0976 in.) |
| O/S 0.125 | 2.555 to 2.605 mm (0.1005 to 0.1025 in.) |
| O/S 0.250 | 2.680 to 2.730 mm (0.1055 to 0.1074 in.) |
| 9. INSTALL PISTON AND CONNECTING ROD |
Apply engine oil to the cylinder walls, the pistons and the surfaces of the connecting rod bearings.
Check the positions of the piston ring ends.
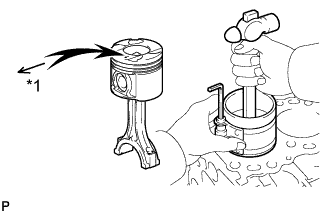 |
Using a piston ring compressor, push the correctly numbered piston and connecting rod assembly into the cylinder with the front mark of the piston facing forward.
| *1 | Front Mark (Arrow) |
Place the connecting rod cap on the connecting rod.
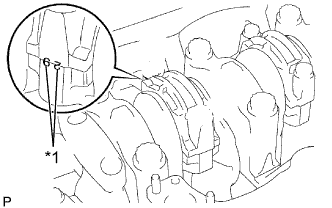 |
Match each numbered connecting rod cap with the correct connecting rod.
| *1 | Matchmark |
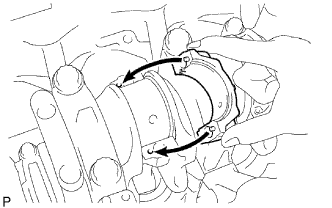 |
Align the pins of the connecting rod cap with the pin holes of the connecting rod and install the connecting rod cap.
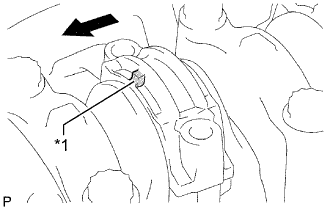 |
Check that the front mark of the connecting rod cap is facing forward.
| *1 | Front Mark (Protrusion) |
 | Front |
Install the connecting rod cap bolts.
Apply a light coat of engine oil to the threads and under the heads of the connecting rod cap bolts.
Install and alternately tighten the bolts of the connecting rod cap in several passes.
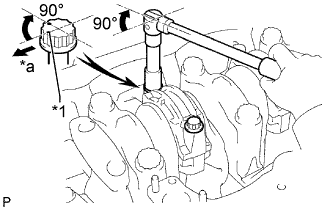 |
Mark the front of each connecting rod cap bolt with paint.
| *1 | Painted Mark |
| *a | Front |
Tighten the connecting rod cap bolts by 90° as shown in the illustration.
Check that the painted marks are now at a 90° angle to the front.
Check that the crankshaft turns smoothly.
| 10. INSPECT CONNECTING ROD THRUST CLEARANCE |
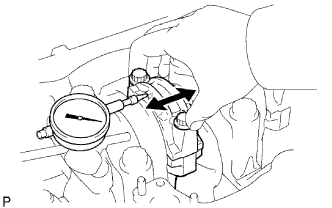 |
Using a dial indicator, measure the thrust clearance while moving the connecting rod back and forth.
| 11. INSTALL CYLINDER BLOCK OIL ORIFICE |