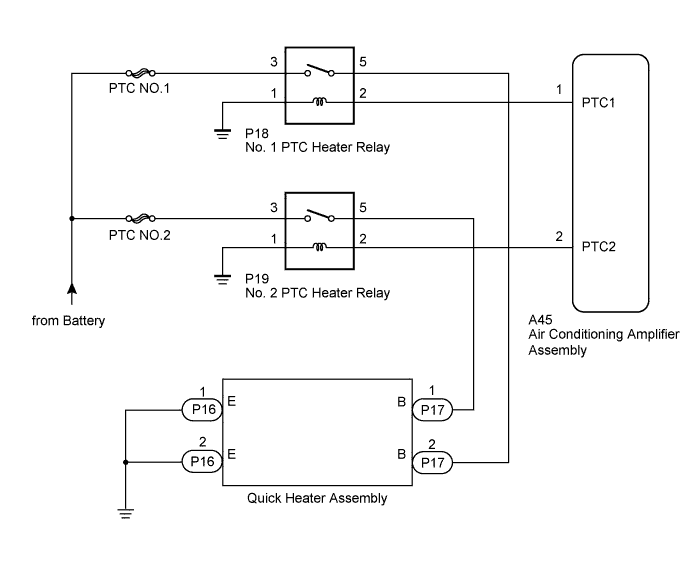
AIR CONDITIONING SYSTEM (for Automatic Air Conditioning System) > PTC Heater Circuit |
| 1.INSPECT NO. 1 PTC HEATER RELAY AND NO. 2 PTC HEATER RELAY |
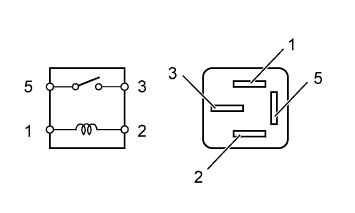 |
Remove the No. 1 PTC heater relay and No. 2 PTC heater relay.
Measure the resistance according to the value(s) in the table below.
| Tester Connection | Condition | Specified Condition |
| 3 - 5 | Battery voltage is not applied to terminals 1 and 2 | 10 kΩ or higher |
| Battery voltage is applied to terminals 1 and 2 | Below 1 Ω |
|
| ||||
| OK | |
 |
| 2.CHECK HARNESS AND CONNECTOR (PTC HEATER RELAY - AIR CONDITIONING AMPLIFIER AND BODY GROUND) |
Disconnect the P18 No. 1 PTC heater relay connector.
Disconnect the P19 No. 2 PTC heater relay connector.
Disconnect the A45 air conditioning amplifier assembly connector.
Measure the resistance according to the value(s) in the table below.
| Tester Connection | Condition | Specified Condition |
| P18-2 - A45-1 (PTC1) | Always | Below 1 Ω |
| P19-2 - A45-2 (PTC2) | ||
| P18-2 - Body ground | Always | 10 kΩ or higher |
| P19-2 - Body ground | ||
| P18-1 - Body ground | Always | Below 1 Ω |
| P19-1 - Body ground |
|
| ||||
| OK | |
|
| 3.CHECK AIR CONDITIONING AMPLIFIER ASSEMBLY |
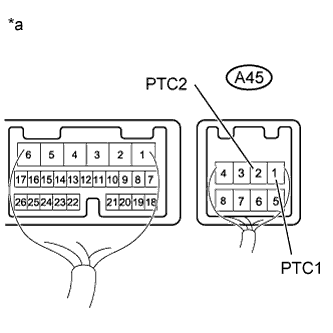 |
Remove the air conditioning amplifier assembly with its connectors still connected (Click here).
Measure the voltage according to the value(s) in the table below.
| Tester Connection | Condition | Specified Condition |
| A45-1 (PTC1) - Body ground |
| 11 to 14 V |
| Below 1 V | |
| A45-2 (PTC2) - Body ground |
| 11 to 14 V |
| Below 1 V |
| *a | Component with harness connected (Air Conditioning Amplifier Assembly) |
|
| ||||
| OK | |
|
| 4.CHECK HARNESS AND CONNECTOR (PTC HEATER RELAY - BATTERY) |
 |
Disconnect the P18 No. 1 PTC heater relay connector.
Disconnect the P19 No. 2 PTC heater relay connector.
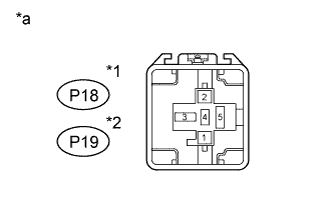
Measure the voltage according to the value(s) in the table below.
| Tester Connection | Condition | Specified Condition |
| P18-3 - Body ground | Always | 11 to 14 V |
| P19-3 - Body ground |
| *1 | for No. 1 PTC Heater Relay |
| *2 | for No. 2 PTC Heater Relay |
| *a | Front view of wire harness connector (to No. 1 PTC Heater Relay or No. 2 PTC Heater Relay) |
|
| ||||
| OK | |
|
| 5.CHECK HARNESS AND CONNECTOR (PTC HEATER RELAY - QUICK HEATER) |
Disconnect the P18 No. 1 PTC heater relay connector.
Disconnect the P19 No. 2 PTC heater relay connector.
Disconnect the P16 and P17 quick heater assembly connector.
Measure the resistance according to the value(s) in the table below.
| Tester Connection | Condition | Specified Condition |
| P19-5 - P17-1 (B) | Always | Below 1 Ω |
| P18-5 - P17-2 (B) | ||
| P19-5 - Body ground | Always | 10 kΩ or higher |
| P18-5 - Body ground | ||
| P16-1 (E) - Body ground | Always | Below 1 Ω |
| P16-2 (E) - Body ground |
|
| ||||
| OK | |
|
| 6.INSPECT QUICK HEATER ASSEMBLY |
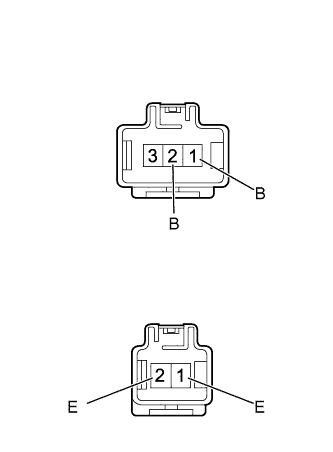 |
Remove the quick heater assembly.
Measure the resistance according to the value(s) in the table below.
| Tester Connection | Condition | Specified Condition |
| 1 (B) - 1 (E) | Always | Below 1 kΩ |
| 2 (B) - 2 (E) |
|
| ||||
| OK | ||
 | ||
| ||
