ROOF HEADLINING > REMOVAL |
| 1. PRECAUTION |
| 2. DISCONNECT CABLE FROM NEGATIVE BATTERY TERMINAL |
| 3. REMOVE TONNEAU COVER ASSEMBLY (w/ Tonneau Cover) |
Remove the tonneau cover.
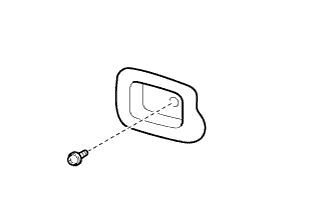
| 4. REMOVE TONNEAU COVER HOLDER LH (w/ Tonneau Cover) |
|
Remove the screw and tonneau cover holder.
| 5. REMOVE TONNEAU COVER HOLDER RH (w/ Tonneau Cover) |
| 6. REMOVE TONNEAU COVER HANGER LH (w/ Tonneau Cover) |
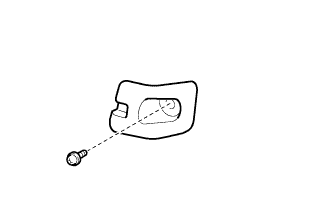 |
Remove the screw and tonneau cover hanger.
| 7. REMOVE TONNEAU COVER HANGER RH (w/ Tonneau Cover) |
| 8. REMOVE REAR NO. 2 SEAT ASSEMBLY RH (w/ Rear No. 2 Seat) |
| 9. REMOVE REAR NO. 2 SEAT ASSEMBLY LH (w/ Rear No. 2 Seat) |
| 10. REMOVE FRONT DOOR SCUFF PLATE LH |
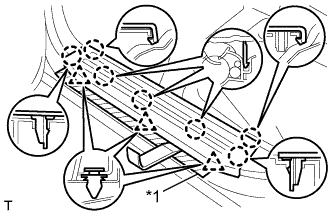 |
Put protective tape around the front door scuff plate.
| *1 | Protective Tape |
Using a moulding remover, detach the 7 claws and 3 clips and remove the front door scuff plate.
| 11. REMOVE FRONT DOOR SCUFF PLATE RH |
| 12. REMOVE FRONT DOOR OPENING TRIM LH |
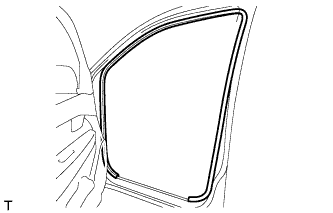 |
Remove the front door opening trim.
| 13. REMOVE FRONT DOOR OPENING TRIM RH |
| 14. REMOVE ASSIST GRIP PLUG LH |
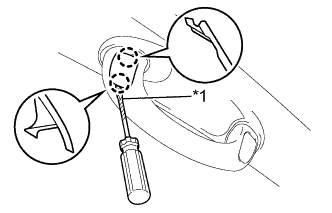 |
Using a screwdriver, detach the 2 claws and remove the assist grip plug.
| *1 | Protective Tape |
| 15. REMOVE ASSIST GRIP PLUG RH |
| 16. REMOVE FRONT ASSIST GRIP SUB-ASSEMBLY |
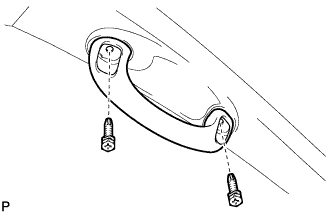 |
Remove the 2 screws and front assist grip.
| 17. REMOVE FRONT PILLAR GARNISH LH |
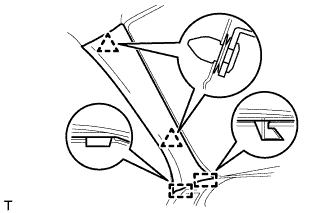 |
Detach the 2 clips and 2 guides and remove the front pillar garnish.
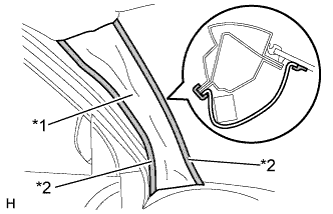 |
w/ Curtain Shield Airbag:
Protect the curtain shield airbag assembly.
Thoroughly cover the airbag with a cloth or nylon sheet and fix the ends of the cover with adhesive tape, as shown in the illustration.
| *1 | Protective Cover |
| *2 | Adhesive Tape |
| 18. REMOVE FRONT PILLAR GARNISH RH |
| 19. REMOVE REAR DOOR SCUFF PLATE LH |
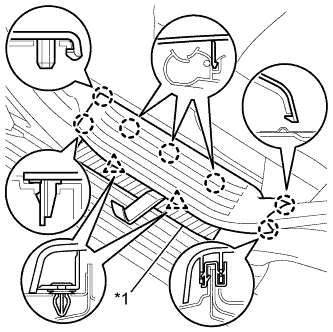 |
Put protective tape around the rear door scuff plate.
| *1 | Protective Tape |
Using a moulding remover, detach the 7 claws and 2 clips and remove the rear door scuff plate.
| 20. REMOVE REAR DOOR SCUFF PLATE RH |
| 21. REMOVE REAR DOOR OPENING TRIM WEATHERSTRIP LH |
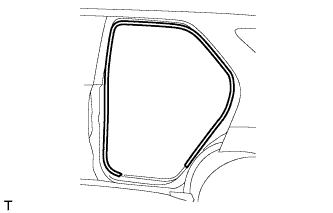 |
Remove the rear door opening trim weatherstrip.
| 22. REMOVE REAR DOOR OPENING TRIM WEATHERSTRIP RH |
| 23. REMOVE LOWER CENTER PILLAR GARNISH LH |
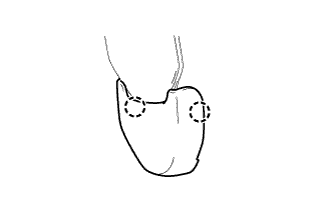 |
Detach the 2 claws and remove the outer lap belt anchor cover.
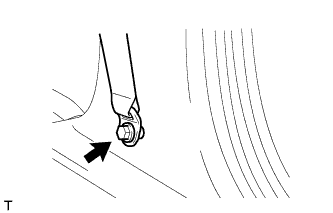 |
Remove the bolt and disconnect the front seat outer belt floor anchor.
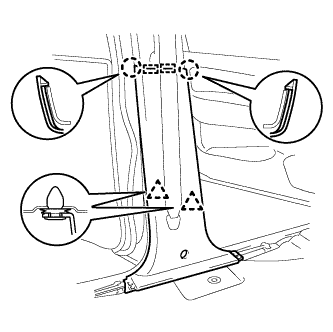 |
Detach the 2 claws, 2 guides and 2 clips and remove the lower center pillar garnish.
| 24. REMOVE LOWER CENTER PILLAR GARNISH RH |
| 25. REMOVE CENTER PILLAR GARNISH LH |
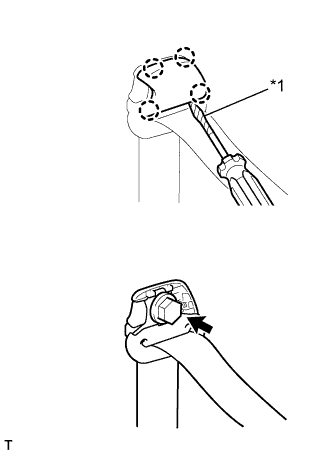 |
Using a screwdriver, detach the 4 claws and remove the front seat belt shoulder anchor cover.
| *1 | Protective Tape |
Remove the bolt and disconnect the front seat belt shoulder anchor.
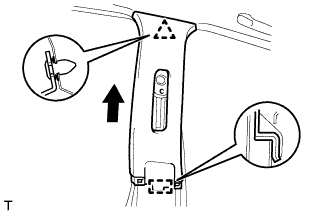 |
Detach the clip.
Pull the center pillar garnish in the direction indicated by the arrow in the illustration to detach the guide and remove the center pillar garnish.
| 26. REMOVE CENTER PILLAR GARNISH RH |
| 27. REMOVE BACK DOOR SCUFF PLATE |
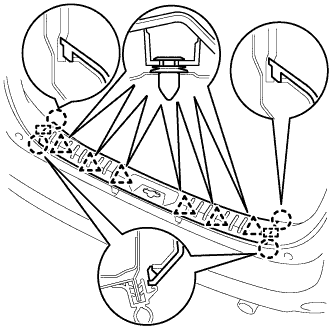 |
Detach the 4 claws, 2 guides and 6 clips and remove the back door scuff plate.
| 28. REMOVE QUARTER TRIM HOOK |
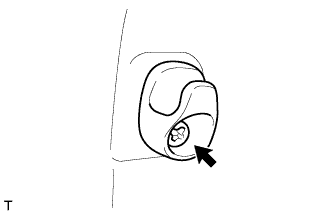 |
Remove the screw and quarter trim hook.
| 29. REMOVE QUARTER INSIDE TRIM BOARD LH |
|
Detach the 2 claws and remove the outer lap belt anchor cover.
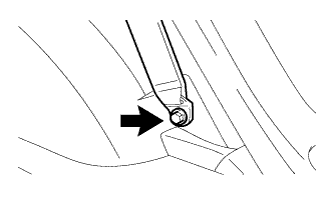 |
Remove the bolt and disconnect the rear No. 1 seat outer belt floor anchor.
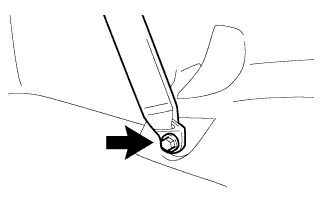 |
w/ Rear No. 2 Seat:
Remove the bolt and disconnect the rear No. 2 seat outer belt floor anchor.
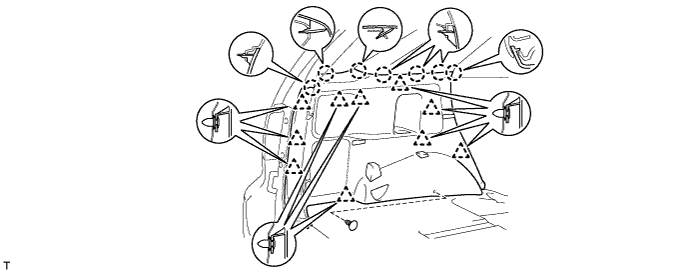
Using a clip remover, remove the clip.
Detach the 7 claws and 10 clips.
Disconnect the power point socket connector and remove the quarter inside trim board.
| 30. REMOVE QUARTER INSIDE TRIM BOARD RH |
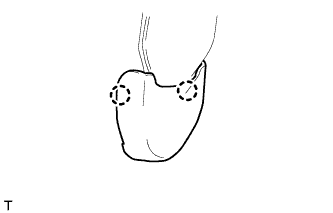 |
Detach the 2 claws and remove the outer lap belt anchor cover.
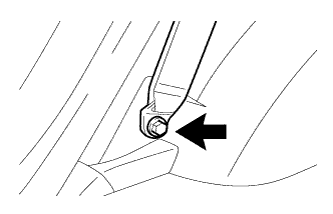 |
Remove the bolt and disconnect the rear No. 1 seat outer belt floor anchor.
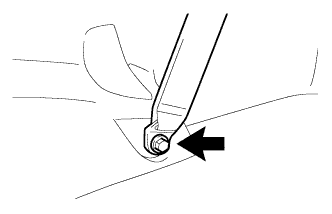 |
w/ Rear No. 2 Seat:
Remove the bolt and disconnect the rear No. 2 seat outer belt floor anchor.
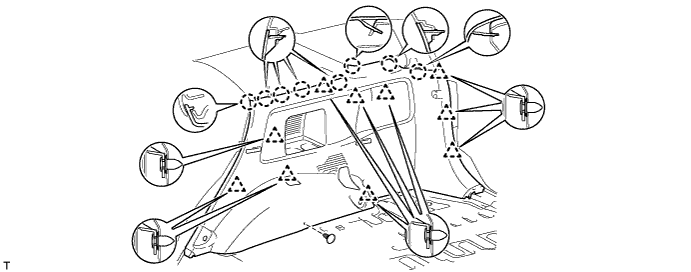
Using a clip remover, remove the clip.
Detach the 8 claws and 10 clips and remove the quarter inside trim board.
| 31. REMOVE QUARTER PILLAR GARNISH LH |
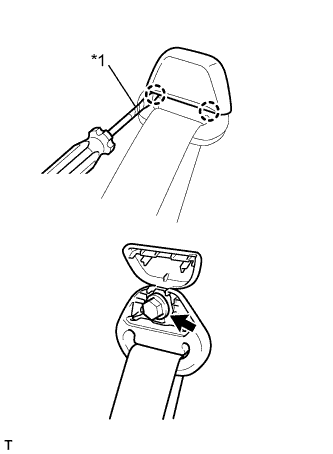 |
Using a screwdriver, detach the 2 claws and open the rear No. 1 seat belt shoulder anchor cover.
| *1 | Protective Tape |
Remove the bolt and disconnect the rear No. 1 seat belt shoulder anchor.
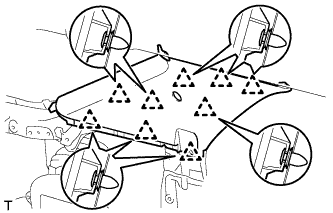 |
Detach the 9 clips and remove the quarter pillar garnish.
| 32. REMOVE QUARTER PILLAR GARNISH RH |
| 33. REMOVE INNER UPPER ROOF SIDE GARNISH LH |
|
w/ Rear No. 2 Seat:
Using a screwdriver, detach the 2 claws and open the rear No. 2 seat belt shoulder anchor cover.
| *1 | Protective Tape |
Remove the bolt and disconnect the rear No. 2 seat belt shoulder anchor.
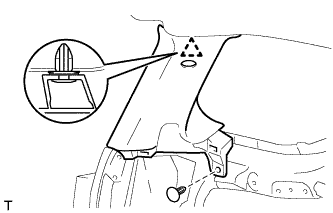 |
Using a clip remover, remove the clip.
Detach the clip and remove the inner upper roof side garnish.
| 34. REMOVE INNER UPPER ROOF SIDE GARNISH RH |
| 35. REMOVE MAP LIGHT ASSEMBLY |
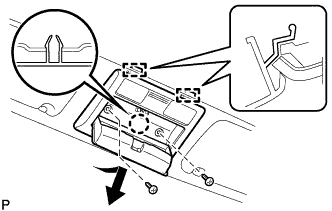 |
Remove the 2 screws.
Detach the claw and 2 guides and remove the map light assembly.
Disconnect the connector.
| 36. REMOVE INNER REAR VIEW MIRROR STAY HOLDER COVER (w/ EC Mirror) |
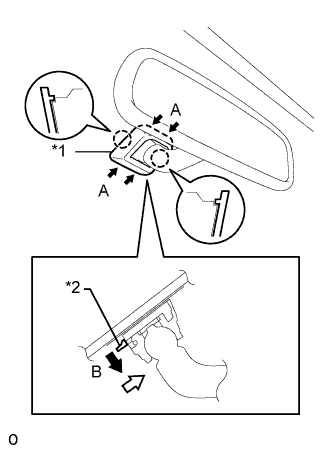 |
w/o Screw:
Push the cover in the direction indicated by the arrows labeled A and remove it.
While holding down the claw in the direction of the black arrow labeled B, slide the inner rear view mirror assembly in the direction of the white arrow and remove it.
| *1 | Cover |
| *2 | Claw |
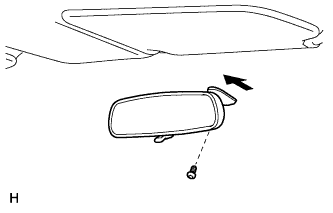 |
w/ Screw:
Using a T20 "TORX" socket wrench, remove the screw.
Slide the inner rear view mirror assembly in the direction of the arrow and remove it.
| 37. REMOVE COOLER CONTROL SWITCH ASSEMBLY (w/ Rear Cooler) |
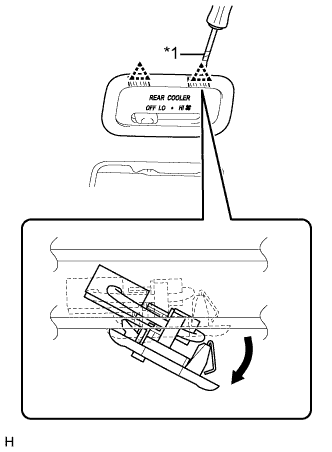 |
Using a screwdriver, detach the 2 clips and remove the cooler control switch assembly (rear blower control switch) as shown in the illustration.
| *1 | Protective Tape |
| 38. REMOVE NO. 1 ROOM LIGHT ASSEMBLY |
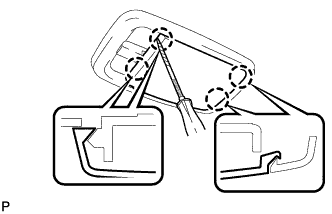 |
Using a screwdriver wrapped with protective tape, detach the 4 claws and remove the lens.
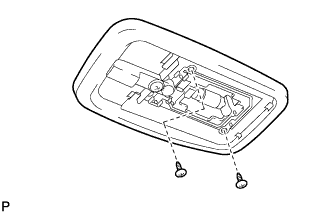 |
Remove the 2 screws and room light.
Disconnect the light connector.
| 39. REMOVE VISOR ASSEMBLY LH |
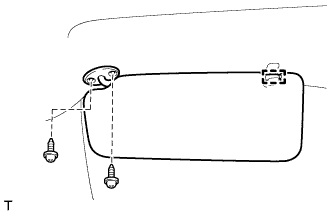 |
Detach the guide.
Remove the 2 screws and visor.
| 40. REMOVE VISOR ASSEMBLY RH |
| 41. REMOVE VISOR HOLDER LH |
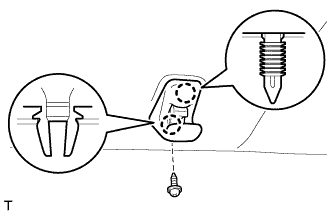 |
Remove the screw.
Detach the 2 claws and remove the visor holder.
| 42. REMOVE VISOR HOLDER RH |
| 43. REMOVE ASSIST GRIP |
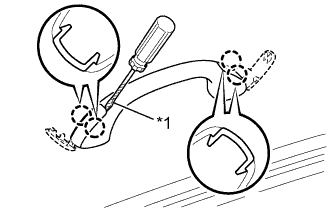 |
Using a screwdriver, detach the 4 claws and open the 2 covers.
| *1 | Protective Tape |
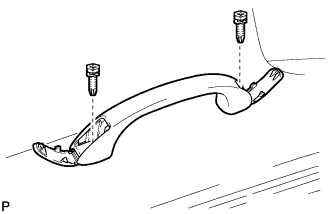 |
Remove the 2 screws and assist grip.
| 44. REMOVE UPPER INSTRUMENT PANEL SUB-ASSEMBLY |
| 45. REMOVE LOWER INSTRUMENT PANEL FINISH PANEL SUB-ASSEMBLY |
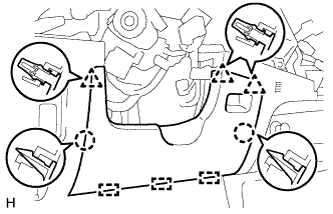 |
Detach the 2 claws, 3 clips and 3 guides and remove the lower instrument panel finish panel.
| 46. REMOVE NO. 2 HEATER TO REGISTER DUCT |
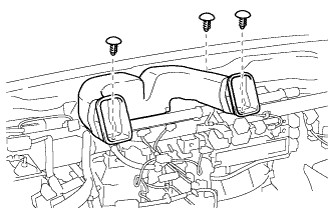 |
Remove the 3 clips and No. 2 heater to register duct.
| 47. REMOVE NO. 1 HEATER TO REGISTER DUCT |
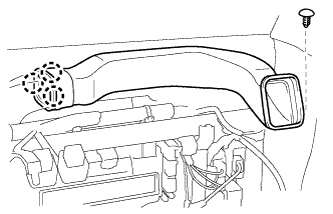 |
Remove the clip.
Detach the 3 claws and remove the No. 1 heater to register duct.
| 48. REMOVE NO. 3 HEATER TO REGISTER DUCT |
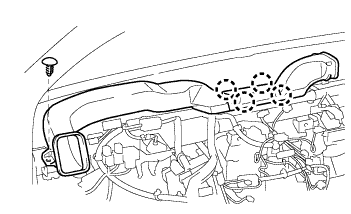 |
Remove the clip.
Detach the 4 claws and remove the No. 3 heater to register duct.
| 49. REMOVE DEFROSTER NOZZLE ASSEMBLY |
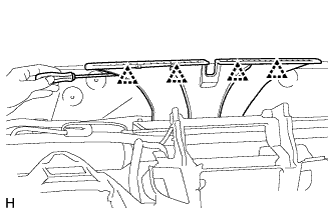 |
Using a screwdriver, detach the 4 clips and remove the defroster nozzle assembly.
| 50. REMOVE ROOF HEADLINING ASSEMBLY |
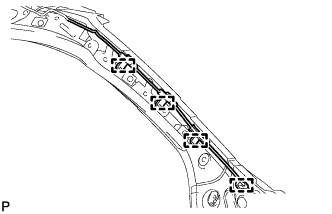 |
Detach the 4 clamps from the front pillar.
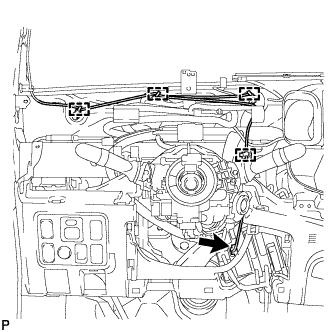 |
Disconnect the connectors and detach the 4 clamps.
w/o Rear Cooler:
Using a clip remover, remove the clips.
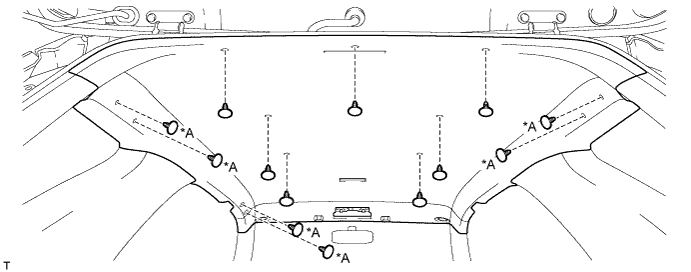
| *A | w/o Assist Grip | - | - |
w/ Rear Cooler:
Using a clip remover, remove the clips.
Detach the 5 fasteners.
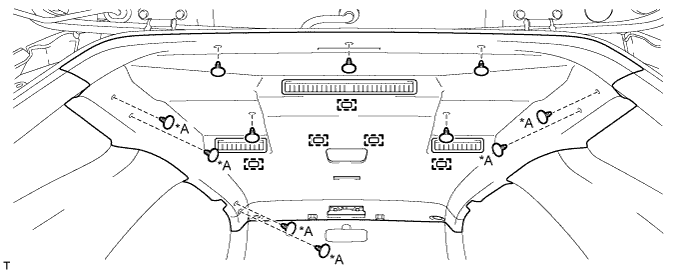
| *A | w/o Assist Grip | - | - |
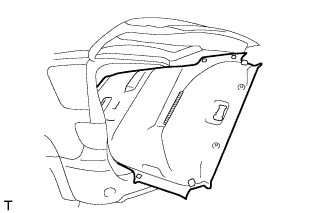 |
Remove the roof headlining as shown in the illustration.
| 51. REMOVE FRONT SIDE RAIL SPACER LH |
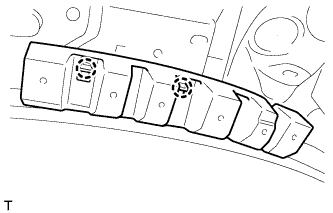 |
Detach the 2 claws and remove the front side rail spacer.
| 52. REMOVE FRONT SIDE RAIL SPACER RH |
| 53. REMOVE SIDE RAIL SPACER |
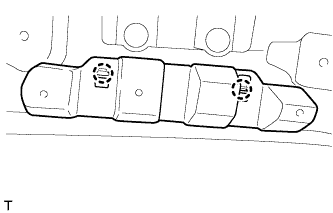 |
Detach the 2 claws and remove the side rail spacer.
| 54. REMOVE REAR NO. 2 SIDE RAIL SPACER LH |
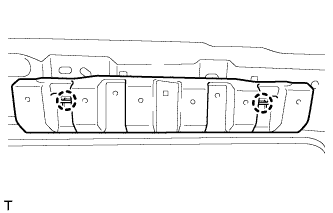 |
Detach the 2 claws and remove the rear No. 2 side rail spacer.
| 55. REMOVE REAR NO. 2 SIDE RAIL SPACER RH |
| 56. REMOVE REAR NO. 3 SIDE RAIL SPACER LH |
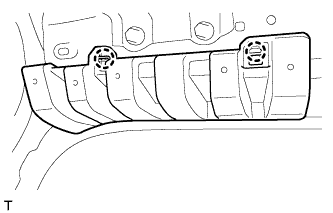 |
Detach the 3 claws and remove the rear No. 3 side rail spacer.
| 57. REMOVE REAR NO. 3 SIDE RAIL SPACER RH |