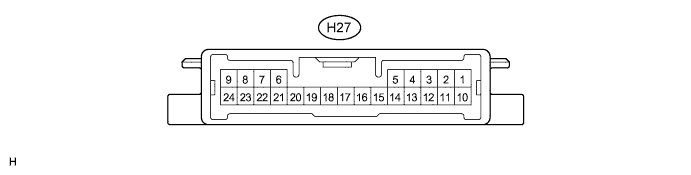
LIGHTING SYSTEM > TERMINALS OF ECU |
| CHECK HEADLIGHT LEVELING ECU (for HID Headlight) |
Disconnect the H27 headlight leveling ECU connector.
Measure the voltage and resistance according to the value(s) in the table below.
| Terminal No. (Symbol) | Wiring Color | Terminal Description | Condition | Specified Condition |
| H27-1 (IG) - Body ground | R-L - Body ground | Ignition power supply | Ignition switch off | Below 1 V |
| Ignition switch ON | 11 to 14 V | |||
| H27-9 (E1) - Body ground | GR - Body ground | Ground | Always | Below 1 Ω |
Reconnect the H27 headlight leveling ECU connector.
Measure the resistance and voltage according to the value(s) in the table below.
| Terminal No. (Symbol) | Wiring Color | Terminal Description | Condition | Specified Condition |
| H27-3 (B2) - H27-9 (E1) | P - GR | Low beam headlight signal input | Low beam headlights on | Below 1 V |
| Low beam headlights off | 11 to 14 V | |||
| H27-5 (SPDL) - H27-9 (E1) | V - GR | Initialization signal input | Terminal LVL and terminal CG of DLC3 connected | Below 1 V |
| Terminal LVL and terminal CG of DLC3 not connected | 4.5 to 5.5 V | |||
| H27-6 (WNG) - H27-9 (E1) | B-L - GR | Warning indicator drive output | Warning indicator on | Below 1 V |
| Warning indicator off | 11 to 14 V | |||
| H27-10 (RH+) - H27-9 (E1) | R - GR | Leveling motor RH power supply | Ignition switch off | Below 1 V |
| Ignition switch ON | 11 to 14 V | |||
| H27-11 (LH+) - H27-9 (E1) | Y - GR | Leveling motor LH power supply | Ignition switch off | Below 1 V |
| Ignition switch ON | 11 to 14 V | |||
| H27-12 (SBR) - H27-21 (SGR) | B - G | Rear height control sensor power supply | Ignition switch off | Below 1 V |
| Ignition switch ON | 4.75 to 5.25 V | |||
| H27-16 (SPDR) - H27-9 (E1) | L - GR | Vehicle speed signal input | Vehicle is driven at approximately 20 km/h (12 mph) | Pulse generation (See waveform 1) |
| H27-17 (RHE) - H27-9 (E1) | LG - GR | Leveling motor RH operation signal input | With low beam headlights on, vehicle height not changed | Below 1 V |
| With low beam headlights on, vehicle height changed and maintained for more than 3 seconds | 1.0 to 14.4 V | |||
| H27-18 (LHE) - H27-9 (E1) | W - GR | Leveling motor LH operation signal input | With low beam headlights on, vehicle height not changed | Below 1 V |
| With low beam headlights on, vehicle height changed and maintained for more than 3 seconds | 1.0 to 14.4 V | |||
| H27-19 (SHRL) - H27-21 (SGR) | L - G | Rear height control sensor signal input | Ignition switch off | Below 1 V |
| Ignition switch ON | 0.5 to 4.5 V | |||
| H27-21 (SGR) - H27-9 (E1) | G - GR | Rear height control sensor ground | Always | Below 1 Ω |
| H27-23 (RH-) - H27-9 (E1) | B-O - GR | Leveling motor RH ground | Always | Below 1 Ω |
| H27-24 (LH-) - H27-9 (E1) | GR - GR | Leveling motor LH ground | Always | Below 1 Ω |
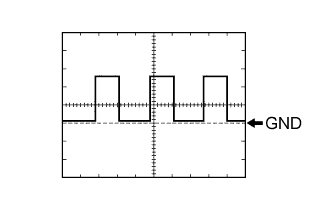 |
Waveform 1
| Item | Content |
| Terminal No. (Symbol) | H27-16 (SPDR) - H27-9 (E1) |
| Tool setting | 5 V/DIV., 20 ms./DIV. |
| Condition | Vehicle is driven at approximately 20 km/h (12 mph) |
| CHECK AUTOMATIC LIGHT CONTROL SENSOR (w/ Automatic Light Control System) |

Disconnect the A46 automatic light control sensor connector.
Measure the voltage and resistance according to the value(s) in the table below.
| Terminal No. (Symbol) | Wiring Color | Terminal Description | Condition | Specified Condition |
| A46-1 (IG) - Body ground | R-L - Body ground | Ignition power supply | Ignition switch off | Below 1 V |
| Ignition switch ON | 11 to 14 V | |||
| A46-2 (B) - Body ground | L-Y - Body ground | Battery power supply | Always | 11 to 14 V |
| A46-6 (A) - Body ground | P-L - Body ground | Ground | Headlight dimmer switch in AUTO position | Below 1 Ω |
| Headlight dimmer switch not in AUTO position | 10 kΩ or higher |
Reconnect the A46 automatic light control sensor connector.
Measure the voltage according to the value(s) in the table below.
| Terminal No. (Symbol) | Wiring Color | Terminal Description | Condition | Specified Condition |
| A46-3 (CTY) - Body ground | R-B - Body ground | Front door courtesy light switch LH signal input | Front door LH open | Below 1 V |
| Front door LH closed | 11 to 14 V | |||
| A46-5 (H) - Body ground | GR - Body ground | H-LP RLY relay drive output | Ignition switch ON Headlight dimmer switch in AUTO position Automatic light control sensor covered with a hand Low beam headlights come on | Below 1 V |
| Ignition switch ON Headlight dimmer switch in AUTO position Automatic light control sensor exposed to ambient light Low beam headlights turn off | 11 to 14 V | |||
| A46-7 (T) - Body ground | LG-B - Body ground | Taillight relay drive output | Ignition switch ON Headlight dimmer switch in AUTO position Automatic light control sensor covered with a hand Taillights come on | Below 1 V |
| Ignition switch ON Headlight dimmer switch in AUTO position Automatic light control sensor exposed to ambient light Taillights turn off | 11 to 14 V |