DTC P2009 Intake Manifold Runner Control Circuit Low (Bank 1) |
DTC P2010 Intake Manifold Runner Control Circuit High (Bank 1) |
| DTC Detection Drive Pattern | DTC Detection Condition | Trouble Area |
| 2 seconds after engine is started, race engine for 1 second | Open in vacuum switching valve (for No. 1 swirl control valve) circuit for 0.5 seconds (2 trip detection logic). |
|
| DTC Detection Drive Pattern | DTC Detection Condition | Trouble Area |
| 2 seconds after engine is started, race engine for 1 second | Short in vacuum switching valve (for No. 1 swirl control valve) circuit for 0.5 seconds (2 trip detection logic). |
|
| 1.PERFORM ACTIVE TEST USING INTELLIGENT TESTER (ACTIVATE THE VSV FOR SWIRL CONTROL VALVE) |
|
Connect the intelligent tester to the DLC3.
Disconnect the vacuum hoses from the vacuum switching valve (for No. 1 swirl control valve).
Turn the ignition switch to ON and turn the tester on.
Enter the following menus: Powertrain / Engine and ECT / Active Test / Activate the VSV for Swirl Control Valve.
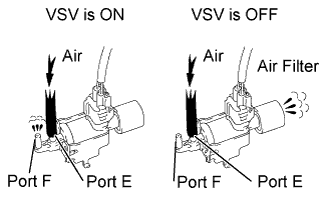
Check the VSV operation when it is operated using the intelligent tester.
| Tester Operation | Specified Condition |
| VSV ON | Air from port E flows out through port F |
| VSV OFF | Air from port E flows out through air filter |
Reconnect the vacuum hoses.
|
| ||||
| OK | ||
 | ||
| ||
| 2.INSPECT VACUUM SWITCHING VALVE FOR SWIRL CONTROL VALVE (RESISTANCE) |
Inspect the vacuum switching valve (for No. 1 swirl control valve) .
|
| ||||
| OK | |
 |
| 3.INSPECT VACUUM SWITCHING VALVE (FOR NO. 1 SWIRL CONTROL VALVE) (POWER SOURCE VOLTAGE) |
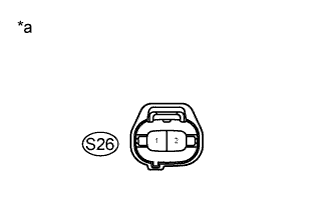 |
Disconnect the vacuum switching valve (for No. 1 swirl control valve) connector.
Measure the voltage according to the value(s) in the table below.
| Tester Connection | Switch Condition | Specified Condition |
| S26-2 - Body ground | Ignition switch ON | 11 to 14 V |
| *a | Front view of wire harness connector (to Vacuum Switching Valve [for Swirl Control Valve]) |
|
| ||||
| OK | |
|
| 4.CHECK HARNESS AND CONNECTOR (VACUUM SWITCHING VALVE [FOR SWIRL CONTROL VALVE] - ECM) |
Disconnect the vacuum switching valve (for No. 1 swirl control valve) connector.
Disconnect the ECM connector.
Measure the resistance according to the value(s) in the table below.
| Tester Connection | Condition | Specified Condition |
| S26-1 - E7-15 (SCV) | Always | Below 1 Ω |
| S26-1 or E7-15 (SCV) - Body ground | Always | 10 kΩ or higher |
Reconnect the vacuum switching valve (for No. 1 swirl control valve) connector.
Reconnect the ECM connector.
|
| ||||
| OK | |
|
| 5.REPLACE ECM |
Replace the ECM (Click here).
|
| ||||
| 6.CHECK HARNESS AND CONNECTOR (VACUUM SWITCHING VALVE [FOR SWIRL CONTROL VALVE] - NO. 1 INTEGRATION RELAY) |
Remove the No. 1 integration relay from the engine room relay block and junction block assembly.
Disconnect the No. 1 integration relay connector.
Disconnect the vacuum switching valve (for No. 1 swirl control valve) connector.
Measure the resistance according to the value(s) in the table below.
| Tester Connection | Condition | Specified Condition |
| 1J-5 - S26-2 | Always | Below 1 Ω |
| 1J-5 or S26-2 - Body ground | Always | 10 kΩ or higher |
Reinstall the No. 1 integration relay.
Reconnect the No. 1 integration relay connector.
Reconnect the vacuum switching valve (for No. 1 swirl control valve) connector.
|
| ||||
| OK | |
|
| 7.INSPECT ECM POWER SOURCE CIRCUIT |
Check the ECM power source circuit (Click here).
|
| ||||
| 8.REPLACE VACUUM SWITCHING VALVE (FOR NO. 1 SWIRL CONTROL VALVE) |
Replace the vacuum switching valve (for No. 1 swirl control valve).
|
| ||||
| 9.REPAIR OR REPLACE HARNESS OR CONNECTOR |
Repair or replace harness or connector.
| NEXT | |
|
| 10.CONFIRM WHETHER MALFUNCTION HAS BEEN SUCCESSFULLY REPAIRED |
Connect the intelligent tester to the DLC3.
Clear the DTCs (Click here).
Start the engine and wait for 3 seconds or more.
Enter the following menus: Powertrain / Engine and ECT / DTC.
Confirm that the DTC is not output again.
| NEXT | ||
| ||
| ||
