Home › ENGINE · 1KD-FTV › ENGINE CONTROL SYSTEM › INTEGRATION RELAY (w/ Glow Plug Controller)

INTEGRATION RELAY (w/ Glow Plug Controller) > ON-VEHICLE INSPECTION

for Preparation Click here


1. INSPECT NO. 1 INTEGRATION RELAY (MAIN)
  1. Check the EFI fuse.

    1. Measure the resistance according to the value(s) in the table below.

      Standard Resistance:
      Tester Connection
      Condition
      Specified Condition
      EFI fuse
      Always
      Below 1 Ω

      If the result is not as specified, replace the EFI fuse.


  1. Check the MAIN relay.


      A225101E09
    1. Measure the resistance according to the value(s) in the table below.

      Standard Resistance:
      Tester Connection
      Condition
      Specified Condition
      1J-1 - 1J-4
      Battery voltage not applied to terminals 1J-2 and 1J-3
      10 kΩ or higher
      Battery voltage applied to terminals 1J-2 and 1J-3
      Below 1 Ω

      Text in Illustration 
      *a
      Component without harness connected
      (No. 1 Integration Relay)
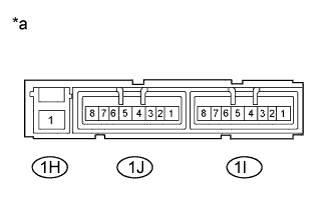
      If the result is not as specified, replace the No. 1 integration relay.


2. INSPECT NO. 1 INTEGRATION RELAY (EDU)
  1. Check the EDU fuse.

    1. Measure the resistance according to the value(s) in the table below.

      Standard Resistance:
      Tester Connection
      Condition
      Specified Condition
      EDU fuse
      Always
      Below 1 Ω

      If the result is not as specified, replace the EDU fuse.


    A225101E09
  1. Measure the resistance according to the value(s) in the table below.

    Standard Resistance:
    Tester Connection
    Condition
    Specified Condition
    1H-1 - 1J-8
    Battery voltage not applied to terminals 1J-6 and 1J-7
    10 kΩ or higher
    Battery voltage applied to terminals 1J-6 and 1J-7
    Below 1 Ω

    Text in Illustration 
    *a
    Component without harness connected
    (No. 1 Integration Relay)
    If the result is not as specified, replace the No. 1 integration relay.