Home › BODY › EXTERIOR › SIDE MOULDING (for Rear Door)

SIDE MOULDING (for Rear Door) > INSTALLATION

for Preparation Click here


HINT:
  1. Use the same procedure for the RH and LH sides.
  2. The procedure listed below is for the LH side.


1. INSTALL REAR DOOR OUTSIDE MOULDING LH
  1. Install 5 new clips to the rear door outside moulding.

  1. Attach the 5 clips to install the rear door outside moulding.

  1. Install a nose piece to an air riveter or hand riveter.

  1. Insert the mandrel part of a new rivet into the nose piece.


    B279910
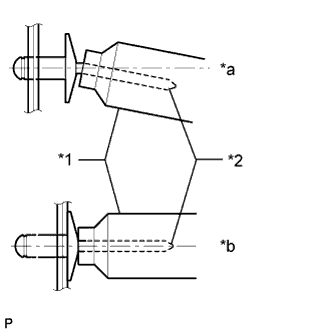
  1. Using the riveter, install the 3 rivets as shown in the illustration.

    HINT:
    If the rivet cannot be cut, pull it once and cut it.

    NOTICE:

    1. B171664E15
      Do not pry the rivet with the riveter as this will cause damage to the riveter and mandrel.
      Text in Illustration 
      *1
      Riveter
      *2
      Mandrel
      *a
      INCORRECT
      *b
      CORRECT

    2. B172390E14
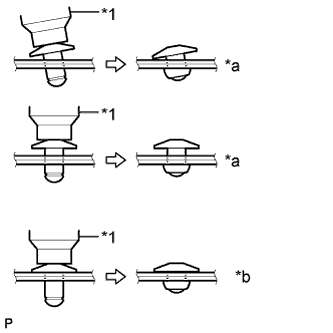
      Confirm that the rivets are seated properly against the rear door outside moulding.
    3. Do not tilt the riveter when installing the rivet to the rear door outside moulding.
    4. Do not leave any space between the rivet head and rear door outside moulding.
      Text in Illustration 
      *1
      Riveter
      *a
      INCORRECT
      *b
      CORRECT

    5. B172391E13
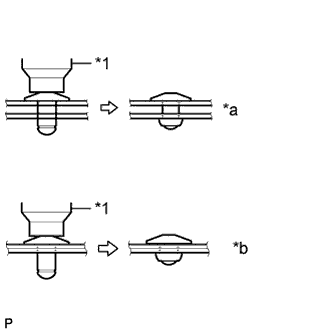
      Do not leave any space between the rear door outside moulding and rear door panel. Firmly hold together the 2 items while installing the rivet.
      Text in Illustration 
      *1
      Riveter
      *a
      INCORRECT
      *b
      CORRECT


2. INSTALL REAR DOOR SERVICE HOLE COVER LH
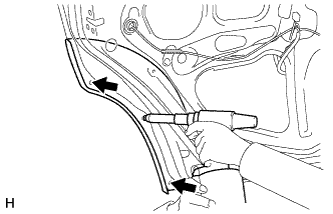
  1. Apply new butyl tape to the rear door panel.


    B281329E01
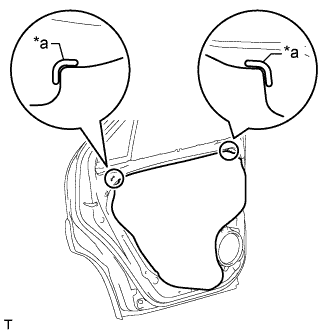
  1. Pass the rear door inside locking cable, rear door lock remote control cable and wire harness through a new rear door service hole cover, and then attach the rear door service hole cover using the reference points on the rear door panel.
    Text in Illustration 
    *a
    Reference Point

    NOTICE:
    1. Securely install the rear door service hole cover to prevent wrinkles and air bubbles.
    2. There should be no wrinkles or folds after installing the rear door service hole cover.
    3. After installing the rear door service hole cover, check the seal quality.


3. INSTALL REAR DOOR NO. 2 TRIM BRACKET
  1. Install the rear door No. 2 trim bracket with the 2 screws.


4. INSTALL REAR DOOR INSIDE HANDLE SUB-ASSEMBLY LH


    B281150
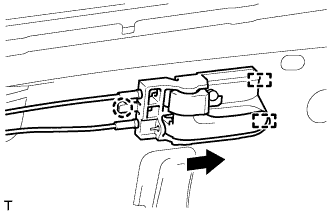
  1. Connect the rear door inside locking cable and rear door lock remote control cable to the rear door inside handle.

  1. Attach the 2 guides as indicated by the arrow in the illustration, and then attach the claw to install the rear door inside handle.


5. INSTALL REAR DOOR TRIM BOARD SUB-ASSEMBLY LH
  1. Attach the 10 clips to install the rear door trim board.

  1. Install the screw.


6. INSTALL DOOR PULL HANDLE
  1. Install the door pull handle with the screw.


7. INSTALL REAR POWER WINDOW REGULATOR SWITCH ASSEMBLY WITH REAR DOOR ARMREST BASE PANEL
  1. Connect the connector.

  1. Attach the 2 claws and 2 clips to install the rear power window regulator switch assembly with rear door armrest base panel.